
Cars BMW Cars Volkswagen Cars Chevrolet Cars Land Rover Cars Lada Cars Honda Cars Peugeot
English Русский
Български
Беларускі
Український
Српски
Hrvatski
Română
Polski
Slovenský
Magyar
Bookmark News and articles Sitemap Feedback Site search
MercedesMan.ru


A-Class C-Class E-Class G-Class M-Class S-Class Others
W116 (1972-1980, petrol) W126 (1979-1991, petrol) W140 (1991-1998) W220 (1998-2005)
  • Main
  • S-Class
  • W220 (1998-2005)
  • Chassis
  • Brake system
  • Vacuum booster — removal, inspection and installation

Vacuum booster — removal, inspection and installation (Mercedes-Benz S-Class W220)

0
Contents: Removal ↡ Installation ↡ Examination ↡

Removal


1. Remove the brake master cylinder.

2. Remove the ASR support pump.

3. Check the master cylinder for damage and leaks.
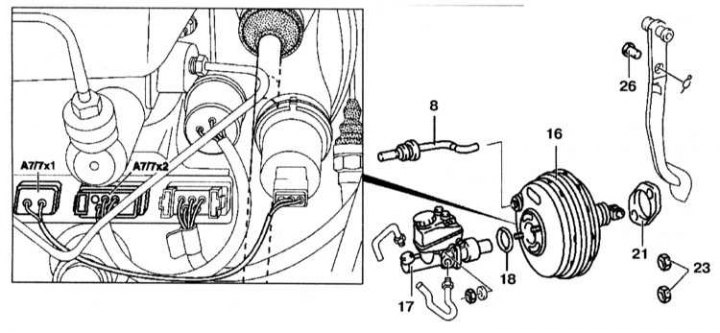
3. Check the master cylinder for damage and leaks.


4. Unscrew or disconnect vacuum pipe 8 from vacuum booster 16. Press the brake pedal several times to reduce the pressure in the vacuum booster.

5. Disconnect the A7/7x1, A7/7x2 connector from the BAS control unit or, on models with ESP, disconnect the connector from the solenoid valve switch and the BAS diaphragm displacement sensor on the vacuum booster. On models with BAS and ESP, the BAS control unit is integrated with the ESP control unit.

6. Remove the lower instrument panel cover.

7. Disconnect the brake pedal return spring.

8. Remove the retainer and pin 26.

9. Unscrew nut 23 from bracket 22.

10. Remove the vacuum booster 16.

11. Check gasket 16.

Installation


Installation is carried out in the reverse order of removal.

Examination


1. Press the brake pedal to reduce the pressure in the vacuum booster.

2. Disconnect the tester from the vacuum booster.
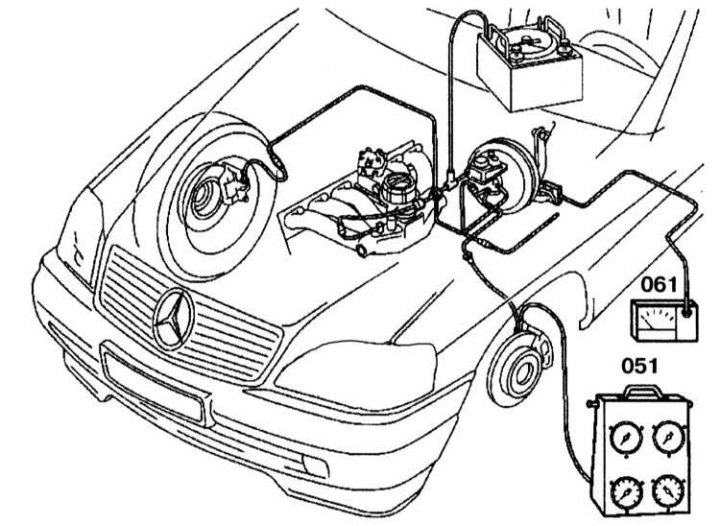
2. Disconnect the tester from the vacuum booster.


3. Attach the pressure gauge 051 to the brake caliper with an adapter.


4. Connect the 060 pedal force sensor to the brake pedal.

5. Start the engine and create a pressure of 0.75-0.80 bar by pressing and releasing the accelerator pedal. If the vacuum achieved is significantly lower than required, or the vacuum decreases immediately, then the sealing ring between the vacuum booster and the master cylinder is damaged or the valve in the vacuum pipe needs to be checked.

6. Apply the required force to the accelerator pedal and read the line pressure.

The hydraulic pressure depending on the pressure on the brake pedal is given in the Specifications.
This article is available at: russian, bulgarian, belarusian, ukrainian, serbian, croatian, romanian, polish, slovak, hungarian
The article has been verified: Khromov Roman Mikhailovich
Share with friends:
◀ Previous
S-Class W220 / Brake system
Next ▶

Dual master cylinder
Location of ESP system components
Location of Emergency brake booster BAS components
Brake system specifications
Basic information about the braking system
Brake caliper — removal and installation
Checking the thickness of the brake disc and brake pads
Removal and installation brake pads
Removal and installation the front parking brake cable
Adjusting the parking brake
More similar articles for repairing other models

☛ Brake booster vacuum — check Mercedes W168 (1997-2004)
☛ Vacuum brake booster — checking, removal and installation Mercedes 190 (W201) (1982-1993)
☛ Vacuum brake booster — removal and installation Mercedes W123 (1976-1985)
☛ Emergency Brake Booster (BAS) Mercedes W463 (1999-2019)
☛ Emergency Brake Booster (BAS) Mercedes W163 (1997-2005)
☛ Vacuum brake booster Mercedes Vito 1 (1996-2003)
Link in different formats to this article
Comments and feedback from visitors
No comments yet


How much will 19 + 29 ?


W220 (1998-2005) 
  • General information
  • Introduction to guide
  • User manual
  • Maintenance
  • Power unit
  • Engine repair
  • Cooling and heating systems
  • Power and exhaust systems
  • Ignition and control system
  • Charge and launch systems
  • Transmission
  • Automatic gearbox
  • Drive shafts
  • Chassis
  • Brake system
  • Front suspension
  • Rear suspension
  • Steering
  • Body
  • Body elements
  • Electrical equipment
  • Equipment and devices
  • Electrical circuits
W140 (1991-1998) 
  • User manual
  • Controls and instruments
  • Driving and operation
  • Maintenance
  • Power unit
  • Petrol engine V6
  • Petrol engine V8
  • Petrol engine V12
  • Diesel engine OM603
  • Diesel engine OM606
  • Cooling system
  • Power supply and injection system
  • Control system HFM-SFI
  • Control system LH-SFI
  • Control systems ME-SFI
  • Diesel control system
  • Ignition system
  • Charge and launch system
  • Transmission
  • Mechanical gearbox 717.438
  • Mechanical gearbox 717.454
  • Automatic gearbox 722.5
  • Automatic gearbox 722.6
  • Clutch and drive shafts
  • Differential
  • Chassis
  • Brake system
  • Steering
  • Front suspension
  • Rear suspension
  • Body
  • Exterior (external elements)
  • Interior (internal elements)
  • Electrical equipment
  • Equipment and devices
  • Electrical circuits
W126 (1979-1991, petrol) 
  • Power unit
  • Engine repair
  • Ignition system
  • Lubrication system
  • Cooling system
  • Fuel system
  • Fuel injection system
  • Transmission
  • Clutch and cardan
  • Mechanical gearbox
  • Automatic gearbox
  • Chassis
  • Front suspension
  • Rear suspension
  • Steering
  • Brake system
  • Electrical equipment
  • Power devices
  • Electrical circuits
W116 (1972-1980, petrol) 
  • General information
  • Introduction to guide
  • Power unit
  • 8-cylinder V8 engine
  • 6-cylinder I6 engine
  • Cooling and lubrication system
  • Power system (carburetor)
  • Fuel injection system
  • Ignition system
  • Transmission
  • Clutch and cardan
  • Car gearbox
  • Chassis
  • Front suspension
  • Rear suspension
  • Steering
  • Brake system
  • Electrical equipment
  • Power devices
  • Electrical circuits
 
MercedesMan.ru © 2017–2026 · Mobile version · Read about Mercedes · Sitemap: EN BG BY UA RS HR RO PL SK HU · Feedback · Site search · Bookmark A-Class (W168) · C-Class (W201) · C-Class (W202) · C-Class (W203) · E-Class (W123) · E-Class (W124) · E-Class (W210) · G-Class (W463) · M-Class (W163) · S-Class (W116, petrol) · S-Class (W126, petrol) · S-Class (W140) · S-Class (W220) · Sprinter · Vito 1 · Vito 2 · Vario 814D ·
 
We only use cookies without which some of the site's features may not be available.