
Cars BMW Cars Volkswagen Cars Chevrolet Cars Land Rover Cars Lada Cars Honda Cars Peugeot
English Русский
Български
Беларускі
Український
Српски
Hrvatski
Română
Polski
Slovenský
Magyar
Bookmark News and articles Sitemap Feedback Site search
MercedesMan.ru


A-Class C-Class E-Class G-Class M-Class S-Class Others
W116 (1972-1980, petrol) W126 (1979-1991, petrol) W140 (1991-1998) W220 (1998-2005)
  • Main
  • S-Class
  • W126 (1979-1991)
  • Power unit
  • Fuel injection system
  • Removal, installation and checking the cold start injector

Removal, installation and checking the cold start injector (Mercedes-Benz S-Class W126)

0
The cold start injector provides additional fuel to the intake manifold during cold engine starting.

Injector failure causes engine starting difficulties (both cold and heated), transient disturbances and high fuel consumption.

The thermal time switch limits the injection time of the cold start injector depending on the engine temperature.

To remove the cold start injector, perform the following operations:
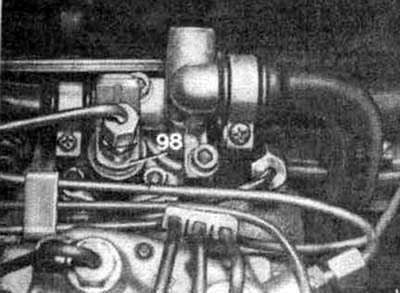
To remove the cold start injector, perform the following operations:


Disconnect the injector connector (98).

Disconnect the fuel hose from the injector.

Caution: If the injector is removed only for inspection, the electrical wire and hose remain connected.


Remove the injector by unscrewing 2 nuts.

To check the cold start injector, perform the following operations.

Connect the brown/blue wire of the thermal time switch to ground, this simulates a lower engine temperature

Caution: Do not connect the pink/blue wire to ground. Risk of short circuit!


Place a measuring cup under the nozzle.

Disconnect the connector of the transistor ignition system switching unit to prevent the engine from starting.

Turn on the starter briefly. The injector should provide a uniform cone of fuel injection.


After the starter is turned off, not a single drop of fuel should appear from the injector for one minute. The injector should be dry on the outside,

To install the cold start injector, perform the removal operations in reverse order.

Attention: Be sure to replace the injector gasket with a new one.


(Original article is on the portal: MercedesMAN)
This article is available at: russian, bulgarian, belarusian, ukrainian, serbian, croatian, romanian, polish, slovak, hungarian
The article has been verified: Burova Vera Semenovna
Share with friends:
◀ Previous
S-Class W126 / Fuel injection system
Next ▶

Adjusting the full throttle limiter
Adjusting the throttle linkage
Checking and adjusting idle speed and CO content
Checking the tightness of the injection system connections
Inspection, testing and adjustment of the fuel injection system
Removal, installation and checking the thermal time switch
Checking the additional air damper
Checking and adjusting the air flow meter flap
Checking the cold start valve
Adjusting the tempomat
More similar articles for repairing other models

☛ Checking the engine oil level using a dipstick Mercedes W168 (1997-2004)
☛ Checking/setting the start of fuel delivery by the pump Mercedes W202 (1993-2000)
☛ Cold start valve — removal and installation Mercedes W124 (1984-1995)
☛ Checking fluid levels, leak control Mercedes W463 (1999-2019)
☛ Checking fluid levels, leak control Mercedes W163 (1997-2005)
☛ Checking the injection start timing Mercedes Sprinter (1995-2000, diesel)
Link in different formats to this article
Comments and feedback from visitors
No comments yet


How much will 21 + 24 ?


W220 (1998-2005) 
  • General information
  • Introduction to guide
  • User manual
  • Maintenance
  • Power unit
  • Engine repair
  • Cooling and heating systems
  • Power and exhaust systems
  • Ignition and control system
  • Charge and launch systems
  • Transmission
  • Automatic gearbox
  • Drive shafts
  • Chassis
  • Brake system
  • Front suspension
  • Rear suspension
  • Steering
  • Body
  • Body elements
  • Electrical equipment
  • Equipment and devices
  • Electrical circuits
W140 (1991-1998) 
  • User manual
  • Controls and instruments
  • Driving and operation
  • Maintenance
  • Power unit
  • Petrol engine V6
  • Petrol engine V8
  • Petrol engine V12
  • Diesel engine OM603
  • Diesel engine OM606
  • Cooling system
  • Power supply and injection system
  • Control system HFM-SFI
  • Control system LH-SFI
  • Control systems ME-SFI
  • Diesel control system
  • Ignition system
  • Charge and launch system
  • Transmission
  • Mechanical gearbox 717.438
  • Mechanical gearbox 717.454
  • Automatic gearbox 722.5
  • Automatic gearbox 722.6
  • Clutch and drive shafts
  • Differential
  • Chassis
  • Brake system
  • Steering
  • Front suspension
  • Rear suspension
  • Body
  • Exterior (external elements)
  • Interior (internal elements)
  • Electrical equipment
  • Equipment and devices
  • Electrical circuits
W126 (1979-1991, petrol) 
  • Power unit
  • Engine repair
  • Ignition system
  • Lubrication system
  • Cooling system
  • Fuel system
  • Fuel injection system
  • Transmission
  • Clutch and cardan
  • Mechanical gearbox
  • Automatic gearbox
  • Chassis
  • Front suspension
  • Rear suspension
  • Steering
  • Brake system
  • Electrical equipment
  • Power devices
  • Electrical circuits
W116 (1972-1980, petrol) 
  • General information
  • Introduction to guide
  • Power unit
  • 8-cylinder V8 engine
  • 6-cylinder I6 engine
  • Cooling and lubrication system
  • Power system (carburetor)
  • Fuel injection system
  • Ignition system
  • Transmission
  • Clutch and cardan
  • Car gearbox
  • Chassis
  • Front suspension
  • Rear suspension
  • Steering
  • Brake system
  • Electrical equipment
  • Power devices
  • Electrical circuits
 
MercedesMan.ru © 2017–2026 · Mobile version · Read about Mercedes · Sitemap: EN BG BY UA RS HR RO PL SK HU · Feedback · Site search · Bookmark A-Class (W168) · C-Class (W201) · C-Class (W202) · C-Class (W203) · E-Class (W123) · E-Class (W124) · E-Class (W210) · G-Class (W463) · M-Class (W163) · S-Class (W116, petrol) · S-Class (W126, petrol) · S-Class (W140) · S-Class (W220) · Sprinter · Vito 1 · Vito 2 · Vario 814D ·
 
We only use cookies without which some of the site's features may not be available.