



Sequence of works


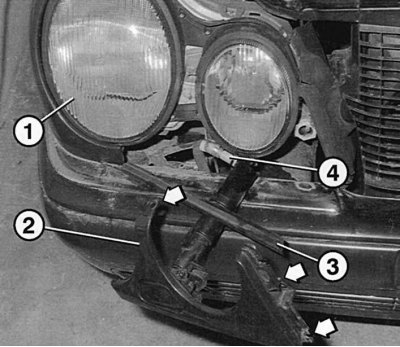
Fig. 9.21. After unscrewing the mounting bolts (arrows), the protective panel 2 of the headlight 1 together with the seal 3 can be removed and positioned at the junction with the wing. If a headlight washer is installed, it is also necessary to remove the hose connection 4 leading to the washer mechanism. Before assembling, thoroughly clean all parts
1. Open the hood, unscrew the mounting bolts on the right and left near the headlight (Fig. 9.21).
2. Carefully pry off the headlight washer mechanism cover (if it is installed) using a screwdriver wrapped in a cloth or a plastic tool.
3. Remove the outer panel together with the seal and leave it at the junction with the wing.
4. Unscrew the mounting bolts to the headlight holder at the top and bottom, as well as from the side of the headlight itself.
5. Remove the vacuum hose of the headlight range control mechanism.
6. Disconnect the electrical plug connections.
7. Remove the headlight forward.
8. The headlight lens can be replaced separately. To do this, remove the seal and unfasten the clips around the perimeter of the headlight. When assembling, install the clips until you hear a characteristic click. The seal is replaced together with the lens.
9. With the diffuser removed, the reflector can also be replaced.
10. After installation, the headlights should be adjusted at a service station.