



Glow Plug Location on a Turbocharged Diesel Engine
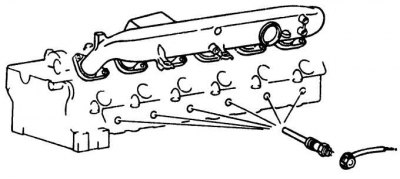
Examination
1. Connect a voltmeter between the glow plug supply line and ground. Turn on the ignition and check that voltage is supplied to the glow plugs at the appropriate time interval. The voltage supply time to the glow plugs increases at lower temperatures and decreases as the temperature increases. If voltage is supplied to the glow plugs, the relay and electrical wiring are in good condition.
2. To check the glow plug for proper operation, disconnect the voltage supply line from it. Using a tester, check the resistance between the contact at the top of the plug and the body of the plug. The resistance of the glow plug is 1.5 ohms and if the tester shows more resistance, the glow plug is faulty.
3. If you have a high-current ammeter, connect it between the supply rail and the top terminal of the glow plug. Apply voltage to the glow plug and measure the current drawn by the plug. If the current drawn by the plug exceeds 15 amps, the glow plug is faulty.
Removal
Elements of connection of the supply bus to the glow plug
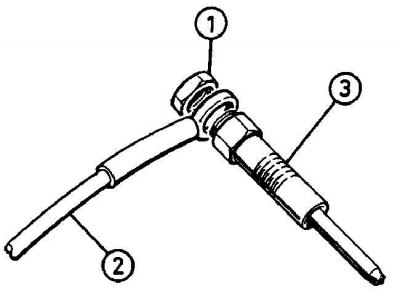
1 – nut; 2 – power bus; 3 – glow plug
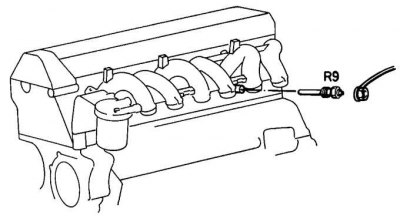
Glow Plug Location on a Non-Turbo Diesel Engine
1. Remove the ground cable from the battery.
2. Unscrew the nut and remove the feed bar from the top of the glow plug (see fig. Elements of connection of the supply bus to the glow plug).
Publication reprinted from this resource: MercedesMAN.ru
3. Unscrew the glow plug from the cylinder head (see fig. Glow plug location on a non-turbocharged diesel engine).
Checking glow plugs removed from the engine
1. Check each glow plug for mechanical damage. Burnt or broken glow plug tips may be due to poor fuel spray jet from the injector. If such damage is present, the fuel injectors must be checked and replaced if necessary.
2. If the glow plugs are not mechanically damaged, check their electrical resistance, which should be less than 1.5 ohms.
3. The glow plugs can be tested for operability by applying 12 volts to them. They should heat up evenly and within the required time interval. The following precautions must be taken:
- Hold the glow plug with a special clamp or pliers.
- The glow plug power supply circuit must have a fuse.
- After checking, the glow plug should cool for several minutes.
4. A glow plug in good condition heats up to the working cone turning red within 5 seconds. If it heats up longer or heats up in the middle part rather than at the end of the plug, the plug is faulty and must be replaced.
Installation
1. Installation is performed in the reverse order of removal. In this case, the threaded part of the glow plug must be lubricated with a copper-based anti-stick compound.