
Cars BMW Cars Volkswagen Cars Chevrolet Cars Land Rover Cars Lada Cars Honda Cars Peugeot
English Русский
Български
Беларускі
Український
Српски
Hrvatski
Română
Polski
Slovenský
Magyar
Bookmark News and articles Sitemap Feedback Site search
MercedesMan.ru


A-Class C-Class E-Class G-Class M-Class S-Class Others
190 (W201) (1982-1993) W202 (1993-2000) W203 (2000-2007)
  • Main
  • C-Class
  • W202 (1993-2000)
  • Power unit
  • Ignition system
  • Glow Plugs — Removal, Checking and Installation

Glow Plugs — Removal, Checking and Installation (Mercedes-Benz C-Class W202)

0
Contents: Examination ↡ Engine 2.0 l ↡ Engine 2.2/2.5 l ↡
To check the current consumption of individual glow plugs, a DC ammeter is used in a workshop. The current clamp is clamped over the appropriate insulated wire and the current is measured by induction.

Examination


Examination


1. If you have a current clamp, clamp it over the individual wires going to the glow plugs, set the ignition to warm (the engine is cold) and measure the current consumption. Wire placement: Cylinder 1 = black and blue; cylinder 2 = black-violet; cylinder 3 = black and red; cylinder 4 = black and yellow; cylinder 5 = black and green.

2. 2.0L engine: After about 8 seconds, each glow plug should draw about 14-16A.

3. 2.2/2.5L engine: After approximately 10–20 seconds, the current consumption of each glow plug should briefly be approximately 8–15 A.

4. If the measured value exceeds the upper specified value, replace the corresponding glow plug.

5. If the measured value is below the lower set value of the glow plug, check the current-carrying line for a break.

6. If you don't have a current clamp, set the ignition to warm up (the engine is cold) and connect a test lamp between the glow plug terminal and the engine block. The test lamp should flash, otherwise check the current-supply wire to the glow plug for a break and replace it accordingly.


7. Turn off the ignition.

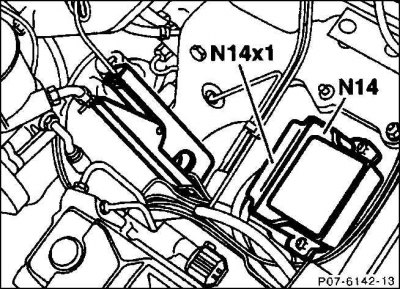
8. Check the glow plugs for electrical current. To do this, remove the plug for the glow plugs G1–G4 (G5) on the heating control relay.

9. Measure the resistance between the plug pins and the body one by one with an ohmmeter (engine cylinder block). If the resistance tends to infinity (oo), then there is a break in the glow plug or in the current supply line.

Caution! The heating control relay has an electronic short-circuit protection. If there is a short circuit in the glow plugs or electrical wires, the current circuit is interrupted. The relay can function again when the short circuit is eliminated or the ignition key is turned back to position "0".


Engine 2.0 l


Removal


1. Remove the intake manifold.
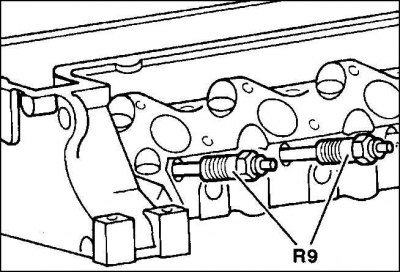
1. Remove the intake manifold.


2. Unscrew the nut for the electrical line.

Please note: Some models have a nut inserted as an integral accessory into the cable end of the line.


3. Remove the glow plug using a flexible socket wrench SW 12.

Engine 2.2/2.5 l


Removal
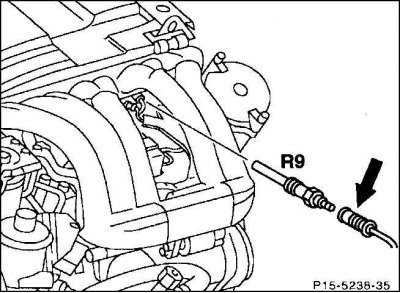


Removal


1. Remove the plug (arrow) with the glow plug.


2. Unscrew the glow plug (R9) using a SW 12 socket wrench.

Glow plugs with burnt pins
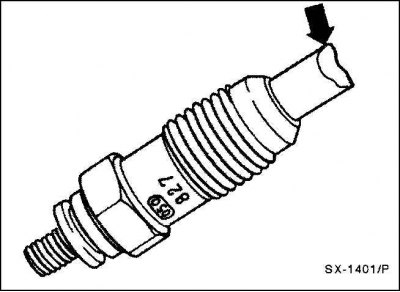


Glow plugs with burnt pins


Burnt glow plug pins are often the result of injector failures that are not caused by faults in or on the glow plugs.

If such glow plugs are detected, it is not enough to replace them. It is also necessary to check the injectors for the formation of the jet of injected fuel, vibration, pressure and tightness (work for a car repair shop).

Installation


1. Screw in the glow plugs to a torque of 20 Nm.

2. Screw the electrical line together with the nut with a torque of 4 Nm, then manually, respectively, with the plug.

3. 2.0L engine: Remove the intake manifold.

4. 2.2/2.5L engine: Remove the air cleaner cross pipe.
This article is available at: russian, bulgarian, belarusian, ukrainian, serbian, croatian, romanian, polish, slovak, hungarian
The article has been verified: Khromov Roman Mikhailovich
Share with friends:
◀ Previous
C-Class W202 / Ignition system
Next ▶

Heating control relay
Incandescent lamp — check
Checking the diesel preheating device
Kalilny number Index
Spark plugs — removal, installation, inspection
Coolant temperature sensor
Intake air temperature sensor — removal, inspection and installation
Self-diagnosis of the diesel heating device
More similar articles for repairing other models

☛ Glow Plugs — Checking Mercedes W168 (1997-2004)
☛ Glow Plugs — Removal, Checking and Installation Mercedes W124 (1984-1995)
☛ Checking diesel glow plugs Mercedes W463 (1999-2019)
☛ Checking glow plugs Mercedes W163 (1997-2005)
☛ Checking and replacing spark plugs, checking the condition of… Mercedes W140 (1991-1998)
☛ Glow plugs Mercedes Vito 1 (1996-2003)
Link in different formats to this article
Comments and feedback from visitors
No comments yet


How much will 10 + 44 ?


W203 (2000-2007) 
  • General information
  • Introduction to guide
  • User manual
  • Maintenance
  • Power unit
  • Gasoline engines
  • Diesel engines
  • Cooling system
  • Ventilation and heating
  • Supply system
  • Injection system (gasoline)
  • Injection system (diesel)
  • Exhaust system
  • Ignition and control system
  • Charge and launch systems
  • Transmission
  • Mechanical gearbox
  • Automatic gearbox
  • Clutch and drive shafts
  • Differential
  • Chassis
  • Brake system
  • Car suspension
  • Steering
  • Body
  • Exterior (external elements)
  • Interior (internal elements)
  • Electrical equipment
  • Equipment and devices
  • Lighting system
  • Electrical diagrams (2000)
  • Electrical diagrams (since 2001)
W202 (1993-2000) 
  • General information
  • User manual
  • Driving a car
  • Car care
  • Maintenance
  • Power unit
  • Gasoline engines
  • Diesel engines
  • Lubrication system
  • Cooling system
  • Heating and ventilation
  • Ignition system
  • Fuel system
  • Injection system (gasoline)
  • Injection system (diesel)
  • Exhaust system
  • Transmission
  • Clutch
  • Car gearbox
  • Chassis
  • Suspension, wheels and tires
  • Steering
  • Brake system
  • Body
  • Exterior (external elements)
  • Interior (internal elements)
  • Doors and windows
  • Electrical equipment
  • Equipment and devices
  • Power devices
  • Lighting system
  • Electrical circuits
190 (W201) (1982-1993) 
  • General information
  • Introduction to the guide
  • Operation and care
  • Maintenance (gasoline)
  • Maintenance (diesel)
  • Troubleshooting
  • Power unit
  • Petrol engine I4
  • Petrol engine V6
  • Diesel engines
  • Engine overhaul
  • Cooling and heating
  • Power system (carburetor)
  • Injection system (gasoline)
  • Injection system (diesel)
  • Exhaust system
  • Charge and start system
  • Ignition system (I4)
  • Ignition system (V6)
  • Diesel heating system
  • Transmission
  • Clutch
  • Mechanical gearbox
  • Automatic gearbox
  • Cardan shaft and axle shafts
  • Chassis
  • Brake system
  • Car suspension
  • Steering
  • Body
  • Exterior (external elements)
  • Interior (internal elements)
  • Doors, locks and windows
  • Electrical equipment
  • Equipment and devices
  • Electrical circuits
 
MercedesMan.ru © 2017–2026 · Mobile version · Read about Mercedes · Sitemap: EN BG BY UA RS HR RO PL SK HU · Feedback · Site search · Bookmark A-Class (W168) · C-Class (W201) · C-Class (W202) · C-Class (W203) · E-Class (W123) · E-Class (W124) · E-Class (W210) · G-Class (W463) · M-Class (W163) · S-Class (W116, petrol) · S-Class (W126, petrol) · S-Class (W140) · S-Class (W220) · Sprinter · Vito 1 · Vito 2 · Vario 814D ·
 
We only use cookies without which some of the site's features may not be available.