
Cars BMW Cars Volkswagen Cars Chevrolet Cars Land Rover Cars Lada Cars Honda Cars Peugeot
English Русский
Български
Беларускі
Український
Српски
Hrvatski
Română
Polski
Slovenský
Magyar
Bookmark News and articles Sitemap Feedback Site search
MercedesMan.ru


A-Class C-Class E-Class G-Class M-Class S-Class Others
190 (W201) (1982-1993) W202 (1993-2000) W203 (2000-2007)
  • Main
  • C-Class
  • W203 (2000-2007)
  • Power unit
  • Gasoline engines
  • Checking oil pressure

Checking oil pressure (Mercedes-Benz C-Class W203)

0
Contents: Examination ↡ 6-cylinder petrol engine 112 ↡

Examination


1. Check the engine oil level, refer to Section Checking fluid levels, leak monitoring.

2. Warm up the engine to operating temperature. To do this, start the engine and wait until the instrument panel displays the normal coolant temperature. To do this, turn on the coolant temperature indicator on the instrument panel display. Then drive the car for about 5 km to ensure that the engine oil reaches its operating temperature.

Note: At the service station, the oil temperature is checked by inserting a thermometer into the hole of the oil level indicator. The specified value is + 90°C.


3. Oil pressure is measured at the oil filter cap. This requires a special filter cap (special tool) with connection for pressure gauge.
  • Replacement oil filter cover required.

The lid can be made as follows:

4. Drill an 8mm diameter hole in the center of the lid.

5. Drill a 2mm diameter hole into the M6 Allen screw.

6. Cut an M6 thread into the connecting nipple of the M12 x 1.5 hose.

7. Insert the screw with the 6.5 x 18 sealing washer from the inside into the hole in the oil filter cover.

8. Install the 12 x 17 aluminum sealing ring and hose connection nipple on the outside of the cover. Screw the Allen screw into the connection nipple.
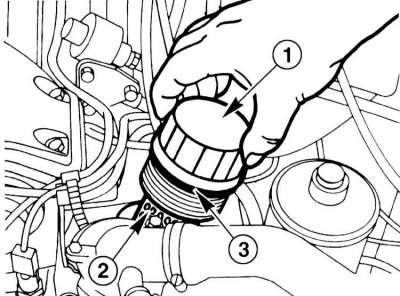
9. 4-cylinder petrol engine: Unscrew the oil filter cover using a 74 mm socket or HAZET 2169.


9. 4-cylinder petrol engine: Unscrew the oil filter cover using a 74 mm socket or HAZET 2169.


10. Remove the cover with the filter element (2). (3) - sealing ring.
11. Diesel engine: Unscrew the oil filter cover (1) using the HAZET 2169 tool (2) and a 27 mm…


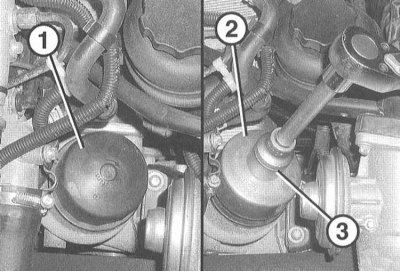
11. Diesel engine: Unscrew the oil filter cover (1) using the HAZET 2169 tool (2) and a 27 mm socket (3). The illustration shows a 611 engine.

12. Insert a new filter element into the oil filter housing.

13. Screw on the cover with the connection for testing (special tool) and a sealing ring.

(Material based on data from the portal: MercedesMAN.ru)

14. Attach a pressure gauge to check the oil pressure to the hose of the connecting fitting.

15. Start the engine and let it idle.

16. Oil pressure should not be less than 0.3 atm. Otherwise, it is necessary to check the lubrication system (pump, bearings, etc.).

17. When increasing engine power, the oil pressure should immediately increase and at 3000 rpm of the engine should be at least 3 atm.

18. Stop the engine.

19. Unscrew the pressure gauge.

20. After completing the oil pressure check, install the standard oil filter cover with a new O-ring.

6-cylinder petrol engine 112


1. The oil pressure is checked at the measuring hole on the end side of the engine.

2. Remove the engine cover or air filter vertically upwards.


3. Remove the fan cover with the electric motor, refer to Section Removal and installation the fan.

4. Unscrew the threaded plug of the hole for measuring the oil pressure, located in the lower part of the oil filter housing on the distribution mechanism housing.

5. Screw in the threaded plug with a new sealing ring and tighten it to a torque of 20 Nm.

6. Install the cover with the electric fan.

7. Install the engine cover or air filter on top.
This article is available at: russian, bulgarian, belarusian, ukrainian, serbian, croatian, romanian, polish, slovak, hungarian
The article has been verified: Rodionov Artyom Semyonovich
Share with friends:
◀ Previous
C-Class W203 / Gasoline engines
Next ▶

Engine lubrication system
Removal and installation the V-belt (V6)
Replacing the timing chains and setting the valve timing (V6)
Removal and installation the cylinder head (V6)
Construction of 6-cylinder petrol engines
Removal and installation the oil level sensor
More similar articles for repairing other models

☛ Checking the engine oil level using a dipstick Mercedes W168 (1997-2004)
☛ Checking oil pressure Mercedes W123 (1976-1985)
☛ Checking the condition of tires and their pressure, designating tires… Mercedes W463 (1999-2019)
☛ Checking the condition of tires and their pressure, designating tires… Mercedes W163 (1997-2005)
☛ Checking the condition of tires and their pressure, designating tires… Mercedes W140 (1991-1998)
☛ Checking the air pressure in the tires Mercedes Sprinter (1995-2000, diesel)
Link in different formats to this article
Comments and feedback from visitors
No comments yet


How much will 11 + 28 ?


W203 (2000-2007) 
  • General information
  • Introduction to guide
  • User manual
  • Maintenance
  • Power unit
  • Gasoline engines
  • Diesel engines
  • Cooling system
  • Ventilation and heating
  • Supply system
  • Injection system (gasoline)
  • Injection system (diesel)
  • Exhaust system
  • Ignition and control system
  • Charge and launch systems
  • Transmission
  • Mechanical gearbox
  • Automatic gearbox
  • Clutch and drive shafts
  • Differential
  • Chassis
  • Brake system
  • Car suspension
  • Steering
  • Body
  • Exterior (external elements)
  • Interior (internal elements)
  • Electrical equipment
  • Equipment and devices
  • Lighting system
  • Electrical diagrams (2000)
  • Electrical diagrams (since 2001)
W202 (1993-2000) 
  • General information
  • User manual
  • Driving a car
  • Car care
  • Maintenance
  • Power unit
  • Gasoline engines
  • Diesel engines
  • Lubrication system
  • Cooling system
  • Heating and ventilation
  • Ignition system
  • Fuel system
  • Injection system (gasoline)
  • Injection system (diesel)
  • Exhaust system
  • Transmission
  • Clutch
  • Car gearbox
  • Chassis
  • Suspension, wheels and tires
  • Steering
  • Brake system
  • Body
  • Exterior (external elements)
  • Interior (internal elements)
  • Doors and windows
  • Electrical equipment
  • Equipment and devices
  • Power devices
  • Lighting system
  • Electrical circuits
190 (W201) (1982-1993) 
  • General information
  • Introduction to the guide
  • Operation and care
  • Maintenance (gasoline)
  • Maintenance (diesel)
  • Troubleshooting
  • Power unit
  • Petrol engine I4
  • Petrol engine V6
  • Diesel engines
  • Engine overhaul
  • Cooling and heating
  • Power system (carburetor)
  • Injection system (gasoline)
  • Injection system (diesel)
  • Exhaust system
  • Charge and start system
  • Ignition system (I4)
  • Ignition system (V6)
  • Diesel heating system
  • Transmission
  • Clutch
  • Mechanical gearbox
  • Automatic gearbox
  • Cardan shaft and axle shafts
  • Chassis
  • Brake system
  • Car suspension
  • Steering
  • Body
  • Exterior (external elements)
  • Interior (internal elements)
  • Doors, locks and windows
  • Electrical equipment
  • Equipment and devices
  • Electrical circuits
 
MercedesMan.ru © 2017–2026 · Mobile version · Read about Mercedes · Sitemap: EN BG BY UA RS HR RO PL SK HU · Feedback · Site search · Bookmark A-Class (W168) · C-Class (W201) · C-Class (W202) · C-Class (W203) · E-Class (W123) · E-Class (W124) · E-Class (W210) · G-Class (W463) · M-Class (W163) · S-Class (W116, petrol) · S-Class (W126, petrol) · S-Class (W140) · S-Class (W220) · Sprinter · Vito 1 · Vito 2 · Vario 814D ·
 
We only use cookies without which some of the site's features may not be available.