
Removing
1. Remove the door trim as described in paragraph 18.
2. Lower the glass so that the gutter guide can be reached through the hole in the middle of the top of the door panel (see fig. 21.2).
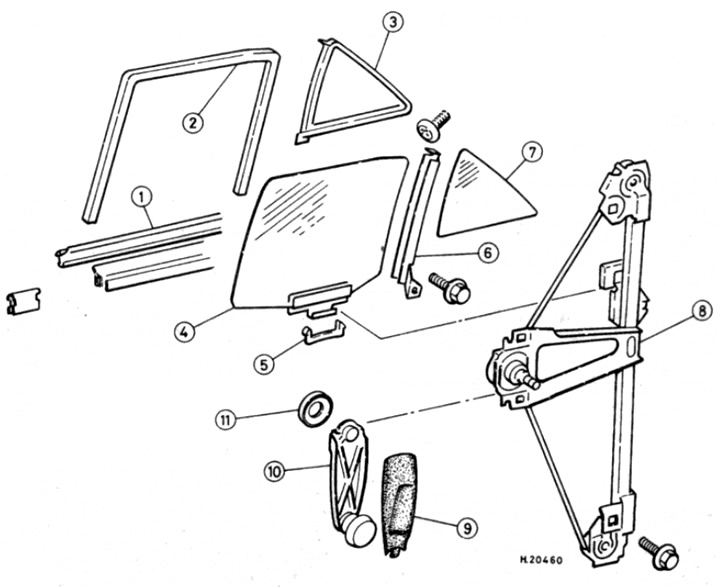
Pic. 21.2. Rear door glass and power window
1 Outer and inner sealing strips of the glass gutter
2 glass frame
3 Fixed glass frame
4 Door glass
5 Retainer
6 Rear guide chute
7 Fixed glass
8 Power window
9 Trim for power window handle
10 Power window handle
11 Decorative disc
3. Hold the glass in this position by placing a wooden wedge between the glass and the door, or by using adhesive tape wrapped around the top of the door frame and glued to the glass inside and out.
4. On vehicles with power windows, open the connector and remove the two power window motor wires.
5. Remove the retainer securing the glass to the guide element of the window lift channel.
6. Turn away two bolts of fastening of a window regulator on mechanical and three nuts on electric windows.
7. Turn away the bottom bolt of fastening of a trench of a window regulator.
8. Turn the power window mechanism back to release the guide element from the clip on the glass base.
9. On vehicles with power windows, remove the motor cable connector from the door panel.
10. Remove the power window mechanism from the large hole in the door panel.
Installation
11. Installation is carried out in the reverse order.