
Cars BMW Cars Volkswagen Cars Chevrolet Cars Land Rover Cars Lada Cars Honda Cars Peugeot
English Русский
Български
Беларускі
Український
Српски
Hrvatski
Română
Polski
Slovenský
Magyar
Bookmark News and articles Sitemap Feedback Site search
MercedesMan.ru


A-Class C-Class E-Class G-Class M-Class S-Class Others
W123 (1976-1985) W124 (1984-1995) W210 (1996-2002)
  • Main
  • E-Class
  • W210 (1996-2002)
  • Body
  • Doors and windows
  • Adjusting the trunk lid

Adjusting the trunk lid (Mercedes-Benz E-Class W210)

0
Contents: Adjusting the closing force ↡ Dampness in the trunk ↡
The purpose of the adjustment is to ensure a uniform gap between the trunk lid and the body parts on the right and left. From the lower edge, it is necessary to ensure a clear closure of the lid. The upper surface of the trunk lid should be at the same level with the body parts on both sides of it.

Sequence of works


Lateral and longitudinal adjustment

1. Loosen the tightening torque of the hinge mounting bolts and install the trunk lid in the desired position.

Adjusting the closing force
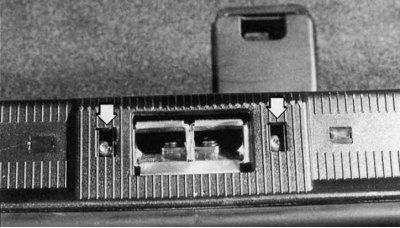


Fig. 11.14. Two bolts that need to be loosened to move the lock bracket

Fig. 11.14. Two bolts that need to be loosened to move the lock bracket


Original source of information [MercedesMan]

2. Loosen the two bolts securing the lock bracket so that it can be moved in a straight line (fig. 11.14).
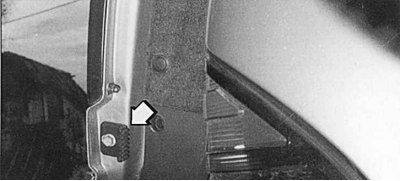


Fig. 11.15. Adjustable clamps

Fig. 11.15. Adjustable clamps


3. Close and adjust the trunk lid. It should not close too easily, otherwise the necessary seal will not be ensured. On the T-model, adjustable clamps (fig. 11.15) keep the rear door closed and prevent the door from moving or banging in the doorway while driving.

4. Screw in the bolts securing the lock bracket.

Dampness in the trunk


If dust and moisture get into the trunk, although the lid is adjusted along the perimeter in the opening, check the condition of the seal - over time, it can lose elasticity or break, if, for example, in winter the frozen trunk lid was opened with force. To prevent wear of the rubber seal, regularly rub glycerin or a special care product. Replace the seal if it fails.
This article is available at: russian, bulgarian, belarusian, ukrainian, serbian, croatian, romanian, polish, slovak, hungarian
The article has been verified: Polyakov Zakhar Grigorievich
Share with friends:
◀ Previous
E-Class W210 / Doors and windows
Next ▶

Removal the trunk lid
Doors — General Information
Removal the front door
Front door adjustment
Removal the rear door
Rear door adjustment
More similar articles for repairing other models

☛ Adjusting the position of the steering wheel Mercedes W168 (1997-2004)
☛ Adjusting the light range Mercedes W202 (1993-2000)
☛ Checking and adjusting the basic position of the camshafts Mercedes W463 (1999-2019)
☛ Checking and adjusting idle speed / ignition timing / CO concentration Mercedes W163 (1997-2005)
☛ Adjusting the trunk lid Mercedes W140 (1991-1998)
☛ Adjusting the axial play of the wheel bearing Mercedes Sprinter (1995-2000, diesel)
Link in different formats to this article
Comments and feedback from visitors
No comments yet


How much will 22 + 31 ?


W210 (1996-2002) 
  • General information
  • Vehicle description
  • Working conditions and tools
  • Car care
  • Diesel engines
  • Engine repair
  • Lubrication system
  • Cooling system
  • Injection system
  • Supply system
  • Exhaust system
  • Gasoline engines
  • Engine repair
  • Lubrication system
  • Cooling system
  • Control system
  • Power and exhaust system
  • Transmission
  • Clutch
  • Mechanical gearbox
  • Automatic gearbox
  • Drive shafts
  • Chassis
  • Car suspension
  • Steering
  • Tires and wheels
  • Brake system
  • Body
  • Exterior (external elements)
  • Interior (internal elements)
  • Doors and windows
  • Heating and ventilation
  • Electrical equipment
  • Equipment and devices
  • Power devices
  • Lighting and signaling
  • Electrical circuits
W124 (1984-1995) 
  • General information
  • Governing bodies
  • Driving and operation
  • Weekly care
  • Maintenance (gasoline)
  • Maintenance (diesel)
  • Troubleshooting
  • Power unit
  • I4 petrol engine
  • V6 petrol engine (SOHC)
  • V6 petrol engine (DOHC)
  • Diesel engines
  • Engine overhaul
  • Cooling system
  • Heating and ventilation
  • Fuel system (carburetor)
  • Injection system «Bosch CIS-E»
  • Injection system «Bosch HFM»
  • Diesel fuel system
  • Supply system
  • Starting and charging system
  • Ignition system (I4)
  • Ignition system (V6)
  • Preheating
  • Transmission
  • Clutch
  • Mechanical gearbox
  • Automatic gearbox
  • Drive shafts
  • Chassis
  • Brake system
  • Car suspension
  • Steering
  • Body
  • Exterior (external elements)
  • Interior (internal elements)
  • Doors, locks and windows
  • Electrical equipment
  • Equipment and devices
  • Switches
  • Headlights and lighting
  • Electrical circuits
W123 (1976-1985) 
  • General information
  • Introduction to the guide
  • Power unit
  • Engine device
  • Repair M102 engines
  • Repair M110 and M123 engines
  • Cooling and lubrication (M102)
  • Cooling (M110 and M123)
  • Ignition system
  • Power system «Stromberg»
  • Power system «Solex 4A1»
  • Fuel injection «K-Jetronic»
  • Fuel injection «L-Jetronic»
  • Transmission
  • Clutch
  • Mechanical gearbox
  • Automatic gearbox
  • Cardan and rear axle
  • Chassis
  • Front suspension
  • Rear suspension
  • Steering
  • Brake system
  • Body
  • Exterior (external elements)
  • Interior (internal elements)
  • Doors, locks and windows
  • Electrical equipment
  • Equipment and devices
  • Power devices
  • Electrical circuits
 
MercedesMan.ru © 2017–2026 · Mobile version · Read about Mercedes · Sitemap: EN BG BY UA RS HR RO PL SK HU · Feedback · Site search · Bookmark A-Class (W168) · C-Class (W201) · C-Class (W202) · C-Class (W203) · E-Class (W123) · E-Class (W124) · E-Class (W210) · G-Class (W463) · M-Class (W163) · S-Class (W116, petrol) · S-Class (W126, petrol) · S-Class (W140) · S-Class (W220) · Sprinter · Vito 1 · Vito 2 · Vario 814D ·
 
We only use cookies without which some of the site's features may not be available.