
Fuel tank, pump and fuel gauge. Gas engine
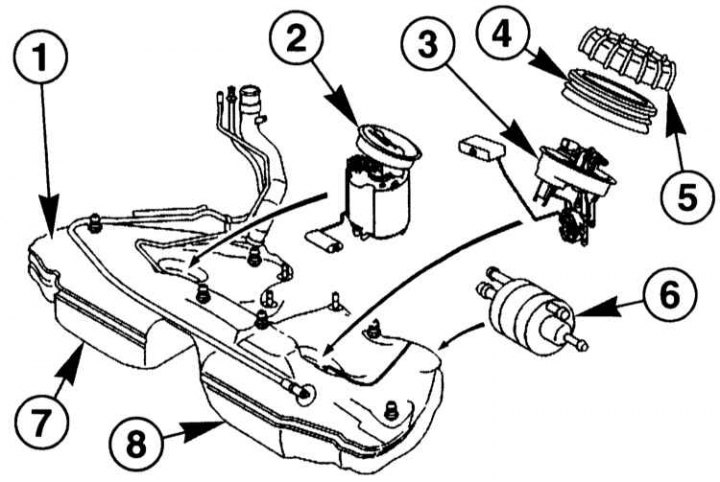
1 - Fuel tank; 2 - Block of the fuel pump and fuel reserve sensor; 3 - Left fuel gauge; 4 - Profile sealing ring; 5 - Round nut; 6 - Fuel filter; 7 - Right chamber; 8 - Left camera
Petrol engine: The electric fuel pump, together with the fuel gauge, is located in the right half of the fuel tank. Individually, they cannot be replaced. The second fuel gauge is located in the left chamber of the fuel tank.
Diesel engine: Since the fuel is drawn from the cam-driven fuel priming pump, only the sensors are located in the tank, respectively each in its own fuel tank chamber.
Before removing the tank, it must be emptied while the vehicle is moving or the fuel must be pumped out with a special pump into a container designed for this purpose. At the same time, it is necessary to ensure good ventilation of the workplace. For this purpose, a radial fan can be used, the electric motor of which is located outside the air flow.
Warning! When removing the fuel pump, some fuel may leak out. Fuel vapors are poisonous and flammable. Therefore, it is necessary to ensure good ventilation of the workplace. Avoid skin contact with fuel. Wear fuel resistant gloves. Do not use open fire!
Diesel engines
Removing
Note. This describes how to remove the diesel fuel gauge. For a gasoline engine, removal is carried out in a similar way.
Attention! For the following work, do not connect the auxiliary power supply, as the engine control unit may be damaged.
1. Disconnect the negative cable (-) battery with the ignition off. The cabin air filter box must first be removed.
Attention! Before disconnecting the cable, find out the security code of the radio, if any, refer to Section Replacing the battery.
2. Empty the fuel tank. With a full tank, suck out about 20 liters of fuel from the right chamber.
3. Tilt the seat cushions forward or remove them.
4. Fold back the floor covering.
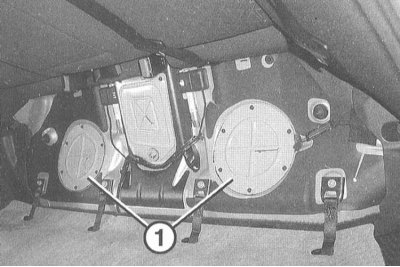
5. Unscrew both covers (1).
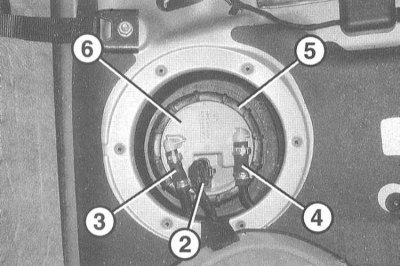
6. Disconnect the connector of the left (2) fuel gauge.
7. Disconnect the fuel supply line (3) and fuel return (4) at the left stock sensor.
8. Loosen the round nuts with a cam wrench (5). If the specified tool is not available, unscrew the sensor using a spanner or hardwood rod and light hammer blows.
Attention! A spark is not allowed, because. this may cause a fire.
9. Remove the cover (6) with profile sealing ring.
10. Slightly remove the right fuel gauge.
11. Disconnect the right sensor connector.
12. If the sensor is being replaced, disconnect the connecting pipes on the right sensor.
Note. The new stock sensors are equipped with couplings on the connecting pipes.
13. Carefully remove both sensors from the tank. At the same time, put a rag and wipe the fuel that flows out.
Installation
1. Clean the mating surfaces on the tank and on the stock sensors.
Attention! Do not allow dirt to enter the fuel tank.
2. Install a new gasket on the left sensor made of profile rubber, made so that it cannot get into the fuel tank.
3. Pass the connecting pipes and plug through the fuel tank.
4. Remove the profile sealing ring from the left sensor and install it on the tank.
5. Connect couplings or connecting pipes.
6. Connect the electrical wire of the right stock sensor.
7. Install the right sensor with a new profile o-ring.
8. Establish a cover of the gauge of a stock of fuel so that labels on a cover and a fuel tank coincide.
9. Tighten the round nuts to 85Nm.
10. Put the fuel inlet and outlet hose on the left sensor and secure with clamps.
11. Dock the left fuel gauge connector.
12. Check the sealing cord of the fuel tank cap and replace if necessary.
13. Install the cover and screw it on the bottom.
14. Tilt back the floor covering.
15. Tilt back or install the seat cushion.
16. Connect the negative cable (-) to the battery when the ignition is off. Install the cabin air filter box. Enter the radio code and set the time on the clock.
Gasoline engines
Removing
Note. Only the difference from the diesel engine is described here.
1. Disconnect the seat cushion clamps.
2. Loosen the round nut with a cam wrench (5) fuel pump and fuel gauge (2). If the specified tool is not available, unscrew the sensor using a spanner or hardwood rod and light hammer blows.
Attention! A spark is not allowed, because. this may cause a fire.
3. Disconnect the right fuel gauge connector.
4. Disconnect the fuel supply hose from the fuel pump.
Note. The right sensor and the fuel pump form a single unit.
5. Slightly remove the right fuel gauge.
6. Disconnect the fuel outlet hose from the right sensor.
7. Carefully remove the fuel pump with the right sensor from the fuel tank. Place a rag on and wipe off any leaking fuel.
Installation
1. Clean the mating surface of the fuel tank and fuel pump holder.
Attention! Do not allow dirt to enter the fuel pump.
2. Check the three fuel gauge mounts on the bottom of the tank, if necessary replace the fuel pump and fuel gauge assembly.
3. Attach the fuel drain hose to the right sensor.
4. Attach the fuel supply hose to the fuel pump.
5. Carefully insert fuel pump with sensor and new O-ring and check their position. The label on the lid must match the label on the tank.
6. Install a new profile seal ring.
7. Screw on the ring nut and tighten it with a torque of 85Nm.
8. Fix collars of a pillow of a back seat.