
Warning: When working on parts of the power system, observe the precautions outlined in paragraph 1. The following operation must be carried out in a well-ventilated area.
Removing
1. If the gas tank is full, in order to avoid spilling gasoline, at least 8 liters of gasoline must be drained before starting work. This is especially important to do when the sensor is faulty and you are not sure how much gasoline is in the gas tank. It is best to carry out this operation when the gas tank is empty.
2. Disconnect the negative battery terminal.
3. Remove the luggage compartment carpet, then remove the latches and open the gas tank hatch - for more information, see Chapter 11.
4. Disconnect the connector from the top of the sensor assembly (see fig. 5.4). Secure the plug with string or wire so that it does not slip down behind the gas tank.
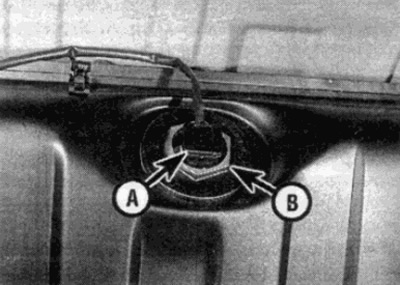
Pic. 5.4. Fuel Level Sensor Assembly
A Plug
The fastening nut
5. Loosen the large fastening nut and lift the sensor out of the gas tank - before finally removing the sensor, allow gasoline to drain into the gas tank for a few seconds.
6. Remove the o-rings from the gas tank opening and destroy them - new ones must be used when installing.
Installation
7. Installation is carried out in the reverse order, taking into account the following points:
- A) If a new sensor is being installed, remove the protective tape and remove the retainer before installing the assembly to the gas tank.
- b) Replace the o-rings in the fuel tank opening.
- V) Tighten the sensor assembly nut securely.
- G) Check that the sensor wire plug is connected securely.
- d) Before installing the trim panels and carpet, test drive to make sure there are no gasoline leaks around the sensor area.