
Cars BMW Cars Volkswagen Cars Chevrolet Cars Land Rover Cars Lada Cars Honda Cars Peugeot
English Русский
Български
Беларускі
Український
Српски
Hrvatski
Română
Polski
Slovenský
Magyar
Bookmark News and articles Sitemap Feedback Site search
MercedesMan.ru


A-Class C-Class E-Class G-Class M-Class S-Class Others
W116 (1972-1980, petrol) W126 (1979-1991, petrol) W140 (1991-1998) W220 (1998-2005)
  • Main
  • S-Class
  • W220 (1998-2005)
  • Transmission
  • Drive shafts
  • Determining the thickness of the adjusting shim and installing it in the gearbox housing

Determining the thickness of the adjusting shim and installing it in the gearbox housing (Mercedes-Benz S-Class W220)

0
Determining the thickness of the adjusting shim and installing it in the gearbox housing


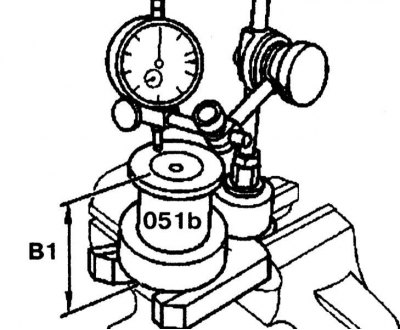
1. Fix the indicator to the clamp and install the measuring plate (refer to the accompanying illustration).

2. Set the indicator to "0" with 3 mm tension on the measuring disk 051. The height of the measuring disk 051 is adjustable.
2. Set the indicator to «0» with 3 mm tension on the measuring disk 051. The height of the…


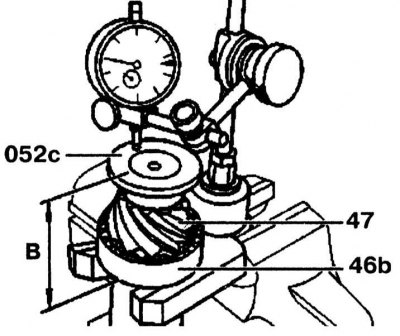
3. Install the outer ring of roller bearing 46b on the inner ring of drive gear 47 and install magnetic disk 052c.

4. Insert the pinion gear into the measuring plate and measure the height of the pinion gear with tapered roller bearing and magnetic disk.

5. Determine the difference between the height "B1" and the height "B". Write down the obtained value (for example, 1.79 mm).
5. Determine the difference between the height «B1» and the height «B». Write down the obtained…


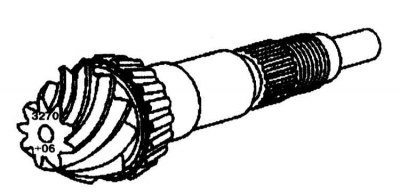
6. Read the basic deviation "a" of the drive gear ("+" or "-") and write it down (e.g. +0.06 mm).


7. Depending on the prefix ("+" or "-"), the value for the drive gear is added (if "+") or subtracted (if "-").
7. Depending on the prefix («+» or «-»), the value for the drive gear is added (if «+») or…


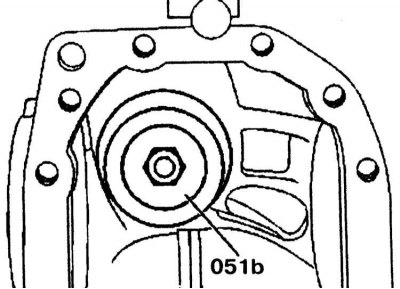
8. Insert the 051 b gauge into the gearbox housing. Screw it in.
8. Insert the 051 b gauge into the gearbox housing. Screw it in.


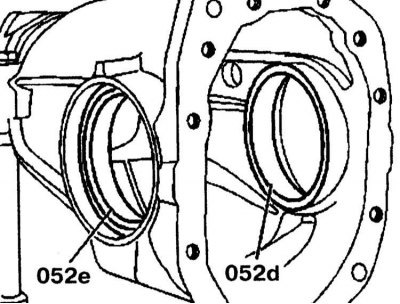
9. Insert the left 052e from the outside inward and the right 052d from the inside outward measuring rings into the gearbox housing until they stop.
9. Insert the left 052e from the outside inward and the right 052d from the inside outward…


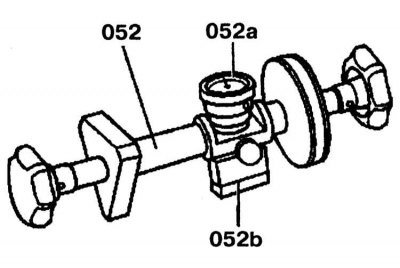
10. Install measuring device 052a with measuring finger into measuring device 052. The measuring finger is screwed into measuring part 052b.


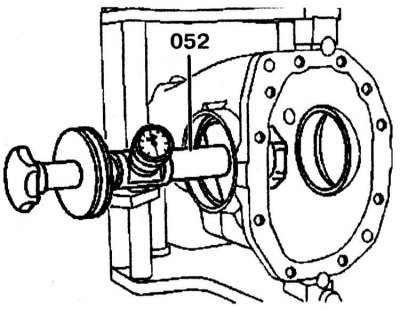
11. Install the measuring part 052b in the measuring device and set the indicator to "0" with a 2 mm interference fit. When tightening the bolt, the indicator should be at "0".
11. Install the measuring part 052b in the measuring device and set the indicator to «0» with a 2…


12. Insert the measuring device into the left hole in the gearbox housing.
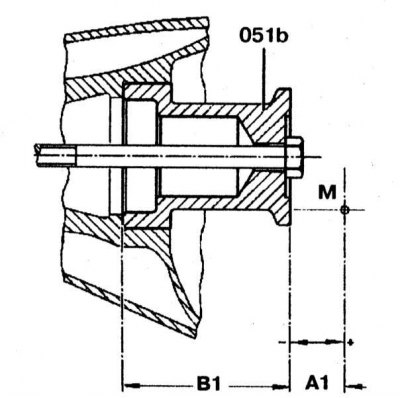
051b - Measuring instrument

051b - Measuring instrument
A1 - Distance between the regulator and the front side of the meter
B1 - Height of the measuring device
M - Gear center


13. Measure the distance "A" between the regulator and the front of the meter and record the reading with positive ("+") or negative ("-") direction (for example, received - 0.01 mm and negative direction). Positive or negative direction depends on the rotation of the indicator. The direction of rotation, from the neutral position, counterclockwise determines the negative direction, clockwise - the positive direction.


[Original article is on the portal: www.mercedesman.ru]

14. Determine the thickness of the gasket:

Distance between height "B1" and height "B" = 1.79 mm + Basic deviation "a" of the drive gear 0.06 mm = 1.85 mm + Difference "A1" between the adjuster and the front side of the gauge 0.01 mm = Thickness of the shim 1.86 mm.

15. Remove the measuring device and measuring rings from the gearbox. Remove the measuring device. Insert a gasket of a certain thickness into the gearbox.
This article is available at: russian, bulgarian, belarusian, ukrainian, serbian, croatian, romanian, polish, slovak, hungarian
The article has been verified: Khromov Roman Mikhailovich
Share with friends:
◀ Previous
S-Class W220 / Drive shafts
Next ▶

Disassembly and assembly of the main gear reducer and adjustment of gear clearances
Disassembling and assembling the differential
Removal and installation of CV joints and protective covers of drive shafts
Drive shaft — removal, inspection and installation
Removal and installation the drive shaft flange and radial thrust ball bearing
Checking and adjusting the flange clearance
Disassembling and assembling a differential with automatic locking
More similar articles for repairing other models

☛ Adjusting the position of the steering wheel Mercedes W168 (1997-2004)
☛ Determining the thickness of the adjusting shim and installing it in… Mercedes W203 (2000-2007)
☛ Removal, adjusting and installing windshield washer jets Mercedes W123 (1976-1985)
☛ Checking and adjusting the basic position of the camshafts Mercedes W463 (1999-2019)
☛ Removal the air conditioner evaporator housing Mercedes W163 (1997-2005)
☛ Disassembly and assembly of the front part of the gearbox housing Mercedes Vito 2 (2003-2014, diesel)
Link in different formats to this article
Comments and feedback from visitors
No comments yet


How much will 39 + 41 ?


W220 (1998-2005) 
  • General information
  • Introduction to guide
  • User manual
  • Maintenance
  • Power unit
  • Engine repair
  • Cooling and heating systems
  • Power and exhaust systems
  • Ignition and control system
  • Charge and launch systems
  • Transmission
  • Automatic gearbox
  • Drive shafts
  • Chassis
  • Brake system
  • Front suspension
  • Rear suspension
  • Steering
  • Body
  • Body elements
  • Electrical equipment
  • Equipment and devices
  • Electrical circuits
W140 (1991-1998) 
  • User manual
  • Controls and instruments
  • Driving and operation
  • Maintenance
  • Power unit
  • Petrol engine V6
  • Petrol engine V8
  • Petrol engine V12
  • Diesel engine OM603
  • Diesel engine OM606
  • Cooling system
  • Power supply and injection system
  • Control system HFM-SFI
  • Control system LH-SFI
  • Control systems ME-SFI
  • Diesel control system
  • Ignition system
  • Charge and launch system
  • Transmission
  • Mechanical gearbox 717.438
  • Mechanical gearbox 717.454
  • Automatic gearbox 722.5
  • Automatic gearbox 722.6
  • Clutch and drive shafts
  • Differential
  • Chassis
  • Brake system
  • Steering
  • Front suspension
  • Rear suspension
  • Body
  • Exterior (external elements)
  • Interior (internal elements)
  • Electrical equipment
  • Equipment and devices
  • Electrical circuits
W126 (1979-1991, petrol) 
  • Power unit
  • Engine repair
  • Ignition system
  • Lubrication system
  • Cooling system
  • Fuel system
  • Fuel injection system
  • Transmission
  • Clutch and cardan
  • Mechanical gearbox
  • Automatic gearbox
  • Chassis
  • Front suspension
  • Rear suspension
  • Steering
  • Brake system
  • Electrical equipment
  • Power devices
  • Electrical circuits
W116 (1972-1980, petrol) 
  • General information
  • Introduction to guide
  • Power unit
  • 8-cylinder V8 engine
  • 6-cylinder I6 engine
  • Cooling and lubrication system
  • Power system (carburetor)
  • Fuel injection system
  • Ignition system
  • Transmission
  • Clutch and cardan
  • Car gearbox
  • Chassis
  • Front suspension
  • Rear suspension
  • Steering
  • Brake system
  • Electrical equipment
  • Power devices
  • Electrical circuits
 
MercedesMan.ru © 2017–2026 · Mobile version · Read about Mercedes · Sitemap: EN BG BY UA RS HR RO PL SK HU · Feedback · Site search · Bookmark A-Class (W168) · C-Class (W201) · C-Class (W202) · C-Class (W203) · E-Class (W123) · E-Class (W124) · E-Class (W210) · G-Class (W463) · M-Class (W163) · S-Class (W116, petrol) · S-Class (W126, petrol) · S-Class (W140) · S-Class (W220) · Sprinter · Vito 1 · Vito 2 · Vario 814D ·
 
We only use cookies without which some of the site's features may not be available.