
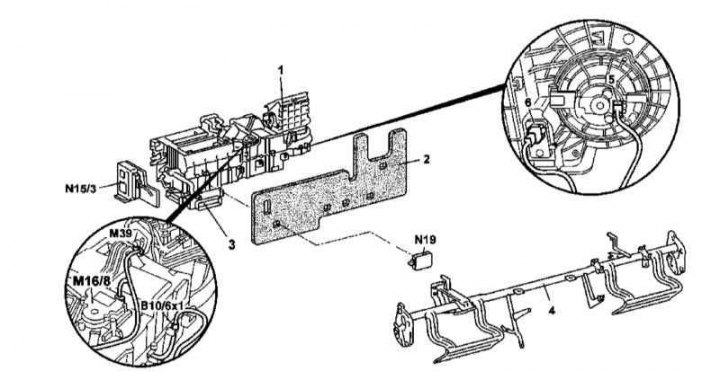
Installation details of the A/C evaporator casing
1 - Casing of the evaporator of the air conditioner / heat exchanger of the heater; 2 - Soundproof panel; 3 - Air distributor; 4 - Instrument panel holder; 5 - Contact connector for heater fan wiring; 6 - Pin connector of the resistive assembly of the fan; B10 / 6x1 - Contact connector for the evaporator temperature sensor; М16/8 - Mixing damper drive electric motor; M39 - Stepper electric motor for switching the circulation mode damper; N15/3 - ETC control module; N19 - A/C control module
Installation details of the A/C evaporator casing
Attention! All sealing elements must be replaced without fail.
1. Installation details of the air conditioner evaporator shell/heater heat exchanger are shown in the illustrations, which include all references in the text.
2. Empty the cooling system (see chapter Checking the cooling system and frost resistance of the coolant, changing the fluid).
3. Disconnect the overflow hose of the cooling system from the battery shield.
4. Loosen the clamp and disconnect the top hose from the electric water pump.
5. Give fixing nuts and remove a broad tank of system of cooling from a bulkhead of an impellent compartment. Take the tank aside.
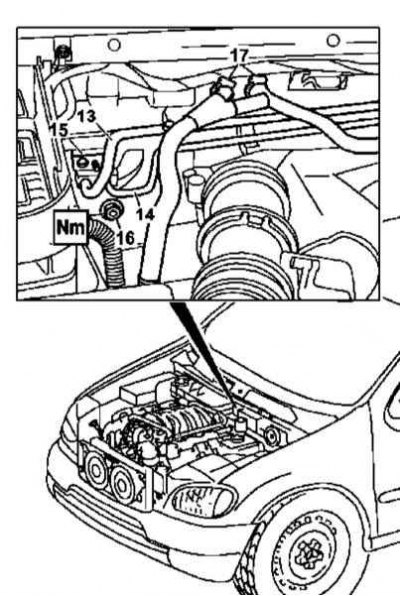
6. Disconnect the hoses of the cooling path (17) from the heater heat exchanger.
7. In the conditions of a car service workshop, discharge the A/C system.
8. Give the self-locking nut (16) expansion valve (15).
9. Disconnect from expansion valve (15) low-pressure (13) and high pressure (14) refrigeration lines.
10. Remove the dashboard holder (4).
11. Release the ETC control module from the latches (N15/3).
12. Disconnect the electrical wiring from the air mixing damper drive motor (М16/8).
13. Disconnect the wiring from the stepper motor of the damper for switching the air circulation modes (M39).
14. Disconnect the wiring connector (В10/6х1) evaporator temperature sensor.
15. Disconnect the wiring from the resistive assembly of the heater fan (6).
16. Disconnect the wiring from the heater fan (5).
17. Remove the A/C control module (N19).
18. Release from the intermediate clips on the evaporator casing (1) cable bundle.
19. Remove the soundproof panel (2).
20. Disconnect the drain hose from the bottom of the A/C evaporator housing (1).
21. Remove the cover (1).
22. Installation is carried out in the reverse order - refueling of the air conditioning system must be carried out in a car service workshop.
23. Finally, check the cooling system for signs of leak development.