
Cars BMW Cars Volkswagen Cars Chevrolet Cars Land Rover Cars Lada Cars Honda Cars Peugeot
English Русский
Български
Беларускі
Український
Српски
Hrvatski
Română
Polski
Slovenský
Magyar
Bookmark News and articles Sitemap Feedback Site search
MercedesMan.ru


A-Class C-Class E-Class G-Class M-Class S-Class Others
W116 (1972-1980, petrol) W126 (1979-1991, petrol) W140 (1991-1998) W220 (1998-2005)
  • Main
  • S-Class
  • W126 (1979-1991)
  • Transmission
  • Clutch and cardan
  • Removal, checking and installation the clutch

Removal, checking and installation the clutch (Mercedes-Benz S-Class W126)

0
To remove, you must perform the following operations:

Remove the gearbox.

Gradually loosen the drive pin mounting bolts by 1-1.5 turns each time until it is relieved.

Caution: If the bolts are unscrewed immediately, the diaphragm spring may be deformed.


To prevent the flywheel from turning when unscrewing the bolts, block the flywheel with a screwdriver or rod.

[Article based on data from the website: mercedesman.ru]

Finally, completely unscrew the bolts.

Remove the drive and driven disks.

Caution: Do not drop the drive and driven discs when removing them, as this may result in difficulty disengaging the clutch or the clutch jerking after installation.


Wipe the flywheel with a rag soaked in gasoline.

To check you need to:

Check the drive disk for scratches and burnt areas.
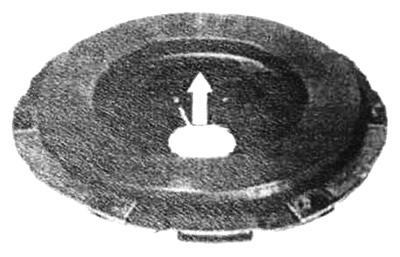
Check the drive disk for scratches and burnt areas.


Check the integrity of the diaphragm spring

Check the spring connections of the drive disk and cover for cracks and the reliability of the rivet connections.

Check the flywheel for scratches and burnt areas.

Treat the drive disk and flywheel with very fine sandpaper.

Oily and mechanically damaged drive disks must be replaced.

Measure the thickness of the drive disk linings with a caliper. The minimum permissible thickness is 7.5 mm. Otherwise, the disk must be replaced. The drive disk is also replaced if there are burnouts.


Check the edges of the diaphragm spring for wear. If wear is up to 0.3 mm, replace the disc.

Check the edges of the diaphragm spring for bending. If the height is uneven, bend the edges with pliers.
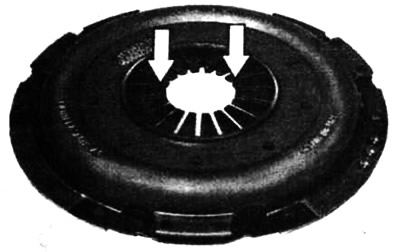
Check the edges of the diaphragm spring for bending. If the height is uneven, bend the edges with…


Check the spring windows, torsion springs and hub for signs of wear. With a composite flywheel, the driven disk has a rigid structure without dampers. In this case, torsion dampers are installed in the flywheel.
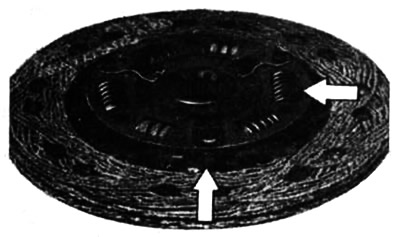
Check the spring windows, torsion springs and hub for signs of wear. With a composite flywheel, the…


Remove the release bearing from the front gearbox cover and inspect it.

The runout of the driven disk is checked in the workshop. Lateral runout should not exceed 0.5 mm.

Note: This check must be carried out when reinstalling the previous driven disc and if there were previously difficulties in disengaging the clutch.


Check the ease of movement of the ball bearing in the crankshaft groove. If necessary, remove the bearing with a puller and replace it.

Before installing a new clutch, remove the anti-corrosion protective coating from it.

Insert the drive and driven disks into the flywheel. Place the drive clutch disk on the corresponding mounting pins. Center the driven disk in the drive disk. For centering, it is best to use a HAZET shaft or the primary shaft from an old gearbox.
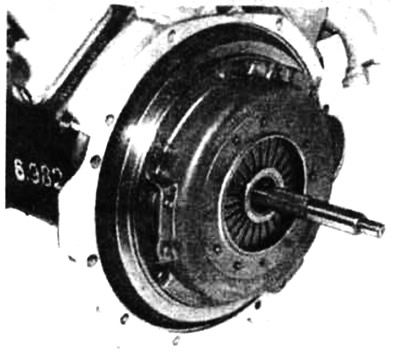
Insert the drive and driven disks into the flywheel. Place the drive clutch disk on the…


When installing the previous drive disk, install it according to the marking. The marking should face the gearbox. a Screw in the drive disk mounting bolts.

Tighten the drive disk mounting bolts sequentially by 1-1.5 turns. Then remove the centering shaft.

Caution: When tightening the bolts, the drive disc must enter the flywheel evenly and freely.


Install the gearbox.
This article is available at: russian, bulgarian, belarusian, ukrainian, serbian, croatian, romanian, polish, slovak, hungarian
The article has been verified: Burova Vera Semenovna
Share with friends:
◀ Previous
S-Class W126 / Clutch and cardan
Next ▶

Description of the clutch design
Bleeding the hydraulic clutch drive
Removal air using a special installation
Removal and installation the release bearing
Clutch Master Cylinder — Removal and Installation
Checking the thickness of the driven disk
More similar articles for repairing other models

☛ Checking the engine oil level using a dipstick Mercedes W168 (1997-2004)
☛ Checking the thickness of the clutch disc in the mounted state Mercedes W202 (1993-2000)
☛ Checking the cooling fan drive clutch Mercedes W123 (1976-1985)
☛ Checking fluid levels, leak control Mercedes W463 (1999-2019)
☛ Checking fluid levels, leak control Mercedes W163 (1997-2005)
☛ Checking the runout of the driven clutch disc Mercedes Vario 814D (1996-2003, diesel)
Link in different formats to this article
Comments and feedback from visitors
No comments yet


How much will 11 + 47 ?


W220 (1998-2005) 
  • General information
  • Introduction to guide
  • User manual
  • Maintenance
  • Power unit
  • Engine repair
  • Cooling and heating systems
  • Power and exhaust systems
  • Ignition and control system
  • Charge and launch systems
  • Transmission
  • Automatic gearbox
  • Drive shafts
  • Chassis
  • Brake system
  • Front suspension
  • Rear suspension
  • Steering
  • Body
  • Body elements
  • Electrical equipment
  • Equipment and devices
  • Electrical circuits
W140 (1991-1998) 
  • User manual
  • Controls and instruments
  • Driving and operation
  • Maintenance
  • Power unit
  • Petrol engine V6
  • Petrol engine V8
  • Petrol engine V12
  • Diesel engine OM603
  • Diesel engine OM606
  • Cooling system
  • Power supply and injection system
  • Control system HFM-SFI
  • Control system LH-SFI
  • Control systems ME-SFI
  • Diesel control system
  • Ignition system
  • Charge and launch system
  • Transmission
  • Mechanical gearbox 717.438
  • Mechanical gearbox 717.454
  • Automatic gearbox 722.5
  • Automatic gearbox 722.6
  • Clutch and drive shafts
  • Differential
  • Chassis
  • Brake system
  • Steering
  • Front suspension
  • Rear suspension
  • Body
  • Exterior (external elements)
  • Interior (internal elements)
  • Electrical equipment
  • Equipment and devices
  • Electrical circuits
W126 (1979-1991, petrol) 
  • Power unit
  • Engine repair
  • Ignition system
  • Lubrication system
  • Cooling system
  • Fuel system
  • Fuel injection system
  • Transmission
  • Clutch and cardan
  • Mechanical gearbox
  • Automatic gearbox
  • Chassis
  • Front suspension
  • Rear suspension
  • Steering
  • Brake system
  • Electrical equipment
  • Power devices
  • Electrical circuits
W116 (1972-1980, petrol) 
  • General information
  • Introduction to guide
  • Power unit
  • 8-cylinder V8 engine
  • 6-cylinder I6 engine
  • Cooling and lubrication system
  • Power system (carburetor)
  • Fuel injection system
  • Ignition system
  • Transmission
  • Clutch and cardan
  • Car gearbox
  • Chassis
  • Front suspension
  • Rear suspension
  • Steering
  • Brake system
  • Electrical equipment
  • Power devices
  • Electrical circuits
 
MercedesMan.ru © 2017–2026 · Mobile version · Read about Mercedes · Sitemap: EN BG BY UA RS HR RO PL SK HU · Feedback · Site search · Bookmark A-Class (W168) · C-Class (W201) · C-Class (W202) · C-Class (W203) · E-Class (W123) · E-Class (W124) · E-Class (W210) · G-Class (W463) · M-Class (W163) · S-Class (W116, petrol) · S-Class (W126, petrol) · S-Class (W140) · S-Class (W220) · Sprinter · Vito 1 · Vito 2 · Vario 814D ·
 
We only use cookies without which some of the site's features may not be available.