
Cars BMW Cars Volkswagen Cars Chevrolet Cars Land Rover Cars Lada Cars Honda Cars Peugeot
English Русский
Български
Беларускі
Український
Српски
Hrvatski
Română
Polski
Slovenský
Magyar
Bookmark News and articles Sitemap Feedback Site search
MercedesMan.ru


A-Class C-Class E-Class G-Class M-Class S-Class Others
190 (W201) (1982-1993) W202 (1993-2000) W203 (2000-2007)
  • Main
  • C-Class
  • W203 (2000-2007)
  • Power unit
  • Gasoline engines
  • Checking the camshaft timing (I4)

Checking the camshaft timing (I4) (Mercedes-Benz C-Class W203)

0
Contents: Examination ↡ Phase correction ↡

Examination


1. Remove the cylinder head cover, refer to the relevant section.

2. Turn the crankshaft until the piston position of the first cylinder is 25±2° after TDC, at the same time the cams of the first cylinder of the intake camshaft should be facing upward at an angle.
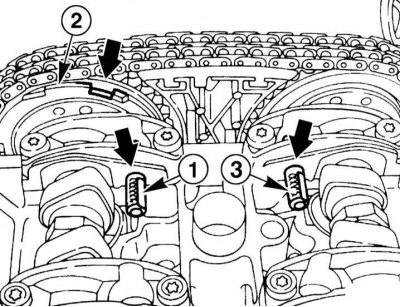
3. Check the phasing of the intake camshaft. To do this, check whether the pin (1) can be inserted…


3. Check the phasing of the intake camshaft. To do this, check whether the pin (1) can be inserted through the hole in the front camshaft cover into the hole in the camshaft flange. If the pin cannot be inserted, there are deviations in the crankshaft rotation angle; adjust the camshaft position if necessary.

Engine with adjustable camshaft: The stops located around the circumference of the intake camshaft sprocket (2) must be in the "late" position (stop in the flange grooves in the direction of rotation of the camshaft) (arrow up).

Note: If the chain is installed incorrectly, for example if the chain is offset by one tooth, the crankshaft rotation angle changes by approximately 20°.


4. Remove the mounting pin.

5. Turn the crankshaft until the piston position of the first cylinder is 28±2° after TDC, at the same time the cams of the first cylinder of the exhaust camshaft should be facing upward at an angle.


6. Check the phasing of the exhaust camshaft. To do this, check whether the pin (3) can be inserted through the hole in the front camshaft cover into the hole in the camshaft flange. If the pin cannot be inserted, there are deviations in the crankshaft rotation angle; adjust the camshaft position if necessary.

Note: If the chain is installed incorrectly, for example if the chain is offset by one tooth, the crankshaft rotation angle changes by approximately 20°.


7. Remove the mounting pin.

Phase correction


1. The cylinder head cover must be removed.

2. Turn the crankshaft in the direction of engine rotation and set the piston of the first cylinder to the position 20° after TDC.

3. Remove the front cover.

4. Remove the chain tensioner, refer to the relevant section.

5. Remove the top guide.

6. Remove the exhaust camshaft sprocket, holding the sprocket from turning by the hex key. Remove the sprocket.

7. Turn the exhaust camshaft to the basic setting position. The cam lobes of the exhaust camshaft of the first cylinder should be facing upward at an angle. Insert the installation pin (3) through the hole in the front bearing cap into the hole in the camshaft flange.

8. Remove the chain from the intake camshaft sprocket.

9. Turn the intake camshaft to the basic setting position. The cam lobes of the intake camshaft of the first cylinder should be facing upward at an angle. Insert the installation pin (3) through the hole in the front bearing cap into the hole in the camshaft flange.

Engine with adjustable camshaft: The stops located around the circumference of the intake camshaft sprocket (2) must be in the "late" position (stop in the flange grooves in the direction of rotation of the camshaft) (arrow up).


10. Install the chain onto the intake camshaft sprocket and onto the guide.

11. Insert the exhaust camshaft sprocket into the chain and secure it to the shaft with a new flange bolt to a torque of 20 Nm. Then tighten the bolt further with a regular wrench to an angle of 90°.

13. Reinstall the chain tensioner, refer to Section Removal and installation the chain tensioner.

14. Turn the engine over twice in the direction of rotation and recheck the basic setting of the camshafts. Repeat the adjustment if necessary.

15. Replace the front cover, refer to the relevant section.

16. Install the cylinder head cover, refer to the relevant section.
This article is available at: russian, bulgarian, belarusian, ukrainian, serbian, croatian, romanian, polish, slovak, hungarian
The article has been verified: Rodionov Artyom Semyonovich
Share with friends:
◀ Previous
C-Class W203 / Gasoline engines
Next ▶

Replacing the timing chains and setting the valve timing (I4)
Removal and installation the chain tensioner (I4)
Removal and installation the cylinder head cover (I4)
Removal and installation the cylinder head (I4)
Construction of 4-cylinder petrol engines
Removal and installation the V-belt (I4)
Construction of 6-cylinder petrol engines
Removal and installation the cylinder head (V6)
Replacing the timing chains and setting the valve timing (V6)
Removal and installation the V-belt (V6)
More similar articles for repairing other models

☛ Checking the engine oil level using a dipstick Mercedes W168 (1997-2004)
☛ Checking and adjusting the ignition timing angle Mercedes W124 (1984-1995)
☛ Checking and adjusting idle speed / ignition timing / CO concentration Mercedes W463 (1999-2019)
☛ Checking and adjusting idle speed / ignition timing / CO concentration Mercedes W163 (1997-2005)
☛ Checking the camshaft reference position Mercedes W140 (1991-1998)
☛ Checking the injection start timing Mercedes Sprinter (1995-2000, diesel)
Link in different formats to this article
Comments and feedback from visitors
No comments yet


How much will 45 + 36 ?


W203 (2000-2007) 
  • General information
  • Introduction to guide
  • User manual
  • Maintenance
  • Power unit
  • Gasoline engines
  • Diesel engines
  • Cooling system
  • Ventilation and heating
  • Supply system
  • Injection system (gasoline)
  • Injection system (diesel)
  • Exhaust system
  • Ignition and control system
  • Charge and launch systems
  • Transmission
  • Mechanical gearbox
  • Automatic gearbox
  • Clutch and drive shafts
  • Differential
  • Chassis
  • Brake system
  • Car suspension
  • Steering
  • Body
  • Exterior (external elements)
  • Interior (internal elements)
  • Electrical equipment
  • Equipment and devices
  • Lighting system
  • Electrical diagrams (2000)
  • Electrical diagrams (since 2001)
W202 (1993-2000) 
  • General information
  • User manual
  • Driving a car
  • Car care
  • Maintenance
  • Power unit
  • Gasoline engines
  • Diesel engines
  • Lubrication system
  • Cooling system
  • Heating and ventilation
  • Ignition system
  • Fuel system
  • Injection system (gasoline)
  • Injection system (diesel)
  • Exhaust system
  • Transmission
  • Clutch
  • Car gearbox
  • Chassis
  • Suspension, wheels and tires
  • Steering
  • Brake system
  • Body
  • Exterior (external elements)
  • Interior (internal elements)
  • Doors and windows
  • Electrical equipment
  • Equipment and devices
  • Power devices
  • Lighting system
  • Electrical circuits
190 (W201) (1982-1993) 
  • General information
  • Introduction to the guide
  • Operation and care
  • Maintenance (gasoline)
  • Maintenance (diesel)
  • Troubleshooting
  • Power unit
  • Petrol engine I4
  • Petrol engine V6
  • Diesel engines
  • Engine overhaul
  • Cooling and heating
  • Power system (carburetor)
  • Injection system (gasoline)
  • Injection system (diesel)
  • Exhaust system
  • Charge and start system
  • Ignition system (I4)
  • Ignition system (V6)
  • Diesel heating system
  • Transmission
  • Clutch
  • Mechanical gearbox
  • Automatic gearbox
  • Cardan shaft and axle shafts
  • Chassis
  • Brake system
  • Car suspension
  • Steering
  • Body
  • Exterior (external elements)
  • Interior (internal elements)
  • Doors, locks and windows
  • Electrical equipment
  • Equipment and devices
  • Electrical circuits
 
MercedesMan.ru © 2017–2026 · Mobile version · Read about Mercedes · Sitemap: EN BG BY UA RS HR RO PL SK HU · Feedback · Site search · Bookmark A-Class (W168) · C-Class (W201) · C-Class (W202) · C-Class (W203) · E-Class (W123) · E-Class (W124) · E-Class (W210) · G-Class (W463) · M-Class (W163) · S-Class (W116, petrol) · S-Class (W126, petrol) · S-Class (W140) · S-Class (W220) · Sprinter · Vito 1 · Vito 2 · Vario 814D ·
 
We only use cookies without which some of the site's features may not be available.