



Contents: Removal ↡ Installation ↡
Removal
1. Mark the position of the corresponding front wheel relative to the hub with paint. This will allow the balanced wheel to be installed in its original position during assembly. Loosen the wheel mounting bolts before jacking up the car. Raise the front of the car, place it on stands and remove the front wheel.
Attention! The operation of lifting and installing the car on stands is associated with danger! Therefore, before carrying out the operation, read the Section Jacking and towing Introduction to the manual.
2. Remove the front wing liner, refer to the relevant section.
3. Loosen the retaining bolt between the wing and the bumper, disconnect and remove the bracket as described in Section Removal and installation the bumper.
4. Unscrew the mounting bolts and remove the spacer clamp of the bottom cover, as well as the lining of the longitudinal beam in the wing area.
5. Using a plastic wedge, separate the door entry strip from the clamp holder and remove.
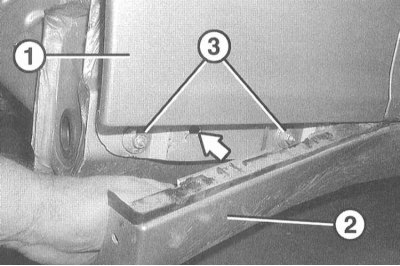
6. Insert a plastic wedge into the gap between the wing (1) and the longitudinal beam lining (2) and remove the lining from the two clamp holders (arrow on the illustration).
7. Unscrew the 2 nuts (3) securing the wing.
8. Open the hood and place it vertically.
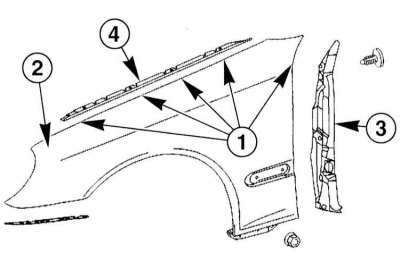
9. Unscrew the bolts (1) and remove the wing (2).
10. Remove the cover (3) and sealing tape (4).
Installation
1. Installation is performed in the reverse order of removal.
In doing so, make sure that the hood is closed correctly and that there is a gap in relation to the front door and the hood. The gap value is given in the Specifications.
2. Install the front wheel so that the marks made during removal match. Pre-lubricate the centering belt of the wheel disk on the hub with a thin layer of bearing grease. Do not lubricate the wheel mounting bolts. Replace rusty bolts. Tighten the bolts. Lower the car onto the wheels and tighten the bolts crosswise to 110 Nm.