
Cars BMW Cars Volkswagen Cars Chevrolet Cars Land Rover Cars Lada Cars Honda Cars Peugeot
English Русский
Български
Беларускі
Український
Српски
Hrvatski
Română
Polski
Slovenský
Magyar
Bookmark News and articles Sitemap Feedback Site search
MercedesMan.ru


A-Class C-Class E-Class G-Class M-Class S-Class Others
W168 (1997-2004)
  • Main
  • A-Class
  • W168 (1997-2004)
  • Body
  • Exterior
  • Front wing — removal and installation

Front wing — removal and installation (Mercedes-Benz A-Class W168)

0
Contents: Removal ↡ Installation ↡

Removal


1. Open the hood.

2. Remove the mudguards from the wheel arches of the front wheels, see the relevant chapter.

3. Remove the front bumper, see the relevant chapter.

4. Remove the triangular cover between the wing and the front pillar by pressing the fasteners with a plastic wedge. The plastic wedge should be installed as close to the fastener as possible.

5. Remove the side turn signal repeater on the wing by sliding its lens forward. After removing the repeater, disconnect its plug, see the relevant chapter.

Attention! Place the wing mounting bolts so that they can be screwed back into place during installation.


6. Unscrew bolt 2 at the bottom of the front part of the wing (see illustration).
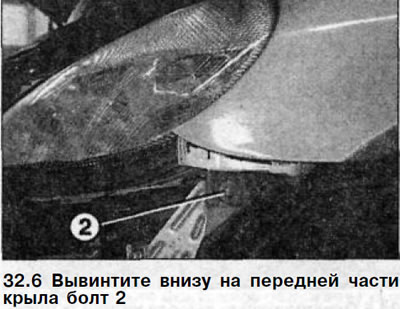
6. Unscrew bolt 2 at the bottom of the front part of the wing (see illustration).


7. Unscrew bolt 3 at the bottom of the rear part of the wing (see illustration).

(Material borrowed from an online resource: «MercedesMAN»)
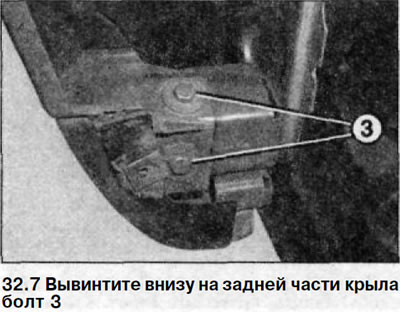
7. Unscrew bolt 3 at the bottom of the rear part of the wing (see illustration).


8. Unscrew the bolts 4 behind the shock absorber strut (see illustration).
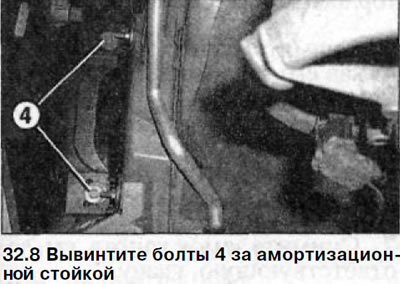


8. Unscrew the bolts 4 behind the shock absorber strut (see illustration).


9. Unscrew the upper bolts 5 that secure the rear part of the wing (see illustration).

9. Unscrew the upper bolts 5 that secure the rear part of the wing (see illustration).


10. Unscrew the upper bolts 6 (see illustration).
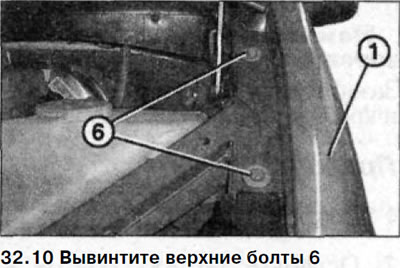
10. Unscrew the upper bolts 6 (see illustration).


11. Release wing 1 from the side guide of the headlight, then detach the wing from the side member by lifting it up and remove it (see illustration 32.10). If the wing is being replaced with a new one, remove the trim from the front pillar.


Installation


12. Install the outer trim on the front pillar if the old wing is being replaced with a new one.

13. Secure the wing to the side member and to the side guide of the headlight.

14. Screw the wing on without tightening the mounting bolts.

15. Fit the wing to the adjacent body parts and tighten the mounting bolts.

Nominal clearance values:
  • The gap between the wing and the front door is 5.0±0.5 mm
  • The gap between the wing and the hood is 3.5±0.5 mm

16. Connect the side turn signal repeater plug and secure the repeater to the mounting hole on the fender by inserting the rear part into the hole and then pressing the front part to secure it.

17. Check the condition of the three fastening clips of the triangular cover on the wing and the front pillar. If necessary, replace them with new ones.

18. Insert the fasteners into the holes and secure the cover to the mounting location.

19. Install the front bumper in place, see the relevant chapter.

20. Install the mudguard liner in place, see the relevant chapter.

21. Close the hood.
This article is available at: russian, bulgarian, belarusian, ukrainian, serbian, croatian, romanian, polish, slovak, hungarian
The article has been verified: Lukyanov Nikita Ilyich
Share with friends:
◀ Previous
A-Class W168 / Exterior
Next ▶

Rear wheel arch liners — removal and installation
Front wheel fender liner — removal and installation
Protective bumper pads — removal and installation
Rear bumper — removal and installation
Front bumper — removal and installation
Hood — removal and installation
Hood — fit
Hood Lock Drive Rod — Removal and Installation
Hood lock — removal and installation
Moldings — removal and installation
More similar articles for repairing other models

☛ Removal and installation the front wing Mercedes W203 (2000-2007)
☛ Replacing the front crankshaft oil seal Mercedes W123 (1976-1985)
☛ Removal and installation the front cover Mercedes W463 (1999-2019)
☛ Access to the right front seat storage compartment Mercedes W163 (1997-2005)
☛ Removal and installation the upper front covers Mercedes W140 (1991-1998)
☛ Removal and installation the front wing Mercedes Vito 2 (2003-2014, diesel)
Link in different formats to this article
Comments and feedback from visitors
No comments yet


How much will 12 + 28 ?


W168 (1997-2004) 
  • General information
  • User manual
  • Maintenance
  • Troubleshooting
  • Power unit
  • Engine repair
  • Cooling and heating
  • Injection system (gasoline)
  • Fuel system (diesel)
  • Fuel system
  • Exhaust system
  • Ignition system
  • Transmission
  • Clutch
  • Transmission
  • Chassis
  • Brake system
  • Suspension
  • Steering
  • Body
  • Interior (all models)
  • Interior (since 1997)
  • Interior (since 2001)
  • Exterior
  • Doors and windows
  • Electrical equipment
  • Equipment and devices
  • Power devices
  • Windshield wipers and washers
  • Headlights and lighting
  • Electrical circuits
 
MercedesMan.ru © 2017–2026 · Mobile version · Read about Mercedes · Sitemap: EN BG BY UA RS HR RO PL SK HU · Feedback · Site search · Bookmark A-Class (W168) · C-Class (W201) · C-Class (W202) · C-Class (W203) · E-Class (W123) · E-Class (W124) · E-Class (W210) · G-Class (W463) · M-Class (W163) · S-Class (W116, petrol) · S-Class (W126, petrol) · S-Class (W140) · S-Class (W220) · Sprinter · Vito 1 · Vito 2 · Vario 814D ·
 
We only use cookies without which some of the site's features may not be available.