
Cars BMW Cars Volkswagen Cars Chevrolet Cars Land Rover Cars Lada Cars Honda Cars Peugeot
English Русский
Български
Беларускі
Український
Српски
Hrvatski
Română
Polski
Slovenský
Magyar
Bookmark News and articles Sitemap Feedback Site search
MercedesMan.ru


A-Class C-Class E-Class G-Class M-Class S-Class Others
190 (W201) (1982-1993) W202 (1993-2000) W203 (2000-2007)
  • Main
  • C-Class
  • W203 (2000-2007)
  • Body
  • Exterior (external elements)
  • Removal and installation the bumper

Removal and installation the bumper (Mercedes-Benz C-Class W203)

0
Contents: Removal ↡ Installation ↡

Removal


1. Mark the position of the corresponding front wheel relative to the hub with paint. This will allow the balanced wheel to be installed in its original position during assembly. Loosen the wheel mounting bolts before jacking up the car. Raise the front of the car, place it on stands and remove the front wheel.

2. Raise the front of the vehicle and support it on stands.

Attention! The operation of lifting and installing the car on stands is associated with danger! Therefore, before carrying out the operation, read the Section Jacking and towing Introduction to the manual.


3. Remove the front mudguard, refer to the relevant section.
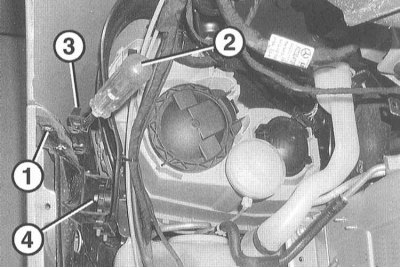
4. Loosen the locking screw (1) between the wing and the bumper. (4) – adjusting screw.


4. Loosen the locking screw (1) between the wing and the bumper. (4) – adjusting screw.

5. Using a screwdriver (2), detach the bracket (3) from the bumper and tilt it towards the center of the car.

6. Pull the bracket back and remove it from the bumper.

7. Remove the outside air temperature sensor, refer to Section Removal and installation the outside air temperature sensor.

8. Disconnect the left and right fog lamp connectors.


9. Disconnect the parking assist connector if equipped.
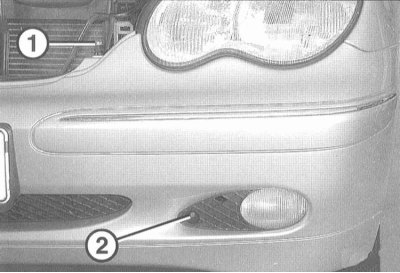
10. Remove the 2 mounting screws (2) on the right and left of the fog lights.


10. Remove the 2 mounting screws (2) on the right and left of the fog lights.

11. Open the hood and remove the 2 screws (1) on the right and left of the headlights.

12. Remove the bumper from the car with the help of an assistant.

Installation


1. Install the bumper in place with the help of an assistant.

2. If necessary, adjust the gap using the screw (4). The gap value is given in the Specifications.

3. Secure the bumper with 4 screws to a torque of 4 Nm.

4. Insert the bracket between the wing and the bumper so that the bracket clamp fits into the guide on the bumper. Screw in the locking screw.

5. Install the outside air temperature sensor, refer to Section Removal and installation the outside air temperature sensor.

6. Connect the fog light connector.

7. Connect the parking assist connector, if equipped.

8. Install the wing locker, refer to Section Removal and installation the front wing liner.

9. Install the front wheel so that the marks made during removal match. Pre-lubricate the centering belt of the wheel disk on the hub with a thin layer of bearing grease. Do not lubricate the wheel mounting bolts. Replace rusty bolts. Tighten the bolts. Lower the car onto the wheels and tighten the bolts crosswise to a torque of 110 Nm.


10. Connect the negative (-) cable to the battery with the ignition off. Reinstall the cabin air filter box. Enter the radio code and set the clock.

11. Check the headlight adjustment at a service station as soon as possible and adjust if necessary.
This article is available at: russian, bulgarian, belarusian, ukrainian, serbian, croatian, romanian, polish, slovak, hungarian
The article has been verified: Rodionov Artyom Semyonovich
Share with friends:
◀ Previous
C-Class W203 / Exterior (external elements)
Next ▶

Removal and installation the spoiler grille
Disconnecting the drive cable from the hood lock
Removal and installation the hood lock
Adjusting the hood
Removal and installation the hood trim
Removal and installation the rear bumper
Removal and installation the front wing
Removal and installation the protective strip on the wing
Removal and installation the protective strip on the bumper
Removal and installation the protective strip on the door
More similar articles for repairing other models

☛ Front bumper — removal and installation Mercedes W168 (1997-2004)
☛ Front bumper — removal and installation Mercedes W124 (1984-1995)
☛ Removal and installation the front bumper Mercedes W163 (1997-2005)
☛ Front bumper Mercedes Vito 1 (1996-2003)
Link in different formats to this article
Comments and feedback from visitors
No comments yet


How much will 38 + 33 ?


W203 (2000-2007) 
  • General information
  • Introduction to guide
  • User manual
  • Maintenance
  • Power unit
  • Gasoline engines
  • Diesel engines
  • Cooling system
  • Ventilation and heating
  • Supply system
  • Injection system (gasoline)
  • Injection system (diesel)
  • Exhaust system
  • Ignition and control system
  • Charge and launch systems
  • Transmission
  • Mechanical gearbox
  • Automatic gearbox
  • Clutch and drive shafts
  • Differential
  • Chassis
  • Brake system
  • Car suspension
  • Steering
  • Body
  • Exterior (external elements)
  • Interior (internal elements)
  • Electrical equipment
  • Equipment and devices
  • Lighting system
  • Electrical diagrams (2000)
  • Electrical diagrams (since 2001)
W202 (1993-2000) 
  • General information
  • User manual
  • Driving a car
  • Car care
  • Maintenance
  • Power unit
  • Gasoline engines
  • Diesel engines
  • Lubrication system
  • Cooling system
  • Heating and ventilation
  • Ignition system
  • Fuel system
  • Injection system (gasoline)
  • Injection system (diesel)
  • Exhaust system
  • Transmission
  • Clutch
  • Car gearbox
  • Chassis
  • Suspension, wheels and tires
  • Steering
  • Brake system
  • Body
  • Exterior (external elements)
  • Interior (internal elements)
  • Doors and windows
  • Electrical equipment
  • Equipment and devices
  • Power devices
  • Lighting system
  • Electrical circuits
190 (W201) (1982-1993) 
  • General information
  • Introduction to the guide
  • Operation and care
  • Maintenance (gasoline)
  • Maintenance (diesel)
  • Troubleshooting
  • Power unit
  • Petrol engine I4
  • Petrol engine V6
  • Diesel engines
  • Engine overhaul
  • Cooling and heating
  • Power system (carburetor)
  • Injection system (gasoline)
  • Injection system (diesel)
  • Exhaust system
  • Charge and start system
  • Ignition system (I4)
  • Ignition system (V6)
  • Diesel heating system
  • Transmission
  • Clutch
  • Mechanical gearbox
  • Automatic gearbox
  • Cardan shaft and axle shafts
  • Chassis
  • Brake system
  • Car suspension
  • Steering
  • Body
  • Exterior (external elements)
  • Interior (internal elements)
  • Doors, locks and windows
  • Electrical equipment
  • Equipment and devices
  • Electrical circuits
 
MercedesMan.ru © 2017–2026 · Mobile version · Read about Mercedes · Sitemap: EN BG BY UA RS HR RO PL SK HU · Feedback · Site search · Bookmark A-Class (W168) · C-Class (W201) · C-Class (W202) · C-Class (W203) · E-Class (W123) · E-Class (W124) · E-Class (W210) · G-Class (W463) · M-Class (W163) · S-Class (W116, petrol) · S-Class (W126, petrol) · S-Class (W140) · S-Class (W220) · Sprinter · Vito 1 · Vito 2 · Vario 814D ·
 
We only use cookies without which some of the site's features may not be available.