



Contents: Repairing damage from rock strikes ↡ Elimination of body…↡ Elimination of body deformations ↡ Preparation for varnishing ↡ Rust removal ↡ Application of a…↡ Putty ↡ Grinding ↡ Cleaning ↡ The varnishing process ↡
Straightening and varnishing work on a car body requires knowledge of the material and its processing. Such knowledge is acquired over many years of practice. Therefore, information is provided here on eliminating only minor faults in the body and varnish coating.
For re-varnishing, the same paintwork is required, since the slightest differences in painting immediately catch the eye after the work is completed. The corresponding paint tone is indicated by the manufacturer on the nameplate, as the varnish number. The nameplate is located in the engine compartment on the front wall.
If there is a difference between the original varnish and the repair varnish, this is due to the change in the color of the varnish during the operation of the car as a result of ageing, ultraviolet solar radiation, extreme temperature fluctuations, weather conditions and chemical influences, such as industrial emissions. In addition, damage to the surface of the varnish, its change in color and fading occur if the care and cleaning of the varnish coating were not carried out with suitable means.
Metallized varnish coating consists of two layers, a base varnish - metallic and a colorless top varnish. During the varnishing process, the colorless varnish is applied on top of the wet base varnish. The risk of color difference when re-applying a metallized varnish coating is especially high, since here the difference in color is caused by the different viscosity of the repair varnish compared to the brand varnish.
Repairing damage from rock strikes
To avoid major repairs caused by rust, minor damage to the paintwork should be repaired regularly.
To remove small scratches and stone impact marks that only damage the top coat and do not penetrate to the tin, generally, it is sufficient to use a varnish pencil. Along with it, varnish in tubes with a brush also helps, and there is also a self-adhesive varnish film on sale, in the event that the damage is very minor or affects only the primer.
Deeper stone chip damage, where rust has already formed, is cleaned with rust removers, a knife or a small screwdriver until clean tin appears. It is very important that no small rust spots remain. Rust removers are small plastic sleeves equipped with a short wire brush for scraping out rust.
The cleaned areas must be thoroughly dried and degreased. To do this, clean the repair area and the surrounding varnish with a silicone remover.
Apply a small amount of varnish primer ("Primer") to the cleaned metal surface with a thin brush. Since the primer is usually sold in an aerosol can, apply a small amount of primer to the lid of the can and dip the brush into it.
After the primer has dried, coat the repair area with varnish from a can of tampon varnish. These types of cans have a brush built into the lid. If you only have one aerosol can of the appropriate paint, spray a little paint onto the lid and then apply a thin layer of varnish with a brush. Always apply only a thin layer of varnish so that it does not spread. Finally, let the paint dry thoroughly. Continue varnishing until the depression is filled with varnish and is no longer visible at the level of the surrounding varnished surface.
Elimination of body deformation/removal of corrosion pits
Small pits can be repaired with a straightening hammer and a suitable hand anvil. In case of pits in the bodywork from rust, it is recommended to replace the damaged part as a whole, depending on the extent of the damage, or weld sheet steel.
Elimination of body deformations
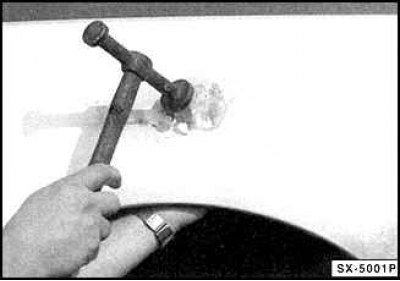
Small depressions are straightened with a straightening hammer. At the same time, hold a hand anvil on the other side of the depression. Do not hit the anvil with the hammer too hard, otherwise the tin will bend and will not be smooth. Work starting from the edge to the middle.
Periodically control the leveled surface with your hand until it acquires the desired shape. Fill small surfaces later.
After leveling, carefully remove any remaining rust and old varnish from the repair area using coarse sandpaper (120) stretched over a grinding wheel, or polish with a cloth wheel. Cover nearby decorative films or plastic parts with adhesive tape so that they are not accidentally scratched during polishing.
Preparation for varnishing
Wash the car before varnishing.
Varnishing should be carried out only at temperatures above +12°C, avoiding direct sunlight and wind.
Rust removal
Cover the repair area with adhesive tape to avoid accidentally damaging the adjacent varnish.
Use a triangular file or screwdriver and 120-grit sandpaper to remove visible rust and rust hidden by bubbles.
Using 320 grit sandpaper, sand the area around the damage in advance, approximately 1–2 cm wide, until the varnish is healthy.
Whenever possible, sand galvanized surfaces of the body only to the primer, and not to the galvanized surface.
Application of a corrosion-protective primer (Primer)
Wipe the repair area with nitro thinner and remove grease and dust with a clean cloth, let dry.
To avoid further problems, the Primer and the topcoat applied to it must be of the same manufacture. Otherwise, the topcoat may bubble or shrink later.
Article text obtained from the website: MercedesMAN
"Primer" is sprayed onto the sheet metal, cleaned of rust, from a distance of 25 cm. To prevent the smallest splashes of aerosol from falling on adjacent parts, cover the surface around the repair site with paper and adhesive tape.
After 10-15 minutes, you can repeat the spraying. If you need to putty after spraying, you should let the Primer dry.
Putty
There are two types of putty: two-component putty and thin putty. Two-component putty is mixed with a hardener shortly before processing. It causes the putty to harden quickly, which can be processed shortly after. This putty is used to level out larger unevenness in the body. Thin putty is decorative, smoothing out small unevenness. It can be applied in several layers. Both types of putty are available in tubes and cans, and filler putties are also available in aerosol packaging.
Attention! Although the can states that the putty can be applied directly to the cleaned tin, we recommend pre-treating the tin with "Primer" just in case (corrosion protection).
Apply two-part filler to the straightened or fiberglassed repair area and allow it to cure. Follow the filler manufacturer's instructions.
After drying, sand the uneven areas by hand or with a superfinishing head. Sandpaper No.180 should be used. Wet sanding paper can be used. In this case, moisten the repair area with a wet sponge and pour a sufficient amount of water on the sandpaper from time to time during the sanding process.
Finally, thoroughly clean the repair area and let it dry.
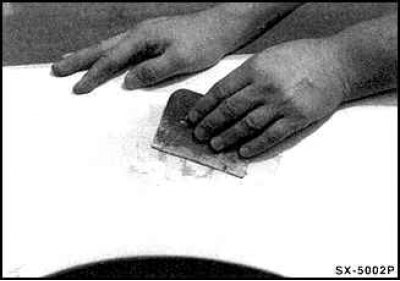
Apply thin filler to the repair area using a wide, flexible plastic spatula and allow it to dry for at least two hours. In areas of repair on curves and contours, it is recommended to use thin filler in an aerosol can.
Depending on the thickness of the layer, thin putty should dry for 2-3 hours.
Grinding
Sanding paper of different grain sizes is available for sale. The lower its number, the rougher the sanding. For sanding two-component putty, grain sizes from No.180 to 240 are recommended; the filler putty and old varnish are sanded with 360 grit sandpaper with dampening. For the final wet sanding before varnishing, 600 grit sandpaper is recommended.
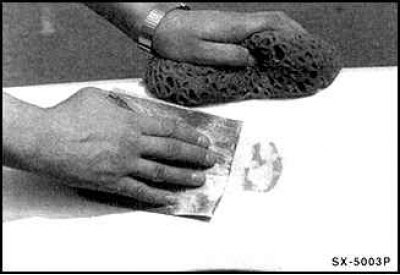
Sand the prepared putty area with wet paper No.360, constantly squeezing the wet sponge over the recommended area. Dip the sponge in clean water from time to time and let it soak completely with water.
For subsequent wet final sanding, special wet sanding paper No.600 is best suited; it can also be used to sand off the border varnish and varnish splashes. The microscopic scratches left on the top varnish are barely noticeable.
Cleaning
Before applying the varnish coating, you need to clean the sanding surface and the adjacent varnish surface from grease and silicone residues, about two palms wide. Silicone remover is best suited for this.
After sanding, thoroughly clean the repair area and cover all adjacent surfaces with newspaper and adhesive tape. When varnishing the fenders, carefully cover the tires and shock absorber.
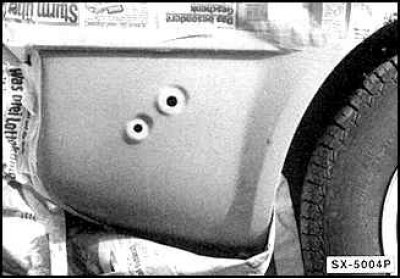
If possible, always cover the repair area so that the sprayed surface reaches the nearest decorative strip or the edge of the body, since paint always flows at the edge of the paint. If a relatively smooth transition to the brand varnish is impossible, then cover at a distance of approximately two palms' width from the repair area.
To prevent dust from settling, spray the floor with water.
The varnishing process
To avoid problems during the varnishing process, the pre-applied Primer should be made by the same company as the aerosol varnish. In this case, the varnish will not form bubbles and shrink.
Attention! We recommend that you practice applying the varnish first, for example, on an old wing.
The surface to be varnished must be dry and free of dust. If possible, blow it with compressed air.
Wet the floor with water to prevent dust from forming.
Wipe the repair area and the surrounding area with silicone remover. An even better base for the topcoat is created by wiping with a polishing paste that removes silicone.
Before use, shake the aerosol can vigorously for at least 3-5 minutes, otherwise the varnish will drip onto the surface.
When applying metallic varnish, apply a small amount of spray paint to some cardboard to remove any metal particles that may settle on the lift tube.
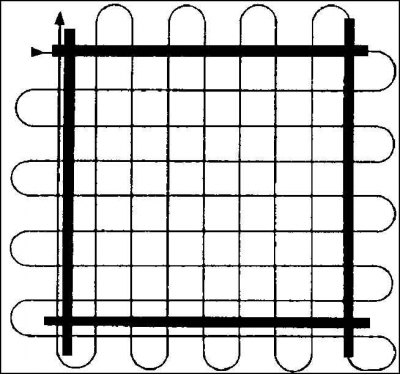
Large vertical and horizontal surfaces are sprayed with varnish in a "cross" pattern: spraying begins outside the surface and continues moving the stream in the other direction, also starting from the outside.
Small surfaces are sprayed in a spiral pattern from the outside in to avoid overspray.
Move the aerosol can at a uniform speed and distance (about 25 cm) from the surface.
To ensure the most unnoticeable transition to a healthy varnish, it is necessary to apply it in at least four overlapping spraying strokes. Each separate application should increase the surface of the previous applied layer by 2-3 centimeters.
Attention! If spraying is done too close, the spraying movement is too slow or occurs at variable speed, so-called varnish runs occur. This means that in some places the varnish flows down, because too much of it is sprayed on the same place. The same thing happens if, when changing direction during spraying, the sprayer does not pass through a closed surface.
Repeat the spraying process with 5-minute pauses to evaporate the solvent until there is sufficient varnish coating. Between individual spraying strokes, especially for "Metallic", shake the aerosol can, as the "Metallic" particles quickly settle.
Attention! For Metallic varnish it is very difficult to achieve a color match with the brand varnish. Pigmentation (distribution of aluminum particles) will be more uniform if the last spraying process occurs from a distance of 30 cm instead of 25 cm. Slow movement of the sprayer gives a more saturated color, and fast spraying gives a lighter tone.
For the "Metallic" varnish coating, a "Metallic" base varnish with a transparent varnish coating is provided, only after this the "Metallic" varnish acquires its shine. Spraying occurs 3-4 times, and each time you should pause for a few minutes. Before the first application, the base varnish should stand open for at least 30 minutes. Transparent (transparent) the varnish should overlap the new base varnish by about the width of a palm, before this, lengthen the protective paper accordingly.
Empty the aerosol can by placing the can on the head and spraying paint until there is none left.
After finishing varnishing work, immediately remove all protective coatings.
Allow the varnished surface to dry. Drying can be accelerated by using a strong photo or reflector lamp.
Caution! Do not use a fan, as this may result in swirling dust particles settling on the fresh varnish.
After the paint has hardened, at least 48 hours later, carefully remove the spray mist on adjacent surfaces with a soft polish and a cotton swab. Polish only in the longitudinal direction of the car.