
Removing
1. Raise the hood and place a thin sheet of metal (approximately 300 mm area) behind the bulkhead of the engine compartment to protect the insulation of the bulkhead during subsequent work.
2. Apply the parking brake and raise the front of the vehicle and support it on jack stands (see "Vehicle lifting and jacking up").
3. Release the parts of the exhaust system from the supports at the rear (talk to Chapter 4), then support the parts of the system with a wire or rope about 500 mm lower than the normal position.
4. On models equipped with an auxiliary heater, be careful not to damage the cooling hose at the rear of the engine compartment during the following steps.
5. Move the shift lever to the position "N".
6. Working from below under the car remove a metal clamp and disconnect the shift lever from draft.
7. Turn away a bolt of a basic arm of system of release of gases from a transmission and system. Remove bracket.
8. Position a wheel jack with an intermediate piece of wood under the rear powertrain support bracket and raise the jack to support the transmission.
9. Turn away an arm of fastening of the power unit from the bottom of the car.
10. Carefully lower the jack while lowering the rear of the transmission so that the starter interlock switch/reverse light switch can be reached. Be careful not to damage the parts at the rear in the engine compartment.
11. Release the speedometer cable clamp on the gearbox.
12. Rotate the latch up, then disconnect the connector from the switch.
13. Turn away two screws of fastening and take out the switch from a transmission.
Installation and adjustment
14. Install the switch on the transmission, making sure that the pin on the switch is aligned with the hole on the shift lever (see fig. 5.14). Check that the shift lever is in position "N" (the position is marked on the gearbox housing).
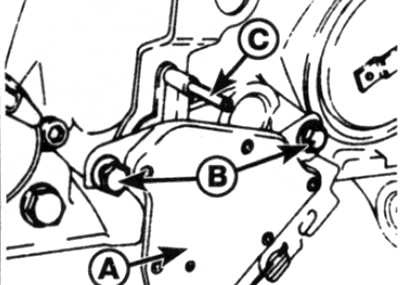
Pic. 5.14. Starter Interlock Switch / Reversing Light Switch Adjustment
15. Insert a 4.0 mm drill bit or rod through the shift lever and guide the pin to align with the mounting hole in the switch body.
16. Tighten the switch mounting screws, then remove the drill or rod.
17. Connect the switch connector and secure it with the retainer.
18. Raise the jack and tighten the bolts of the rear bracket of the power unit support to the bottom of the car.
19. Establish an arm of fastening of system of release of gases.
20. Connect the speedometer cable.
21. Connect draft of the lever of switching to the lever and fix it with a clamp.
22. Connect the exhaust system to the rear bracket.
23. Lower the vehicle to the ground and remove the metal shield from the engine compartment.