
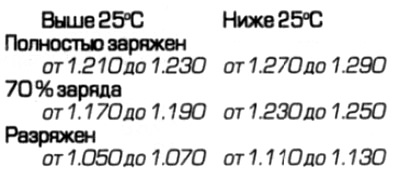
1. If the car has a low annual mileage, it is enough to check the density of the electrolyte every three months to determine the state of charge of the battery. Check the density with a hydrometer and compare the results with the following table. Keep in mind that the density values determined by the hydrometer are correct at an electrolyte temperature of 15°C; for every 10°C below 15°C subtract 0.007. For every 10°C above 15°C add 0.007.
2. If the condition of the battery is suspicious, first check the density of the electrolyte in each section. A difference of 0.040 or more between any sections indicates loss of electrolyte or destruction of the internal plates.
3. If the density difference is 0.040 or more, the battery must be replaced. If the difference between the sections is within the normal range, but the battery is discharged, it must be charged. as indicated below in this paragraph.
Maintenance free battery monitoring
4. If a maintenance-free battery is installed on the vehicle, checking the density of the electrolyte in the sections is not possible. The condition of the battery in this case can only be checked with a voltmeter or a battery status indicator.
5. Some models have a maintenance-free battery with a built-in charge indicator. The indicator is located on top of the battery case, and the charge of the latter can be determined by the color of the indicator. If the indicator is green, the battery is well charged. If the indicator darkens, in some cases to black, this means that the battery needs to be charged (described in this paragraph below). If the indicator turns solid yellow, the electrolyte level is below the acceptable limit and the battery needs to be replaced. Do not attempt to charge, top up, or start the engine with another battery while the battery indicator is amber.
6. When testing a battery using a voltmeter, connect a voltmeter to the battery terminals and compare the result with the voltages listed in section "Technical data" under the heading "Degree of charge". The test results will only be accurate if the battery has not been charged within the previous six hours. If this is not the case, turn on the headlights for 30 seconds, then wait four to five minutes, after which you can perform a battery test. At the same time, all electrical consumers must be turned off, in particular, check that the saloon and trunk doors are properly closed.
7. If the voltage shown by the voltmeter is lower than 12.2V, then the battery is discharged, the voltage in the range of 12.2 to 12.4V indicates a partially discharged condition.
8. To charge the battery, remove it from the vehicle (paragraph 3) and charge as described later in this paragraph.
Charging conventional and low-maintenance batteries
Note: The steps below should be considered as a general guide only, before charging, please read the manufacturer's instructions (usually included with the battery) and follow its recommendations, even if they differ from those described in this book.
9. Charge the battery with a current of 3.5-4 amperes until the density of the electrolyte stops increasing within four hours.
10. Alternatively, you can leave the battery on a continuous recharge with a current of 1.5 amperes all night - this is completely safe for the battery.
11. Too fast, forced charging, which allows you to restore battery capacity in 1-2 hours, is not recommended, as it can cause serious damage to the battery plates due to overheating.
12. When charging the battery, make sure that the temperature of the electrolyte never exceeds 40°C.
Charging a maintenance-free battery
Note: The steps below should be considered as a general guide only: read the manufacturer's instructions before charging (usually included with the battery) and follow its recommendations, even if they differ from those described in this book.
13. This type of battery takes significantly longer to fully charge than the standard type. The real time depends on the degree of discharge and can be up to three days.
14. Charging requires constant voltage charger. After connecting, it should be set to a voltage of 13.9 to 14.9 V with a charging current of up to 25 amperes. In this way, the battery can be brought to a working state for three hours, bringing its output voltage to 12.5 V, but this is only a partially charged state. A full charge, as mentioned above, may take significantly longer.
15. If the battery needs to be charged from a fully discharged state (from terminal voltage below 12.2 V), it is recommended to entrust this work to a battery specialist, since in this case the charge is carried out at a high current and the battery must be constantly monitored.