



2. Remove the brake fluid reservoir (4)g without disconnecting it from the master cylinder.
3. Remove the vacuum from the vacuum system; to do this, with the engine off, press the brake pedal several times.
4. Remove the master cylinder.
5. Disconnect the pressure pipes from the master cylinder. When installing, tighten to a torque of 14 Nm.
6. Remove the left panel under the instrument panel.
7. Remove the brake pedal return spring.
8. Remove the cotter pin (8) and the master cylinder fork shaft (9).
9. Unscrew the self-locking nuts (indicated by arrows in the figure) from the brake booster (6). When assembling, tighten the nuts to a torque of 20 Nm.
10. Disconnect the vacuum tube (3) from the vacuum booster (6).
11 Remove the vacuum booster (6) through the engine compartment.
12. Installation is carried out in reverse order. After installation, adjust the brake light switch rod (10).
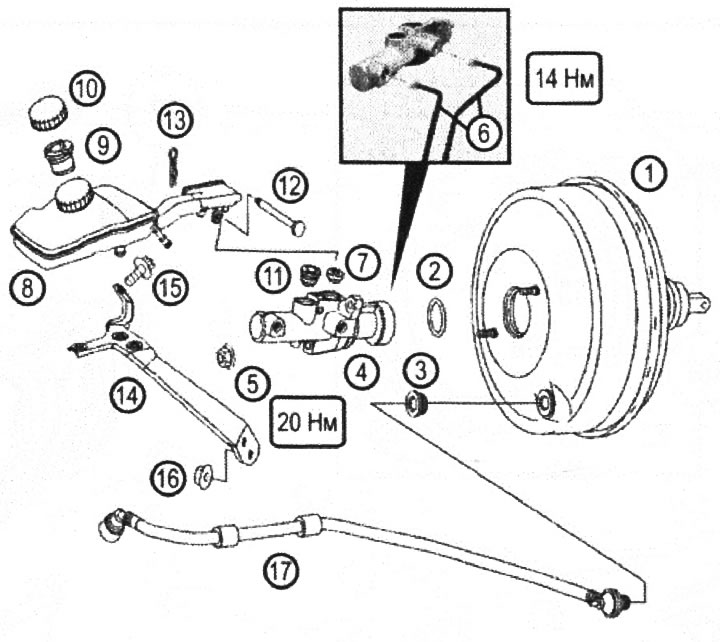
VN 7.005 1. Brake booster; 2. Sealing ring; 3. Sealing ring; 4. GTZ; 5. Nut for fastening the brake master cylinder to the brake booster; 6. Pressure tubes of the GTZ; 7. Sealing ring; 8. Expansion tank; 9. Filter; 10. Expansion tank cap; 11. Sealing ring; 12. Finger; 13. Finger retainer; 14. Bracket; 16, Screw; 16. Nut; 17. Vacuum tube
[Material created based on the website: MercedesMan.ru]
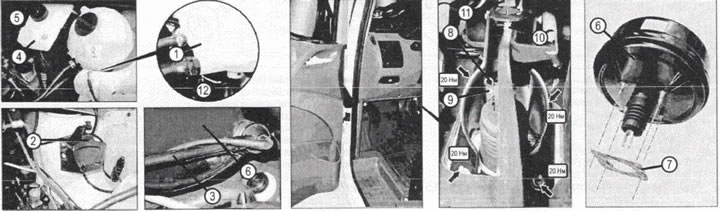
VN 7.006 1. Tank; 2. Bracket; 3. Vacuum tube; 4. Expansion tank; 5. Expansion tank cap; 6. Brake booster; 7. Gasket; 8. Cotter pin; 9. Pedal mounting bolt; 10. Brake light switch rod; 11. Brake light connector (S9/1); 12. Cooling system sensor connector (S41)