



Contents: Rules for using the remote…↡ Monitoring the battery charge level ↡ Replacing the remote control…↡ Single Lock Sync ↡
Main remote control for single lock with folding key (2 pcs)
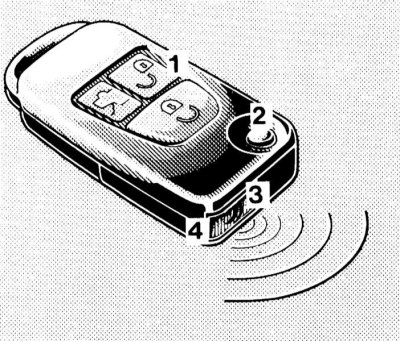
1 - Remote control buttons
2 - Folding key release button
3 - Infrared emitter
4 — Power supply control LED
The spare remote control is equipped with a retractable key
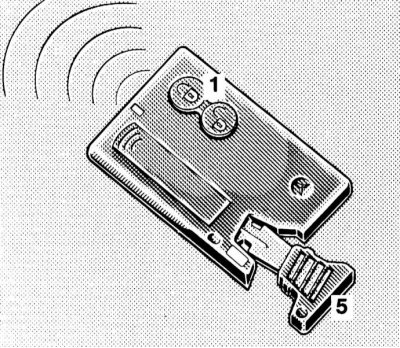
1 - Remote control buttons
2 - Retractable key
All models discussed in this Manual are equipped as standard with a single remote-controlled lock.
When purchasing a car, the owner is provided with two main remote controls (RC) equipped with folding keys and one spare remote control with a retractable key. The key included with the remote control fits all locks used on the car.
The remote control (RC) allows you to activate locks/emergency alarms from a distance of up to 10 meters (depending on local conditions).
If you lose the remote control, you should recode the single lock at a Mercedes-Benz service station - you can also order a spare remote control there.
Remote control failures may be caused by the following reasons:
- a) The key is in the ignition switch;
- b) The battery level of the remote control has dropped;
- c) The distance between the remote control and the car exceeds 10 meters;
- d) The synchronization of the single lock system is broken.
Caution: Observe the following precautions when handling remote controls:
- a) Do not allow the remote control to get wet!
- b) Do not drop or shake the remote control!
- c) Do not expose the remote control to direct sunlight or heat above 60°C for a long time!
It is also possible to control the operation of the lock actuators using a key switch mounted in the front section of the central console (see Vehicle equipment, arrangement of instruments and controls).
Automatic simultaneous locking of all car doors occurs when the car's speed reaches a certain value - unlocking any of the car's doors from the inside will lead to the unlocking of the others.
Caution! If the doors are unlocked after the locks have been activated while driving using the central lock switch on the center console, the locks will remain open even after the vehicle is driven again.
Attention! Automatic door locking occurs when the left front wheel is turned when the ignition key is turned to position 2, which should be taken into account in order not to be left outside when pushing a stuck car!
The automatic door locking feature can be turned off while driving by holding down the lower portion of the console single lock switch for approximately 5 seconds (see Vehicle equipment, arrangement of instruments and controls) with the ignition key turned to position 2.
The creators of the single lock have provided a function for automatic unlocking of door locks in the event of an emergency collision with an excess of a specified overload level.
Rules for using the remote control/keys
Controlling the operation of lock actuators
The remote control allows simultaneous unlocking/locking of all doors, the trunk lid and the hatch lid.
The design of the remote control allows you to turn on/off the driver's door opening function. To activate the function, press the buttons simultaneously
 and
and  and hold them down for about 5 seconds - the control LED should flash twice to confirm that the function is enabled. The function is deactivated in a similar manner.
When the driver's door unlocking function is turned off, pressing the button once
 causes the activation of the unlocking actuators of all doors, the trunk lid and the fuel filler flap, accompanied by a single flashing of the direction indicators.
The locks are locked by pressing the button once and are accompanied by three turns of the direction indicators.
Caution! If any of the vehicle doors is opened from the inside after locking with the remote control, the other locks will remain locked.
When the driver's door unlocking function is enabled, press the button once
 causes the driver's door and fuel filler flap to unlock. Pressing the button twice unlocks all doors, the boot lid and the fuel filler flap, while simultaneously flashing the direction indicators once.
Attention! If after unlocking the locks none of the car doors are opened, they will automatically lock after approximately 40 seconds.
Using the button
 the luggage compartment lid can be unlocked individually - the indicator LED built into the remote release switch for the luggage compartment lid lock should light up (see Vehicle equipment, arrangement of instruments and controls).
Attention! After releasing the latch, the luggage compartment lid will swing upwards, so make sure there is adequate free space!
Burying door glass and hatch cover
Attention! The glass and sunroof drive can only be controlled from the main remote controls.
The design of the remote control allows you to close the door windows and the top hatch cover that are left open.
Point the remote control emitter at the handle of one of the front doors of the car and press the button on the remote control. After holding the button
 pressed for about 2 seconds, the drive for the lowered windows/open sunroof is activated.
Attention! The range of the remote control in this mode is significantly less than the standard 10 m for safety reasons.
Attention! In case of danger of pinching the hands of passengers remaining in the car by the glass or sunroof cover, immediately release the remote control button, if necessary, press the button to lower the glass/open the sunroof - the opening process will begin only if the corresponding element has not been fully opened.
Monitoring the battery charge level
The status of the power elements is controlled by pressing any of the buttons
 and
and  remote control and holding it down for more than 1 second - a short-term activation of the LED built into the remote control confirms that the batteries are in good condition. If the LED does not light up, you should immediately replace the batteries in the remote control.
Replacing the remote control batteries
Please note: Replacement batteries for remote controls are always available at Mercedes-Benz service stations.
Main control panel
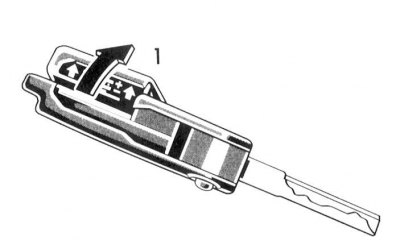
To replace the batteries of the main remote control, open the key built into it, then press up the access cover on the rear panel.
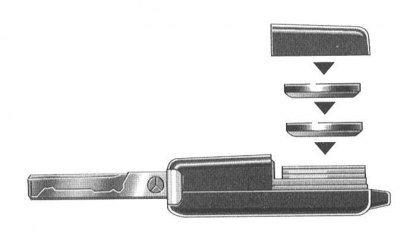
Install the replacement batteries with the positive pole facing up, then snap the cover securely into place and remove the key.
Spare remote control
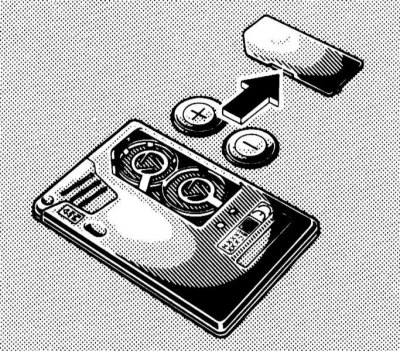
Push aside the access cover on the back of the remote control. Remove the used batteries and install replacement batteries in their place.
Single Lock Sync
If the lock actuators do not operate from the remote control, you must synchronize the system. Point the remote control at the car and briefly press any of the buttons twice
 and
and  . Within the next 30 seconds, insert the key into the ignition switch and turn it to position 2.