
Removing
1. Mark with paint the position of the front wheel relative to the hub. This will allow the assembly to install the balanced wheel in its original position. Loosen the wheel bolts before jacking up the vehicle. Raise the front of the car, put it on stands and remove the front wheel.
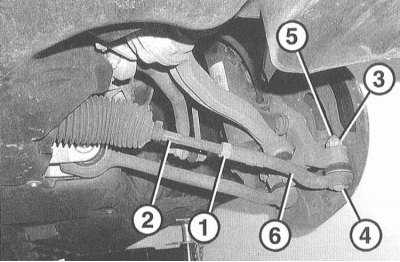
2. Loosen the locknut (1) inner tie rod. At the same time, keep the steering rod from turning by the hexagon (2).
3. Loosen the self-locking nut (3) ball joint tie rod (4), holding the hinge pin from turning (5) socket wrench for an internal hexagon. Turn the nut to the end of the thread, it serves as a support for the puller and protects the thread from damage.
4. Remove the tie rod joint using a puller mounted on the steering knuckle. Loosen the nut.
5. Mark the position of the tie rod end (6) in relation to the inner tie rod. To do this, apply strokes on adjacent parts with a felt-tip pen.
6. Unscrew the tip from the inner link.
Note. For ease of reassembly, count and record the number of revolutions.
Installation
1. Screw the tip onto the inner tie rod in accordance with the recorded number of revolutions.
2. Align the tip on the inner tie rod in accordance with the marked marks and tighten the lock nut to 60 Nm. At the same time, hold the tip by the flats with a wrench. When tightening, be careful not to twist the protective cover.
3. Clean the cone on the ball joint.
4. Install the hinge on the steering knuckle and secure with a self-locking nut to a torque of 55Nm.
5. Reinstall the front wheel so that the marks made during removal match. Pre-lubricate with a thin layer of bearing grease the centering belt of the wheel disk on the hub. Do not grease wheel bolts. Replace rusty bolts. Wrap bolts. Lower the car onto the wheels and tighten the bolts crosswise to 110Nm.
6. Check the installation of the front wheels at the service station, adjust if necessary.