
Cars BMW Cars Volkswagen Cars Chevrolet Cars Land Rover Cars Lada Cars Honda Cars Peugeot
English Русский
Български
Беларускі
Український
Српски
Hrvatski
Română
Polski
Slovenský
Magyar
Bookmark News and articles Sitemap Feedback Site search
MercedesMan.ru


A-Class C-Class E-Class G-Class M-Class S-Class Others
190 (W201) (1982-1993) W202 (1993-2000) W203 (2000-2007)
  • Main
  • C-Class
  • W202 (1993-2000)
  • Chassis
  • Steering
  • Steering linkage — removal, inspection and installation

Steering linkage — removal, inspection and installation (Mercedes-Benz C-Class W202)

0
Contents: Removal ↡ Examination ↡ Installation ↡
The steering rod and steering linkage arms are connected to each other using ball joints and cannot be disassembled.

Removal


1. Mark the position of the front wheels in relation to the hub with paint. This will allow the removed wheel to be put back in the same position it was in before. Loosen the wheel bolts with the car on the ground, then place it on stands, unscrew the bolts completely and remove the front wheels.
1. Mark the position of the front wheels in relation to the hub with paint. This will allow the…


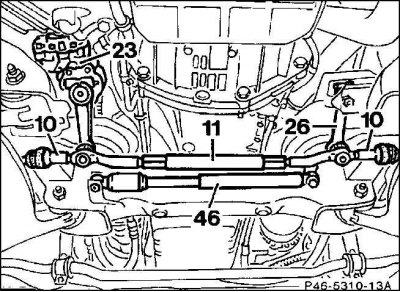
2. Unscrew the steering shock absorber (46) from the steering rod (11). Unscrew the fastening nuts of the pendulum arm joints (26) from the steering knuckle (23) and on the steering knuckles. In doing so, hold the joint journals with a size 5 Allen key.
2. Unscrew the steering shock absorber (46) from the steering rod (11). Unscrew the fastening nuts…


Information copied from the website MERCEDESMAN


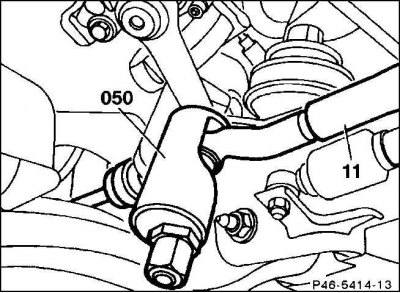
3. Remove the steering linkage joints using puller 050 or HAZET 779.

Caution! Do not damage the rubber cuffs.


Examination


1. Move the joints by the trunnions. If the movement is too easy or there is play, replace the steering linkage arm tip.

Attention! The left trapezoid joint is intended for turning only (does not bend).


2. Check the anthers for damage and leaks (the lubricant contained within them protrudes out). If the dust boots are damaged, replace the rod end and, accordingly, the rod, since dirt that gets inside will disable the joint in a short time.

Attention! If the cuff is damaged only during removal, it is sufficient to replace the cuff.


Installation


1. Clean the grease from the pivot pins of the trapezoid joints, as well as the seats in the control levers.

2. Insert the pivot pins tightly into the cones of the corresponding levers.

3. Fit new self-locking nuts, holding the trunnion with an Allen key, and tighten the nuts to 50 Nm.

4. Screw the steering shock absorber using a new self-locking nut, tightening it to a torque of 35 Nm to the steering rod.

5. Position the front wheels so that the markings match when removed. Screw the wheels on. Remove the vehicle from the stands and tighten the wheel mounting bolts to 110 N·m in a cross pattern.

6. Check the alignment.

Caution: For safety, before starting your ride, double check that all tie rod pivots have new self-locking nuts and are tightened to the correct torque.
This article is available at: russian, bulgarian, belarusian, ukrainian, serbian, croatian, romanian, polish, slovak, hungarian
The article has been verified: Khromov Roman Mikhailovich
Share with friends:
◀ Previous
C-Class W202 / Steering
Next ▶

Steering wheel — removal and installation
Steering wheel airbag unit
Design and description of steering
Steering linkage joint cuffs — removal and installation
Power steering pump — removal and installation
Installing camber-wheel convergence
Power steering — easy and effortless
Maintenance of the steering system
More similar articles for repairing other models

☛ Adjusting the position of the steering wheel Mercedes W168 (1997-2004)
☛ Removal, disassembly and installation of the steering knuckle Mercedes W123 (1976-1985)
☛ Checking the condition of suspension and steering components Mercedes W463 (1999-2019)
☛ Checking the condition of suspension and steering components Mercedes W163 (1997-2005)
☛ Checking the condition of suspension and steering components Mercedes W140 (1991-1998)
☛ Checking the Power Steering Fluid Level Mercedes Sprinter (1995-2000, diesel)
Link in different formats to this article
Comments and feedback from visitors
No comments yet


How much will 37 + 49 ?


W203 (2000-2007) 
  • General information
  • Introduction to guide
  • User manual
  • Maintenance
  • Power unit
  • Gasoline engines
  • Diesel engines
  • Cooling system
  • Ventilation and heating
  • Supply system
  • Injection system (gasoline)
  • Injection system (diesel)
  • Exhaust system
  • Ignition and control system
  • Charge and launch systems
  • Transmission
  • Mechanical gearbox
  • Automatic gearbox
  • Clutch and drive shafts
  • Differential
  • Chassis
  • Brake system
  • Car suspension
  • Steering
  • Body
  • Exterior (external elements)
  • Interior (internal elements)
  • Electrical equipment
  • Equipment and devices
  • Lighting system
  • Electrical diagrams (2000)
  • Electrical diagrams (since 2001)
W202 (1993-2000) 
  • General information
  • User manual
  • Driving a car
  • Car care
  • Maintenance
  • Power unit
  • Gasoline engines
  • Diesel engines
  • Lubrication system
  • Cooling system
  • Heating and ventilation
  • Ignition system
  • Fuel system
  • Injection system (gasoline)
  • Injection system (diesel)
  • Exhaust system
  • Transmission
  • Clutch
  • Car gearbox
  • Chassis
  • Suspension, wheels and tires
  • Steering
  • Brake system
  • Body
  • Exterior (external elements)
  • Interior (internal elements)
  • Doors and windows
  • Electrical equipment
  • Equipment and devices
  • Power devices
  • Lighting system
  • Electrical circuits
190 (W201) (1982-1993) 
  • General information
  • Introduction to the guide
  • Operation and care
  • Maintenance (gasoline)
  • Maintenance (diesel)
  • Troubleshooting
  • Power unit
  • Petrol engine I4
  • Petrol engine V6
  • Diesel engines
  • Engine overhaul
  • Cooling and heating
  • Power system (carburetor)
  • Injection system (gasoline)
  • Injection system (diesel)
  • Exhaust system
  • Charge and start system
  • Ignition system (I4)
  • Ignition system (V6)
  • Diesel heating system
  • Transmission
  • Clutch
  • Mechanical gearbox
  • Automatic gearbox
  • Cardan shaft and axle shafts
  • Chassis
  • Brake system
  • Car suspension
  • Steering
  • Body
  • Exterior (external elements)
  • Interior (internal elements)
  • Doors, locks and windows
  • Electrical equipment
  • Equipment and devices
  • Electrical circuits
 
MercedesMan.ru © 2017–2026 · Mobile version · Read about Mercedes · Sitemap: EN BG BY UA RS HR RO PL SK HU · Feedback · Site search · Bookmark A-Class (W168) · C-Class (W201) · C-Class (W202) · C-Class (W203) · E-Class (W123) · E-Class (W124) · E-Class (W210) · G-Class (W463) · M-Class (W163) · S-Class (W116, petrol) · S-Class (W126, petrol) · S-Class (W140) · S-Class (W220) · Sprinter · Vito 1 · Vito 2 · Vario 814D ·
 
We only use cookies without which some of the site's features may not be available.