
Removing
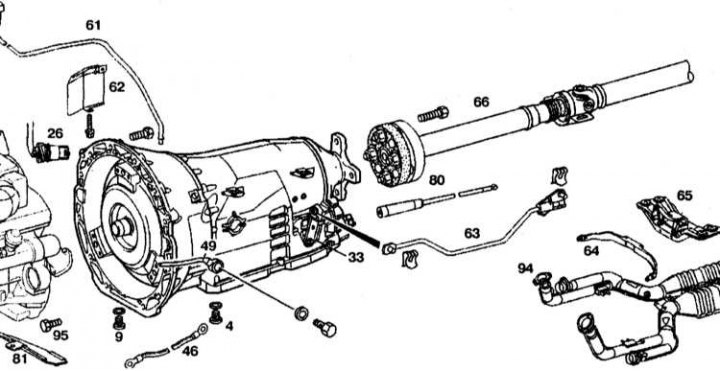
Details of the AT assembly installation with a torque converter
4 - Drain plug of the pallet; 9 - Drain plug of the torque converter; 26 - Wiring connector; 33 - Gearshift lever; 46 - Ground bus on «mass»; 49 - Oil pipeline; 61 - Oil filler tube; 62 - Shield; 63 - Gearshift rod; 64 - Rear exhaust pipe mounting bracket; 65 - Engine bracket with support; 66 - Cardan shaft; 80 - Cable to enable the parking lock; 81 - Torque converter cover; 94 - Exhaust pipe; 95 - Bolt
1. Disconnect the negative cable from the battery.
2. Remove the oil filler tube (61) from the engine.
3. Remove the drain plug (4) from the transmission pan and drain the transmission oil.
4. Remove the drain plug (9) from the torque converter and drain the gear oil.
5. Remove the shield (62) and disconnect the 13-pin connector (26).
6. Disconnect cable (80) activating the parking lock.
7. Turn away bolts (95) securing the torque converter to the drive plate, then remove the torque converter cover (81).
8. Remove the left and right oil lines (49) from the oil cooler.
9. Remove the shift rod (63), by releasing the latch.
10. Remove bracket (64) exhaust pipe fittings.
11. Disconnect the exhaust system (94).
12. Remove fan shroud from radiator (see chapter Cooling, heating systems).
13. Unscrew the engine rear bracket with support (65).
14. Unscrew the cardan shaft (66).
15. Disconnect the connection wire at «mass» (46) from transmission.
16. Turn away bolts of fastening of transmission to the block of cylinders and remove it down at an angle.
17. Remove the torque converter.
Installation
Installation is carried out in the reverse order of removal.