
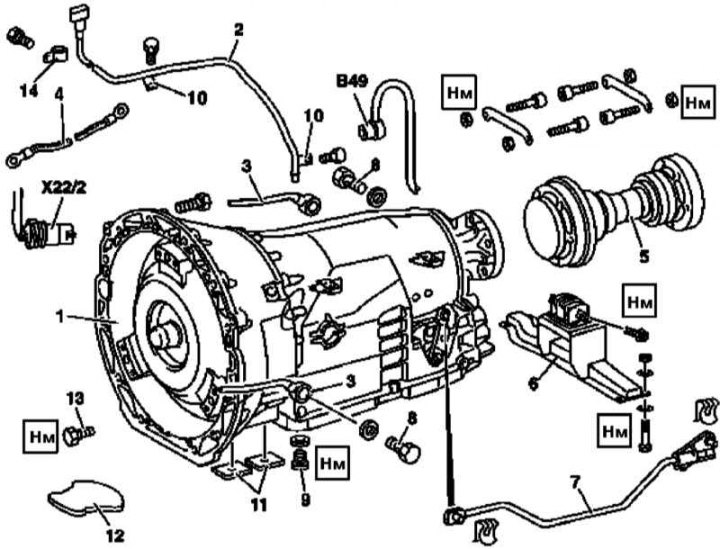
AT installation details
1 - Carter AT; 2 - Filler tube; 3 - Oil pipelines; 4 - Bus ground to ground; 5 - Cardan shaft; 6 - Rear suspension support of the power unit; 7 - Switching rod; 8 - Hollow bolt of the union connection; 9 - Drain plug of the oil pan AT; 10 - Bracket; 11, 12 - Covers; 13 - Bolts (external TORX); 14 - Mounting clamp; B49 - AT output speed sensor; Х22/2 - Electrical wiring connector АТ
1. On models of the corresponding configuration (code ET2) activate the service mode of the TELE AID emergency call system (see Section Activation / deactivation of the service mode of the TELE AID emergency call system).
2. Disconnect the negative cable from the battery.
3. Jack up the car and put it on stands.
4. Disconnect the filler tube from the crankcases of the engine and transmission (2).
5. Remove the plug (9) and drain the transmission fluid, - immediately assess the condition of the ATF, if necessary, replace it (see chapter Ongoing care and maintenance).
6. Release the bandages, separate the wiring harness from the filler tube and disconnect the connector (Х22/2), - prepare replacement bandages.
7. Turn out the gauge of output turns of transmission (B49), - if necessary, prepare a replacement sealing ring.
8. Remove the left and right oil lines to the oil cooler.
9. Release a fixing collar and remove draft of switching (7).
10. Remove cover (12) and disconnect the torque converter from the drive plate.
11. Support the transmission with a special jack.
12. Remove the transverse beam assembly with the rear suspension support of the power unit (6).
13. Unbolt the cardan shaft (5) from the output flange of the transmission and the transfer case and remove it from under the car, - if necessary, pre-bolt and tilt the transmission (see below), - and tie it to the elements of the bottom.
14. Remove the anti-roll bar (see chapter Suspension and steering).
15. Release the brace that attaches the wiring harness to the frame, routed to the left of the transmission.
16. Unbolt the ground bar (4).
17. Turn out bolts of fastening of AT to the engine and lower it at an angle - if you haven't done it yet, remove the cardan shaft.
18. If necessary, use special pullers to remove the torque converter from the transmission.
19. Installation is carried out in the reverse order - before installation, the drive flange of the torque converter should be lightly lubricated. Track correctness of installation of cardan shaft.
20. Finally, deactivate the service mode of the TELE AID system and clear the memory of the processor of the on-board self-diagnosis system (see chapter Engine Electrical Systems).