
Cars BMW Cars Volkswagen Cars Chevrolet Cars Land Rover Cars Lada Cars Honda Cars Peugeot
English Русский
Български
Беларускі
Український
Српски
Hrvatski
Română
Polski
Slovenský
Magyar
Bookmark News and articles Sitemap Feedback Site search
MercedesMan.ru


A-Class C-Class E-Class G-Class M-Class S-Class Others
W463 (1999-2019)
  • Main
  • G-Class
  • W463 (1999-2019)
  • Transmission
  • Automatic gearbox
  • Removal and installation the selector module (ESM)

Removal and installation the selector module (ESM) (Mercedes-Benz G-Class W463)

0
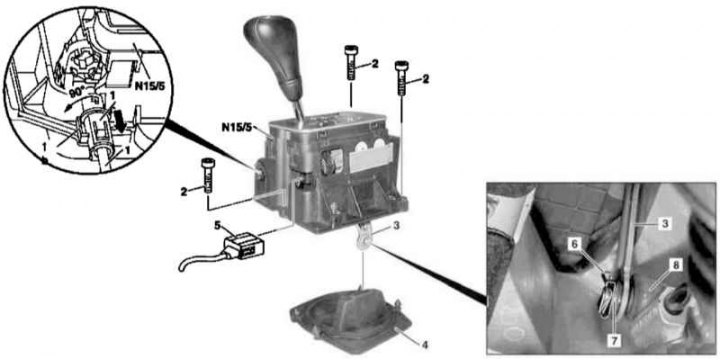
Electronic Selector Module (ESM) Installation Details

Electronic Selector Module (ESM) Installation Details
1 - Ignition interlock drive cable; 1b - Locking tongue; 1c - Connector; 2 - Bolt; 3 - Intermediate lever; 4 - Sealing gasket; 5 - Connector; 6 - Fuse; 7 - Nest; 8 - Shift rod; N15/5 - ESM


1. On models with the corresponding configuration (code ET2), activate the service mode of the TELE AID emergency call system (see Section Activation/deactivation of the service mode of the TELE AID emergency call system).

2. Disconnect the negative cable from the battery.

3. Disconnect the shift drive rod (8) from the intermediate lever (3) from below.

4. Remove the center console

5. Press the locking tab (1b), turn the connector (1c) 90° in the direction of the arrow and pull to disconnect the EIS locking cable (1) from the selector module (N15/5).

6. Disconnect the connector (5).

7. Remove the bolts (2).

8. Remove the selector module (N15/5), check the condition of its sealing gasket (4), and replace it if necessary.

9. Installation is carried out in reverse order.

10. Finally, switch off the service mode of the TELE AID system and clear the memory of the on-board diagnostic module (see Chapter Engine electrical systems).
This article is available at: russian, bulgarian, belarusian, ukrainian, serbian, croatian, romanian, polish, slovak, hungarian
The article has been verified: Polyakov Zakhar Grigorievich
Share with friends:
◀ Previous
G-Class W463 / Automatic gearbox
Next ▶

Removal and installation of AT with a torque converter
Removal and installation the electro-hydraulic shift control unit
Adjusting the AT shift drive
General principles of operation of the transmission control system, control signals
Troubleshooting — General Information
Removal and installation the AT output speed sensor
Removal and installation the ATF cooler
ATF Cooler and Oil Lines Flushing
Removal and installation the electronic transmission control module (TCM/ETC)
More similar articles for repairing other models

☛ Intake Manifold Module — Removal and Installation Mercedes W168 (1997-2004)
☛ Installing the gear selector lever Mercedes W202 (1993-2000)
☛ Selector lever — removal and installation Mercedes W124 (1984-1995)
☛ Removal and installation the selector module Mercedes W163 (1997-2005)
☛ Gear selector lever Mercedes W140 (1991-1998)
☛ Gear selector lever position sensor (vehicles with engines 111,… Mercedes Vito 1 (1996-2003)
Link in different formats to this article
Comments and feedback from visitors
No comments yet


How much will 50 + 10 ?


W463 (1999-2019) 
  • General information
  • Introduction to the guide
  • Controls and instruments
  • Driving and operation
  • Maintenance
  • Power unit
  • Engine repair
  • Cooling system
  • Heating and ventilation
  • Power system (gasoline)
  • Fuel system (diesel)
  • Exhaust system
  • Ignition and control system
  • Charging and starting system
  • Transmission
  • Automatic gearbox
  • Transfer case
  • Axles front and rear
  • Chassis
  • Brake system
  • Front suspension
  • Rear suspension
  • Steering
  • Body
  • Exterior (external elements)
  • Interior (internal elements)
  • Doors, locks and windows
  • Electrical equipment
  • Equipment and devices
  • Switches in salon
  • Headlights and lighting
  • Audio system and navigation
  • Electrical circuits
 
MercedesMan.ru © 2017–2026 · Mobile version · Read about Mercedes · Sitemap: EN BG BY UA RS HR RO PL SK HU · Feedback · Site search · Bookmark A-Class (W168) · C-Class (W201) · C-Class (W202) · C-Class (W203) · E-Class (W123) · E-Class (W124) · E-Class (W210) · G-Class (W463) · M-Class (W163) · S-Class (W116, petrol) · S-Class (W126, petrol) · S-Class (W140) · S-Class (W220) · Sprinter · Vito 1 · Vito 2 · Vario 814D ·
 
We only use cookies without which some of the site's features may not be available.