
Cars BMW Cars Volkswagen Cars Chevrolet Cars Land Rover Cars Lada Cars Honda Cars Peugeot
English Русский
Български
Беларускі
Український
Српски
Hrvatski
Română
Polski
Slovenský
Magyar
Bookmark News and articles Sitemap Feedback Site search
MercedesMan.ru


A-Class C-Class E-Class G-Class M-Class S-Class Others
W168 (1997-2004)
  • Main
  • A-Class
  • W168 (1997-2004)
  • Power unit
  • Fuel system
  • Intake Manifold Module — Removal and Installation

Intake Manifold Module — Removal and Installation (Mercedes-Benz A-Class W168)

0
Contents: Removal ↡ Installation ↡
Cars with diesel engines.


Removal


1. Disconnect the air intake hose 1 (see illustration).
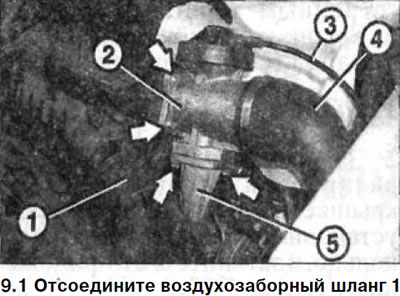
1. Disconnect the air intake hose 1 (see illustration).


2. Remove mixer 2 by disconnecting low pressure hose 3 from the EGR valve, boost air hose 4 from the mixer, EGR system line 5 from the bottom of the mixer (see illustration 9.1).

3. Unscrew the four mounting bolts and disconnect the mixer from the inlet module.

4. Unscrew the mounting bolts (see arrows in the illustration) and disconnect fuel filter 1 from inlet module 2 without removing the hoses from it.
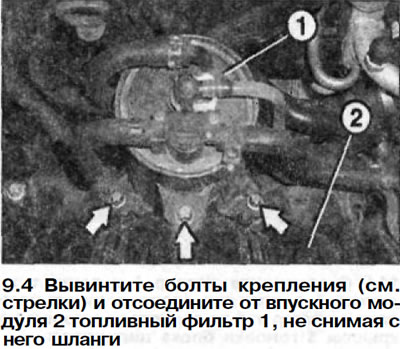
4. Unscrew the mounting bolts (see arrows in the illustration) and disconnect fuel filter 1 from…


5. Remove the low pressure hose of the brake booster from the fitting on the right side, when viewed in the direction of travel, by squeezing the side leashes and releasing the hose from the mount on the manifold.


6. Disconnect the low pressure hose from the boost air pressure sensor.

7. Cars manufactured since 9/00. Unscrew the mounting bolts 2 of the oil separator 1, mark the attachment points of all hoses, disconnect them and remove the oil separator (see illustration).
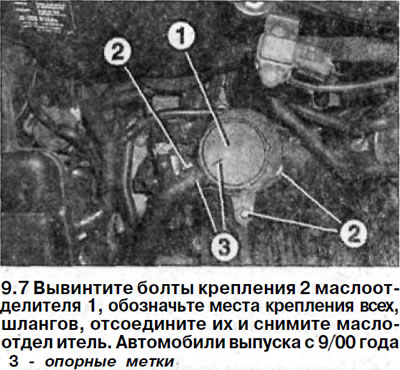
7. Cars manufactured since 9/00. Unscrew the mounting bolts 2 of the oil separator 1, mark the…


8. Unscrew the bolt securing the oil filler pipe to the intake module.

9. Unscrew the three bolts securing the heat shield.

10. Remove the intake module to cylinder head mounting bolts, removing the engine lifting eyes and marking the mounting position of the dipstick guide and all wiring harness holders and clamps.

11. Remove the air intake tube from the intake module by first moving the locking lever 1 to the right, if looking in the direction of travel, and then pressing it down (see arrows in the illustration).
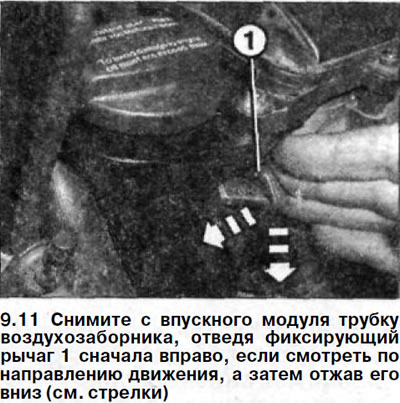
11. Remove the air intake tube from the intake module by first moving the locking lever 1 to the…


12. Disconnect the intake module.


Installation


13. Place eight new profile sealing gaskets on the cylinder head.

14. Install the intake module, connect the air intake tube to it and secure it with the lever.

15. Secure the intake module to the cylinder head with bolts to a tightening torque of 14 Nm.

At the same time, install the guide tube of the engine oil level indicator by screwing in the bolt that secures it.

16. Reinstall all wire harness holders and clamps in their original locations.

17. Secure the heat shield with three bolts.

18. Install and secure the oil filler pipe to the intake module, tightening the mounting bolts to 9 Nm.

19. Cars produced since 9/00. Install the oil separator, connect the hoses, I following the marks made before removal and the reference marks (see illustration 9.7).

20. Connect the low pressure hose to the boost air pressure sensor.

21. Secure the low pressure hose of the vacuum booster to the holders on the intake manifold and connect it to the fitting on the manifold.

22. Fasten the fuel filter to the intake module with bolts.

23. Install the air mixer, after cleaning the sealing surfaces of the inlet module and mixer, and installing a new rubber seal.

24. Secure the mixer with bolts to the inlet module, tightening them to 9 Nm.

25. Connect the air recirculation system pipe, tightening it to 9 Nm.

Publication taken from an online resource [MercedesMan.ru]

26. Install the boost air hose and secure it with a clamp.

Attention! Before doing this, thoroughly clean the hose landing branch, because over time the hose may come off during operation.


27. Connect the low pressure hose to the recirculation valve.

28. Connect the air intake hose.
This article is available at: russian, bulgarian, belarusian, ukrainian, serbian, croatian, romanian, polish, slovak, hungarian
The article has been verified: Lukyanov Nikita Ilyich
Share with friends:
◀ Previous
A-Class W168 / Fuel system
Next ▶

Intake manifold — removal and installation
Accelerator pedal stop — adjustment
Air filter — removal and installation
Fuel Shut-Off Solenoid Valve — Removal and Installation
Fuel injection pump — removal and installation
Crankshaft Position Sensor — Removal and Installation
Camshaft Position Sensor — Removal and Installation
More similar articles for repairing other models

☛ Intake manifold — removal and installation Mercedes 190 (W201) (1982-1993)
☛ Removal and installation the intake manifold and exhaust manifold Mercedes W123 (1976-1985)
☛ Removal and installation the heater/air conditioner fan and its… Mercedes W463 (1999-2019)
☛ Removal and installation the intake manifold Mercedes W163 (1997-2005)
☛ Removal and installation the intake manifold with resonator Mercedes W140 (1991-1998)
☛ Removal and installation the intake manifold Mercedes Sprinter (1995-2000, diesel)
Link in different formats to this article
Comments and feedback from visitors
No comments yet


How much will 22 + 11 ?


W168 (1997-2004) 
  • General information
  • User manual
  • Maintenance
  • Troubleshooting
  • Power unit
  • Engine repair
  • Cooling and heating
  • Injection system (gasoline)
  • Fuel system (diesel)
  • Fuel system
  • Exhaust system
  • Ignition system
  • Transmission
  • Clutch
  • Transmission
  • Chassis
  • Brake system
  • Suspension
  • Steering
  • Body
  • Interior (all models)
  • Interior (since 1997)
  • Interior (since 2001)
  • Exterior
  • Doors and windows
  • Electrical equipment
  • Equipment and devices
  • Power devices
  • Windshield wipers and washers
  • Headlights and lighting
  • Electrical circuits
 
MercedesMan.ru © 2017–2026 · Mobile version · Read about Mercedes · Sitemap: EN BG BY UA RS HR RO PL SK HU · Feedback · Site search · Bookmark A-Class (W168) · C-Class (W201) · C-Class (W202) · C-Class (W203) · E-Class (W123) · E-Class (W124) · E-Class (W210) · G-Class (W463) · M-Class (W163) · S-Class (W116, petrol) · S-Class (W126, petrol) · S-Class (W140) · S-Class (W220) · Sprinter · Vito 1 · Vito 2 · Vario 814D ·
 
We only use cookies without which some of the site's features may not be available.