
Convertible Models
Side window trim panels

Installation Details for Side Window Trim Panel on Convertible Models
1 - Mounting loop; 2 - Bolts; 3 - Wind deflector support; 4 - Screws; 5 - Protector; 6 - Finishing panel; 7 - Clips
1. Open the convertible top.
2. Remove the side glass (see Section Removal and installation of body glazing elements).
3. Remove the screws (2) and remove the fastener (1).
4. Remove the screws (4) and remove the wind deflector support (3).
5. Remove the protector (5).
6. Release the two latches (7) and remove trim panel (6).
7. Installation is carried out in the reverse order.
Side panels
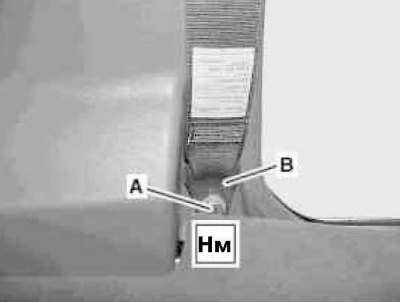
Fitting details for trim side panels on Convertible models (1 of 3)
And - the Screw of the bottom anchor of a seat belt; B - Lower seat belt anchor
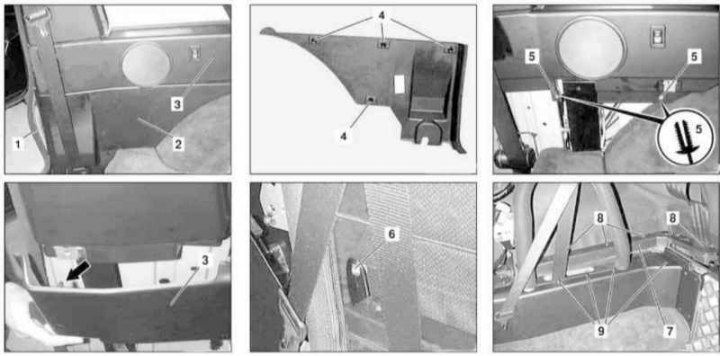
Fitting details for trim side panels on Convertible models (2 of 3)
1 - Protector; 2 - Lower side trim panel; 3 - Upper side trim panel; 4, arrows - Clips; 5 - Rivets; 6 - Nut; 7 - The supporting frame of the convertible top; 8 - Screws; 9 - Wind deflector supports
Fitting details for trim side panels on Convertible models (3 of 3)
E18 / 2 - Left lamp for lighting the luggage compartment; E18 / 3 - Right lamp for lighting the luggage compartment
1. Remove side window trim panels (see above).
2. Remove the protector (1) in the B-pillar area.
3. Release the three latches (4) and separate the lower side trim panel (2) from the top (3).
4. Remove the facing plate and unscrew the bolt (A) bottom anchor (IN) seat belt.
5. Release the latch (4) and, moving up, remove the lower side trim panel (2).
6. Remove the rivet (5).
7. Remove the luggage compartment lid with wind deflector.
8. Give the nut (6) folding top.
9. Remove decorative trims and remove screws (8) to loosen the frame (7) on the window shelf.
10. Remove supports (9) wind deflector (three on each side).
11. Disconnect the wiring from the luggage compartment light (E18/2 or E18/3).
12. Release the latches (arrows) and release the top trim panel (3).
13. Appropriate models (code E08) disconnect the wiring from the loudspeaker.
14. Appropriate models (code H11) Disconnect the rear seat heating wire.
15. Pushing up, remove the panel (3).
16. Installation is carried out in the reverse order.
Models Wagon
Side panels
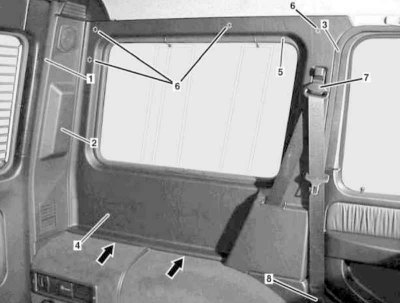
Fitting details for trim side panels on Wagon models
1 - Protector; 2 - Panel trim rear rack; 3 - Door seal; 4 - Side finishing panel; 5 - Rubber window frame; 6 - Clamps; 7 - Guide bracket of the upper anchor of the seat belt; 8 - Lower seat belt anchor
1. Peel off trim panel (2) tread (1).
2. Remove trim panel (2) (see Section Removal and installation of trim panels body pillars), - do not forget to disconnect the loudspeaker wiring connector.
3. Release the rubber seal (3) in the area of installation of the side trim panel (4).
4. Turn out bolts of anchor knots (7 and 8) seat belt.
5. Remove the side trim panel (4).
6. Installation is carried out in the reverse order - make sure that the lower edge of the panel fits correctly (arrows).
Upper back panel
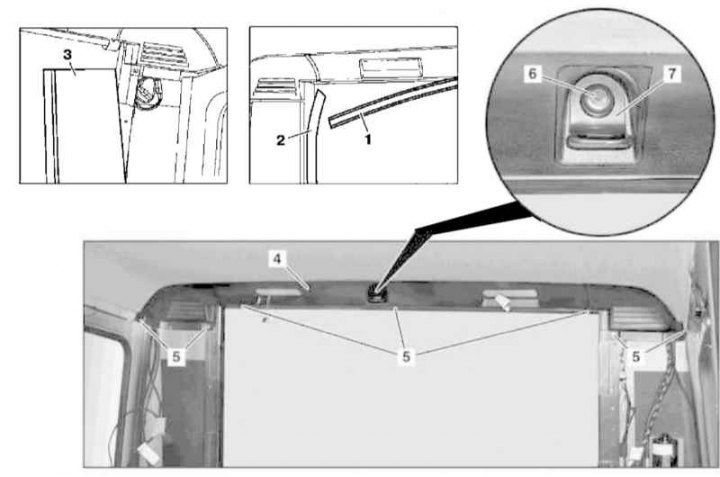
Installation Details for Top Rear Trim Panel on Wagon Models
1, 2 - Protectors; 3 - Finishing panel of the rear pillar; 4 - Upper rear finishing panel; 5 - Screws; 6 - Cover; 7 - Eyelet
1. Remove C-pillar trim panels (3) (see Section Removal and installation of trim panels body pillars).
2. Remove the rear interior lights (see chapter Onboard electrical equipment).
3. Appropriate models (SD0 code) unscrew located under the decorative cover (6) screw and remove the upper ISOFIX child seat fixing eye.
4. Remove the screws (5) and remove the rear top trim panel (4), by carefully removing it from the guide supports of the headlining.
5. Installation is carried out in the reverse order.
6. In conclusion, make sure that the interior lamps are working properly and (with appropriate equipment) signaling device BA.