
Cars BMW Cars Volkswagen Cars Chevrolet Cars Land Rover Cars Lada Cars Honda Cars Peugeot
English Русский
Български
Беларускі
Український
Српски
Hrvatski
Română
Polski
Slovenský
Magyar
Bookmark News and articles Sitemap Feedback Site search
MercedesMan.ru


A-Class C-Class E-Class G-Class M-Class S-Class Others
W463 (1999-2019)
  • Main
  • G-Class
  • W463 (1999-2019)
  • Body
  • Interior (internal elements)
  • Removal and installation the front ashtray

Removal and installation the front ashtray (Mercedes-Benz G-Class W463)

0
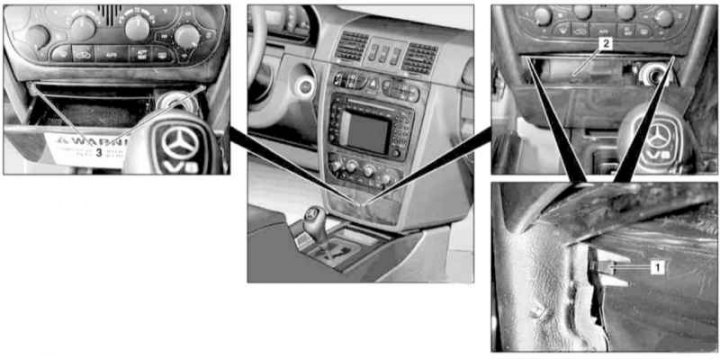
Front Ashtray Installation Details

Front Ashtray Installation Details
1 - Retainer; 2 - Ashtray; 3 - Mounting screws


1. Move the AT selector lever to position "D".

2. Open the front ashtray.

3. Using a suitable tool, press back the tabs of the catches (1) on the left and right sides of the ashtray casing.

[Publication taken from an online resource: www.mercedesman.ru]

4. Remove the mounting screws (3) and remove the ashtray (2).

5. Disconnect the ashtray light wiring.

6. Installation is carried out in reverse order.
This article is available at: russian, bulgarian, belarusian, ukrainian, serbian, croatian, romanian, polish, slovak, hungarian
The article has been verified: Polyakov Zakhar Grigorievich
Share with friends:
◀ Previous
G-Class W463 / Interior (internal elements)
Next ▶

Removal and installation the instrument panel handle
Removal and installation the glove box
Removal and installation the instrument panel air duct deflectors
Removal and installation lower instrument panel covers
Removal and installation the left lower section of the instrument panel trim
Removal and installation the knee support
Removal and installation the steering column end cover
Removal and installation the trim panel of the console section of the instrument panel
Removal and installation the center console
More similar articles for repairing other models

☛ Front catalytic converter — removal and installation Mercedes W168 (1997-2004)
☛ Front ashtray — removal and installation Mercedes W202 (1993-2000)
☛ Replacing the front crankshaft oil seal Mercedes W123 (1976-1985)
☛ Access to the right front seat storage compartment Mercedes W163 (1997-2005)
☛ Removal and installation the upper front covers Mercedes W140 (1991-1998)
☛ Front crankshaft oil seal Mercedes Sprinter (1995-2000, diesel)
Link in different formats to this article
Comments and feedback from visitors
No comments yet


How much will 19 + 31 ?


W463 (1999-2019) 
  • General information
  • Introduction to the guide
  • Controls and instruments
  • Driving and operation
  • Maintenance
  • Power unit
  • Engine repair
  • Cooling system
  • Heating and ventilation
  • Power system (gasoline)
  • Fuel system (diesel)
  • Exhaust system
  • Ignition and control system
  • Charging and starting system
  • Transmission
  • Automatic gearbox
  • Transfer case
  • Axles front and rear
  • Chassis
  • Brake system
  • Front suspension
  • Rear suspension
  • Steering
  • Body
  • Exterior (external elements)
  • Interior (internal elements)
  • Doors, locks and windows
  • Electrical equipment
  • Equipment and devices
  • Switches in salon
  • Headlights and lighting
  • Audio system and navigation
  • Electrical circuits
 
MercedesMan.ru © 2017–2026 · Mobile version · Read about Mercedes · Sitemap: EN BG BY UA RS HR RO PL SK HU · Feedback · Site search · Bookmark A-Class (W168) · C-Class (W201) · C-Class (W202) · C-Class (W203) · E-Class (W123) · E-Class (W124) · E-Class (W210) · G-Class (W463) · M-Class (W163) · S-Class (W116, petrol) · S-Class (W126, petrol) · S-Class (W140) · S-Class (W220) · Sprinter · Vito 1 · Vito 2 · Vario 814D ·
 
We only use cookies without which some of the site's features may not be available.