
Door glass
Front doors
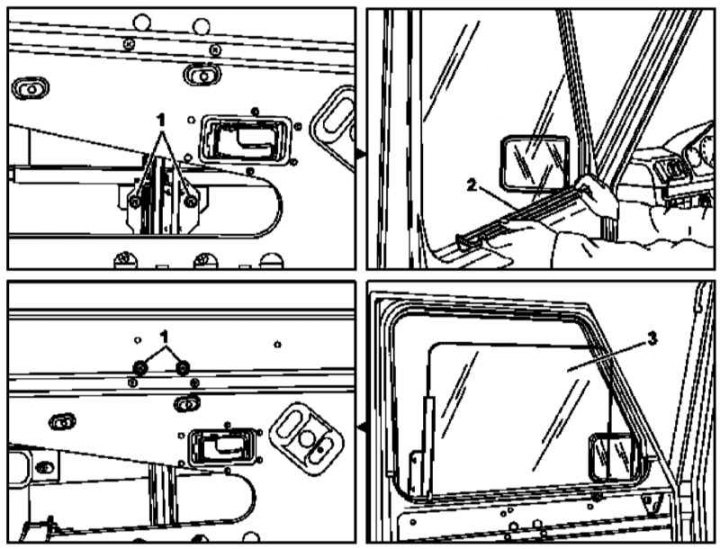
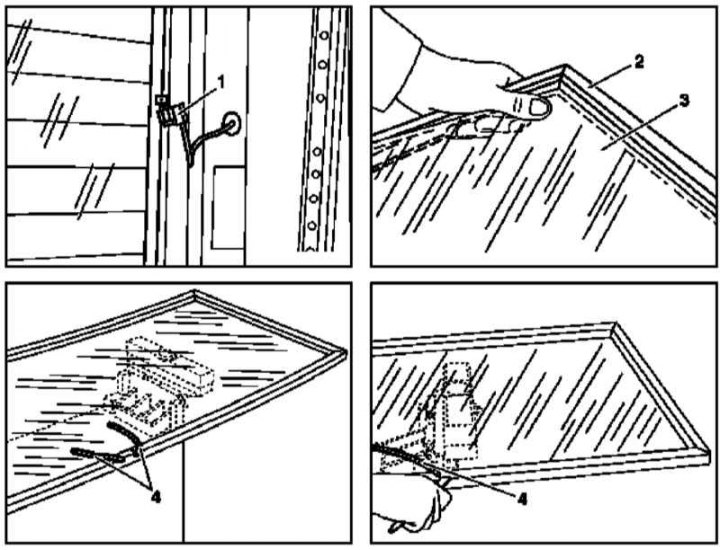
Front Door Window Glass Installation Details
1 - Mounting screws; 2 - Sealing element; 3 - Window glass (prepared for extraction)
1. Remove the inner upholstery and the insulating lining of the door (see Section Removal and installation of an internal upholstery of door assemblies), - a damaged lining must be replaced.
2. Partly (about half way) roll down the window glass (3).
3. Having taken measures against falling glass, unscrew the fixing screws (1).
4. Remove the sealing element (2), - be careful not to break the front latch tab. A damaged seal must be replaced.
5. Pull up 90°to remove the glass (3) from the window opening.
6. installation is carried out in the reverse order, - tightening the fixing screws (1) should only be done after the glass (3) will be aligned in the window opening.
7. In conclusion, make sure that the lowering / raising of the door glass moves smoothly.
Rear doors
The rear door glass is removed as an assembly with the window frame (see Section Removal and installation of window frames door assemblies).
Side fixed windows
Models Wagon
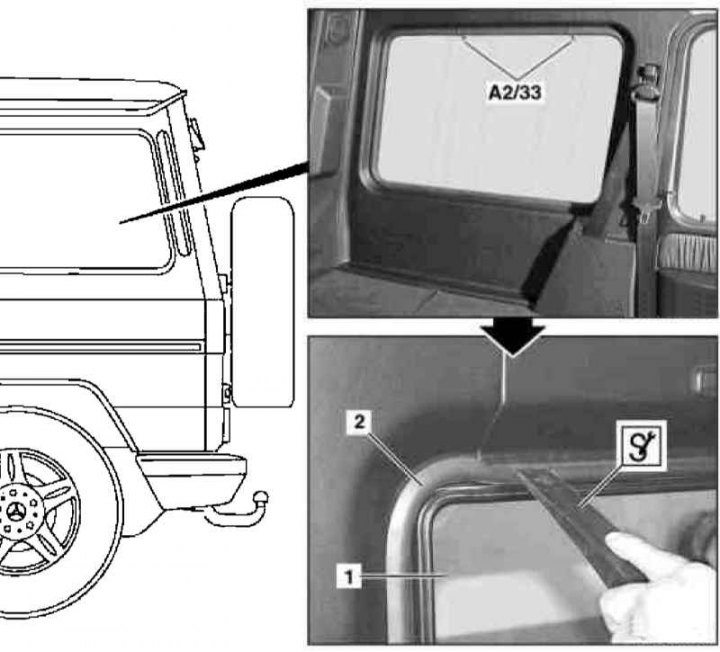
Installation details of side fixed glass on Wagon models
1 - Glass; 2 - Rubber seal; A2/33 - Antenna
Removing
1. Gently disconnect the electrical connector of the antenna pasted on the glass (A2/33).
Note. If the mating connector separates from the glass (1) the latter will have to be replaced.
2. Fix on glass (1) extractor suction cups.
3. Prying with a suitable wedge and at the same time pulling the puller outward, release the glass (1) complete with rubber seal (2) from the window opening.
4. If necessary, remove the seal (2) and replace the glass (1). Damaged seal (2) also needs to be replaced.
Installation
1. Insert the installation cord into the groove of the rubber seal (2).
2. Lubricate the seal (2) suitable composition (000 989 11 60).
3. With the help of an assistant, press the glass (1) from the outside to the seating flange of the window opening and start filling the sealant (2) on the flange by pulling the cord inward (start from the bottom), - make sure that the seal is seated correctly.
4. Finally, connect the electrical wiring to the antenna (A2/33).
Convertible Models
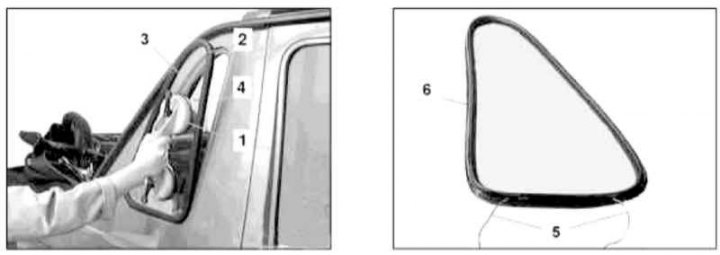
Installation details of the fixed side window on Convertible models
1 - Puller; 2 - Rubber seal; 3 - Glass; 4 - Landing flange; 5 - Installation cord; 6 - Groove
Removing
1. Attach the suction cups of the puller (1) on glass (3) and release the latter from the window opening in the body element.
2. If necessary, remove the seal (2) and replace the glass (3). Damaged seal (2) also needs to be replaced.
Installation
The installation procedure is the same as described above for Universal models.
Windshield
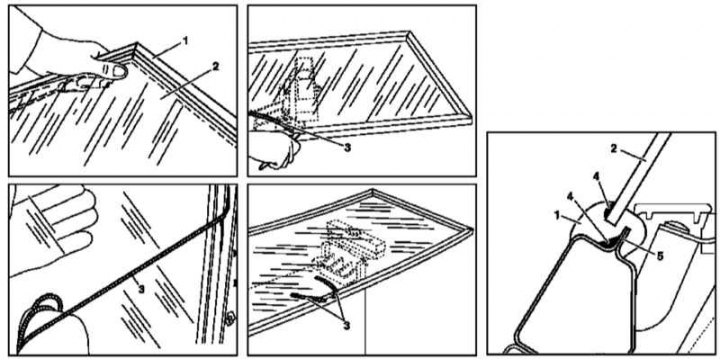
Windshield Installation Details
1 - Sealing frame; 2 - Glass; 3 - Installation cord; 4 - Glue; 5 - Landing flange of the window opening
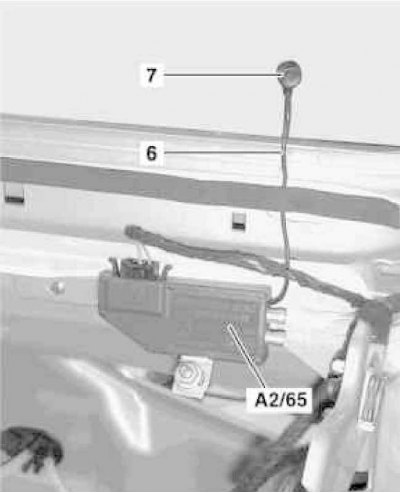
Installation details of the glass-glued antenna
6 - Wiring; 7 - Button; А2/65 - Antenna amplifier
Removing
1. Remove the sun sensor (see chapter Onboard electrical equipment).
2. Remove the rain sensor (see chapter Onboard electrical equipment).
3. Move the wiper arms away from the glass.
4. Cut off the exposed rubber seal of the sealing frame (1).
5. With the help of an assistant, push the glass (2) out of the window opening and remove it from the car - do not forget to disconnect the push-button connector (7) antenna amplifier wiring (A2/65) on the right side of the glass panel (2).
6. Thoroughly clean the seat flange (5) window opening from mud deposits.
Installation
1. Plant on glass (2) sealing frame (1).
2. Thread the installation cord (3) into the seating slot of the sealing frame (1).
Note. The overlap of the cord should be approximately 20 centimeters.
3. Lubricate with glue (4) around the perimeter of the landing flange (5) window opening, - the width of the smeared area must be at least 7 millimeters.
4. With the help of an assistant, wind the glass (2) into the window opening and connect the electrical wiring (6) antenna amplifier (A2/65).
5. Gently press the glass (2) to the seat flange (5) and, starting from the bottom, start pulling the installation cord inward (3).
Attention! Insufficient pressure on the flange (5) may cause glass damage (2)!
6. Insert glue (4) into the gap between the sealing frame (1) and glass (2) around the perimeter of the window opening. Remove excess adhesive mass immediately.
7. Duration of polymerization of the adhesive is 12 hours, after which the wipers can be lowered to the working position.
8. Finally install rain and solar sensors (see chapter Onboard electrical equipment).
Rear glass (station wagon models)
Rear window installation details (station wagon models)
1 - Wiring connector
2 - Sealing frame
3 - Glass
4 - Installation cord
Removing
1. Remove the spare wheel.
2. Remove the inner door trim (see Section Removal and installation of an internal upholstery of door assemblies).
3. Disconnect the connector (1) electrical wiring for heating glass heating element.
4. Remove high level brake light (see chapter Onboard electrical equipment).
5. Cut off the outer lips of the sealing frame (2).
6. With the help of an assistant, push the glass (3) out of the window opening and remove it from the vehicle.
Installation
1. Plant on glass (3) sealing frame (2).
2. Thread the installation cord (4) into the seating slot of the sealing frame (2), - pre-sprinkle the frame with talcum powder, or grease with soapy water.
Note. The overlap of the cord should be approximately 20 centimeters.
3. With the help of an assistant, gently press the glass against the seating flange of the window opening and, pulling the cord inward, fix the assembly in the door frame.
4. Install the remaining components in the reverse order of their dismantling.