
Cars BMW Cars Volkswagen Cars Chevrolet Cars Land Rover Cars Lada Cars Honda Cars Peugeot
English Русский
Български
Беларускі
Український
Српски
Hrvatski
Română
Polski
Slovenský
Magyar
Bookmark News and articles Sitemap Feedback Site search
MercedesMan.ru


A-Class C-Class E-Class G-Class M-Class S-Class Others
W463 (1999-2019)
  • Main
  • G-Class
  • W463 (1999-2019)
  • Body
  • Doors, locks and windows
  • Removal and installation of window frames and door assemblies

Removal and installation of window frames and door assemblies (Mercedes-Benz G-Class W463)

0
Contents: Front doors ↡ Rear doors ↡

Front doors
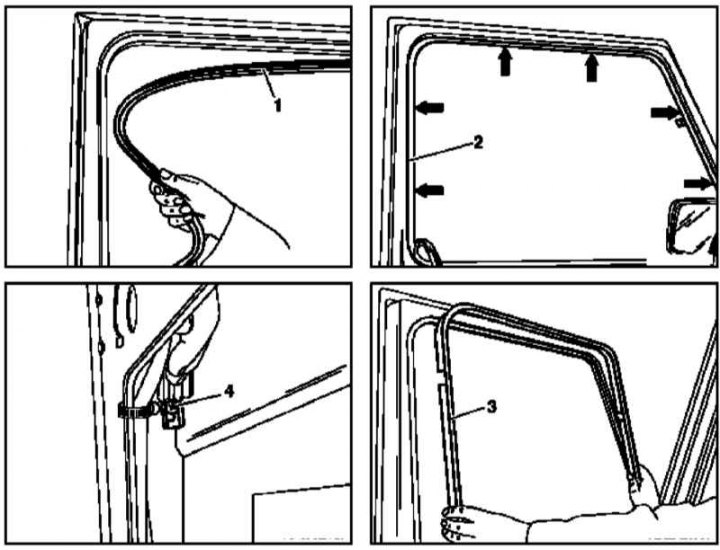


Procedure for removing the front door window frame

Procedure for removing the front door window frame
1 - Rubber seal; 2 - Window frame; 3 - Facing frame; 4 - Bolt; Arrows - Mounting screws


1. Remove the door window glass (see Section Removal and installation of body glazing elements).

2. Remove the rubber seal (1) from the window opening - if necessary, prepare a replacement sealing element.

3. Remove the screws (arrows) securing the window frame (2).

4. Release the window frame trim (3) from the clips and remove it.

5. Remove the screws (4) on the left and right at the bottom of the frame (2), then remove the latter from the window opening by pulling it up and out.

6. Installation is carried out in the reverse order - the trim frame must be installed before securing the frame.

7. Finally, make sure that the door glass moves smoothly when lowering/raising.

Rear doors


Note: The rear door window frames are removed together with the glass.
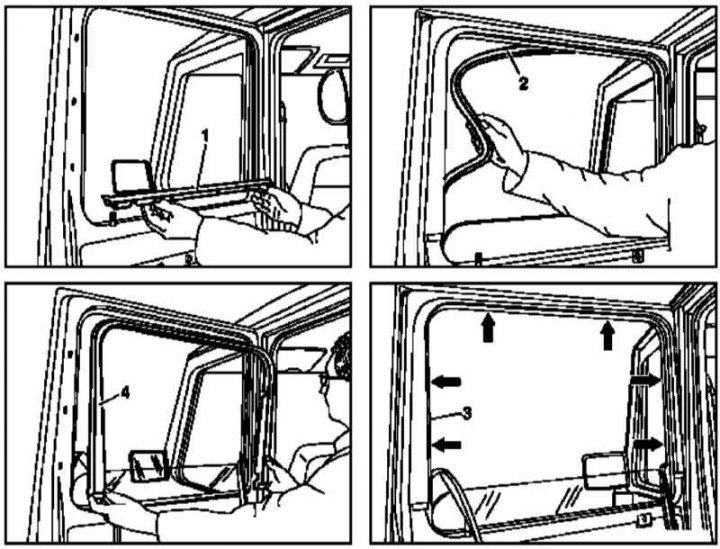

Rear Door Window Frame Removal Procedure (1 of 2)

Rear Door Window Frame Removal Procedure (1 of 2)
1, 2 - Sealing elements; 3 - Window frame; 4 - Facing frame; Arrows - Mounting bolts
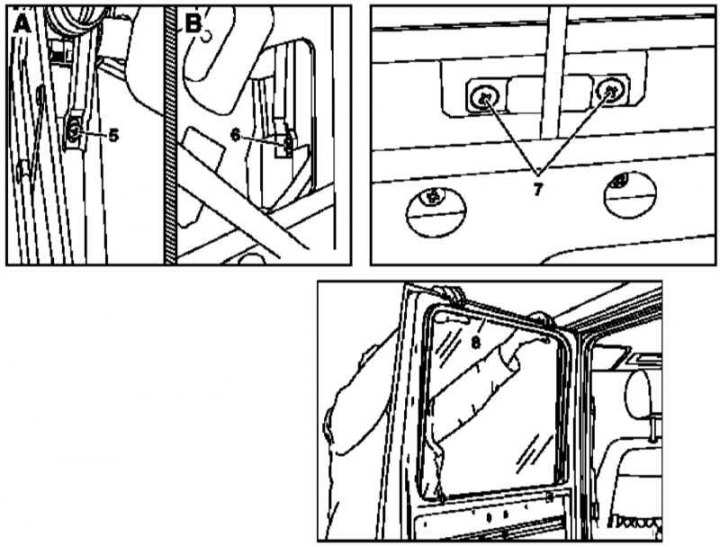


Rear Door Window Frame Removal Procedure (2 of 2)

Rear Door Window Frame Removal Procedure (2 of 2)
5, 6, 7 - Bolts; 8 - Glass


1. Remove the inner door trim (see Section Removal and installation interior trim of door assemblies).

2. Remove the lower sealing element (1) of the window opening - try not to break the tongue of the front retainer. A damaged seal must be replaced.

Original published on the website: www.MercedesMan.ru

3. Release the rubber seal (2) from the window opening.

4. Unscrew the frame mounting bolts (arrows) (3).

5. Release the clamps and remove the trim frame (4).

6. Replace the rubber seal (2) and raise the glass (8) completely.

7. Carefully remove the door's film insulation covering (see Section Removal and installation interior trim of door assemblies), - the damaged film will have to be replaced.

8. Remove the mounting bolts (5 and 6) on the left and right at the bottom of the frame (3).

9. Take measures to prevent the glass from falling and unscrew the screws (7) securing it to the regulator.

10. Push outward and carefully remove the frame (3) together with the glass (8) from the window opening.

11. Installation is carried out in the reverse order - the trim frame must be installed before securing the frame.


Note: Tightening of the screws (7) should only be carried out after the raised glass (8) has been aligned in the window opening.


12. Finally, make sure that the door glass moves smoothly when lowering/raising.
This article is available at: russian, bulgarian, belarusian, ukrainian, serbian, croatian, romanian, polish, slovak, hungarian
The article has been verified: Polyakov Zakhar Grigorievich
Share with friends:
◀ Previous
G-Class W463 / Doors, locks and windows
Next ▶

Removal and installation door window regulators
Removal and installation interior trim of door assemblies
Removal and installation tailboard latches and locking wedges
Removal and installation door locks
Removal and installation interior door handles
Removal and installation of body glazing elements
Removal and installation the upper hatch cover trim panel
Removal and installation the top hatch cover
Removal and installation the sunroof drive cable
Removal and installation the upper hatch frame
More similar articles for repairing other models

☛ Rear side door — window lift handle removal and installation Mercedes W168 (1997-2004)
☛ Front door window lifter — removal and installation Mercedes 190 (W201) (1982-1993)
☛ Removal and installation a mechanical door window lifter Mercedes W123 (1976-1985)
☛ Removal and installation interior trim panels of door assemblies Mercedes W163 (1997-2005)
☛ Unlocking the driver's door with the key Mercedes W140 (1991-1998)
☛ Scheme 39. Electric drive of the driver's door window lifter Mercedes Vito 2 (2003-2014, diesel)
Link in different formats to this article
Comments and feedback from visitors
No comments yet


How much will 22 + 11 ?


W463 (1999-2019) 
  • General information
  • Introduction to the guide
  • Controls and instruments
  • Driving and operation
  • Maintenance
  • Power unit
  • Engine repair
  • Cooling system
  • Heating and ventilation
  • Power system (gasoline)
  • Fuel system (diesel)
  • Exhaust system
  • Ignition and control system
  • Charging and starting system
  • Transmission
  • Automatic gearbox
  • Transfer case
  • Axles front and rear
  • Chassis
  • Brake system
  • Front suspension
  • Rear suspension
  • Steering
  • Body
  • Exterior (external elements)
  • Interior (internal elements)
  • Doors, locks and windows
  • Electrical equipment
  • Equipment and devices
  • Switches in salon
  • Headlights and lighting
  • Audio system and navigation
  • Electrical circuits
 
MercedesMan.ru © 2017–2026 · Mobile version · Read about Mercedes · Sitemap: EN BG BY UA RS HR RO PL SK HU · Feedback · Site search · Bookmark A-Class (W168) · C-Class (W201) · C-Class (W202) · C-Class (W203) · E-Class (W123) · E-Class (W124) · E-Class (W210) · G-Class (W463) · M-Class (W163) · S-Class (W116, petrol) · S-Class (W126, petrol) · S-Class (W140) · S-Class (W220) · Sprinter · Vito 1 · Vito 2 · Vario 814D ·
 
We only use cookies without which some of the site's features may not be available.