
A-pillar Trim Panel Installation Details (on the example of release models up to 31.08.98)
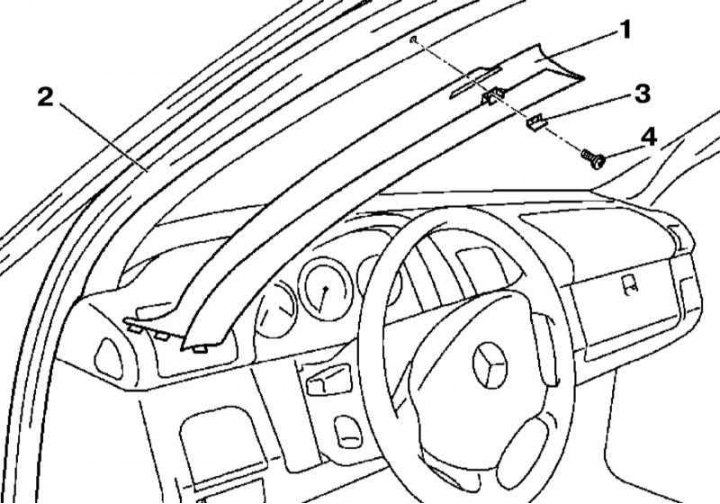
1. Installation details of the A-pillar trim panel are shown in the illustration, to which all references in the text refer.
2. Separate the door seal (2) near the A-pillar.
3. On models after 08/31/98, remove the plugs (3) and remove the fixing screws (4), in the lower part, the panel is attached to the instrument panel by means of clamps.
4. On release models from 09/01/98, release the upper and lower fasteners of the trim panel (1).
5. Remove the panel (1).
6. Installation is carried out in the reverse order - make sure that the latches snap into place.
Note. When installing the new version of the panel on models manufactured before 08/31/98, slightly expand the screw holes in the rack to install the upper clamps in them.
B-pillars
B-pillar trim panel installation details
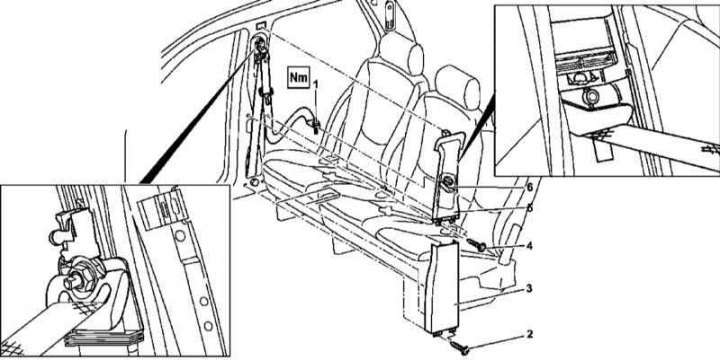
1 - Anchor bolt of a seat belt; 2 - Self-tapping screws; 3 - Bottom finishing panel; 4 - Self-tapping screws; 5 - Top finishing panel; 6 - Adjuster for the position of the upper anchor assembly of the seat belt
1. Installation details of the B-pillar trim panel are shown in the illustration, to which all references in the text refer.
2. Remove the sill trim of the relevant door (see Section Removal and installation of overlays of door thresholds).
3. Peel off the door seals on both sides of the B-pillar.
4. Remove the anchor bolt (1) seat belt.
5. Remove the screws (2) and remove the bottom panel (3) rack trim.
6. On release models from 09/01/01, remove the SRS label and unscrew the screw located under it.
7. Remove the screws (4) and, releasing the latches, remove the upper section (5) rack trim.
8. Installation is carried out in the reverse order - make sure that the adjuster of the upper anchor assembly of the seat belt is correctly positioned (6) in the receiving slot of the finishing panel (5). Make sure the fasteners are secure.
C-pillars
C-pillar trim panel installation details
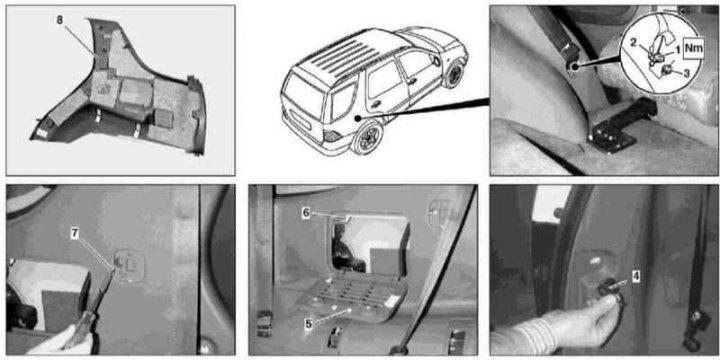
1 - Screw; 2 - Anchor assembly of the seat belt; 3 - Remote sleeve; 4 - Bracket; 5 - Cover; 6, 7 - Screws; 8 - Finishing panel
1. Installation details of the C-pillar trim panel are shown in the illustration, to which all references in the text refer.
2. If equipped, remove the seat of the third additional row.
3. Remove the safety net
4. On ML 55 AMG models, remove the spare wheel cover.
5. Remove the rear ceiling panel, - if equipped, do not unscrew the anchor screw of the seat belt of the third row seat.
6. Remove the door sill in the luggage compartment of the car.
7. Fold forward a back seat.
8. On models with VIN from A145273, X708319, remove the SRS label and unscrew the screw located under it.
9. Remove the screw (1) and remove the spacer (3) anchor node (2) rear seat belt.
10. Remove from panel (8) brackets (4).
11. Open and remove the cover (5).
12. Remove the screws (6 and 7), release the upper latches and remove the trim panel (8), by releasing the belt webbing from it.
13. At service of the right rack remove the socket of onboard power supply.
14. Installation is carried out in the reverse order - make sure that the latches snap into place.