
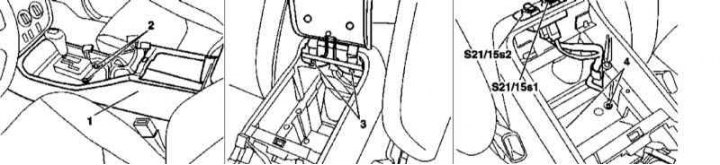
Center console installation details
1. The relevant illustrative material is presented in the illustration to which all references in the text refer.
2. Remove center armrest/cantilever glove box cover (see Section Removal and installation of a cover of a console ware box).
3. Remove the front screws (2) console cover fasteners (1).
4. Disconnect the electrical wiring from the rear door power window switches (S21/15s1 and S21/15s2), on models after 08/31/01, release the harness from the support bracket.
5. Disconnect the electrical wiring connector on the floor panel under the console; on models manufactured after 08/31/01, release the harness from the support bracket.
6. Remove rear fixing screws (4) and remove the console cover (1) assembled with the lower section by moving the AT selector lever to the position «N».
7. Installation is carried out in the reverse order - on models of release from 09/01/01, make sure that the air duct is securely fixed.
Disassembly and assembly
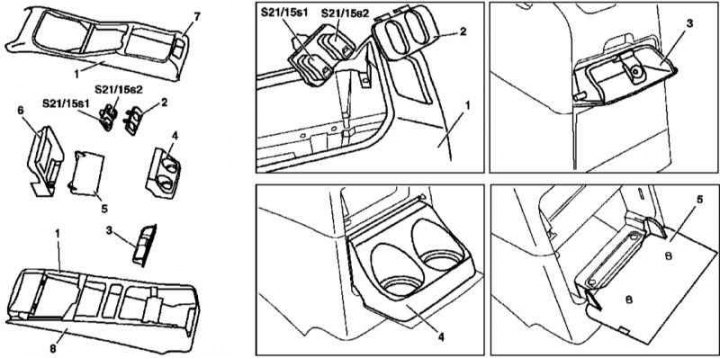
Installation details of the center console components
1 - Casing; 2 - Cover; 3 - Ashtray; 4 - Cup holder; 5 - Cover; 6 - Internal element; 7 - Upper section of the console assembly; 8 - Lower section of the console assembly; S21 / 15s1 - Switch for controlling the operation of the power window of the left rear door; S21 / 15s2 - Switch for controlling the operation of the window regulator, right rear door
1. The relevant illustrative material is presented in the illustration to which all references in the text refer.
2. Remove the console assembly (see above) and transfer it to the workbench.
3. Remove switches of management of functioning of windows of back doors (lid (2) removed from the outside, switches - from the inside).
4. Remove the rear ashtray (3).
5. Remove the cup holder (4).
6. Remove inner element (6).
7. Remove the six mounting screws and separate the top section/casing (7/1) console from bottom (9).
8. Installation of components is carried out in the reverse order of their dismantling.