
Cars BMW Cars Volkswagen Cars Chevrolet Cars Land Rover Cars Lada Cars Honda Cars Peugeot
English Русский
Български
Беларускі
Український
Српски
Hrvatski
Română
Polski
Slovenský
Magyar
Bookmark News and articles Sitemap Feedback Site search
MercedesMan.ru


A-Class C-Class E-Class G-Class M-Class S-Class Others
W163 (1997-2005)
  • Main
  • M-Class
  • W163 (1997-2005)
  • Body
  • Interior (internal elements)
  • Removal and installation the rear seat

Removal and installation the rear seat (Mercedes-Benz M-Class W163)

0
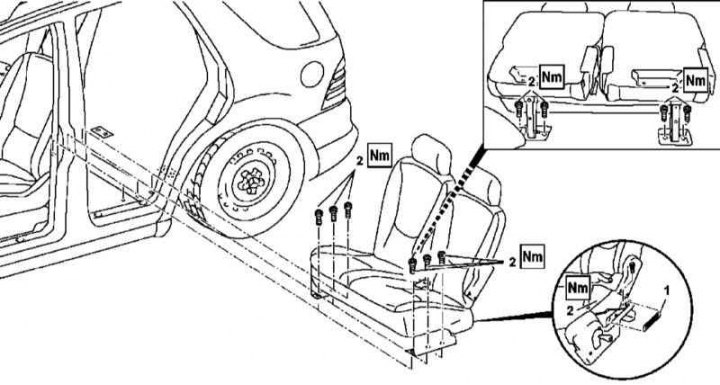
Installation details for the two-seater (60%) section of the dual rear seat on models produced up…

Installation details for the two-seater (60%) section of the dual rear seat on models produced up to 31.08.99


1. Installation details for the two-seater (60%) section of the dual rear seat on models produced up to 31.08.99 are shown in the illustration, to which all references in the text refer.

2. Remove the headrests.

3. Release the fasteners and remove the cover (1) from the left seat support.

4. Loosen the mounting bolts (2), remove the two-piece rear seat section and take it out through the tailgate.

5. Installation is carried out in the reverse order - replace the fasteners, lubricate the bolt threads with a special sealant to fix the threaded connections before installation.

Models produced since 01.09.99


Installation details of the two-seater (60%) section of the dual rear seat on models produced from…

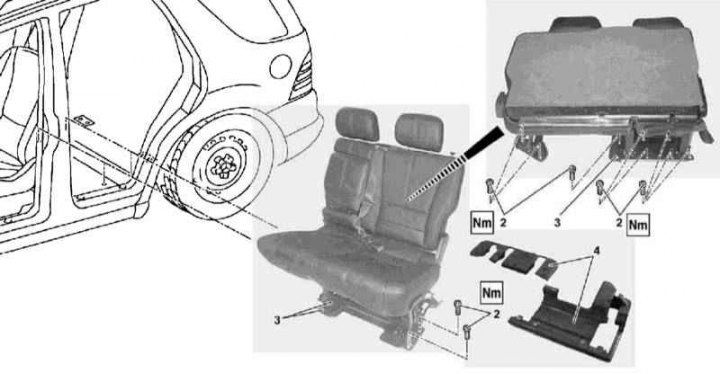
Installation details of the two-seater (60%) section of the dual rear seat on models produced from 01.09.99


1. Installation details for the two-seater (60%) section of the dual rear seat on models produced from 01.09.99 are shown in the illustration to which all references in the text refer.

2. Remove the headrests.

3. Remove the bottom covers (4) (only with a two-section section).

4. Remove the mounting bolts (2) and nuts (3).

5. Remove the bolts from the rear of the single seat section - the section frames are stacked on top of each other.

6. Remove the two-piece section and pull it out through the tailgate.

7. Installation is carried out in the reverse order - replace the fasteners, lubricate the bolt threads with a special sealant to secure the threaded connections before installation.

Single (40%) seat section


Models produced up to 31.08.99


Installation details of single (40%) section of double rear seat on models produced up to 31.08.99

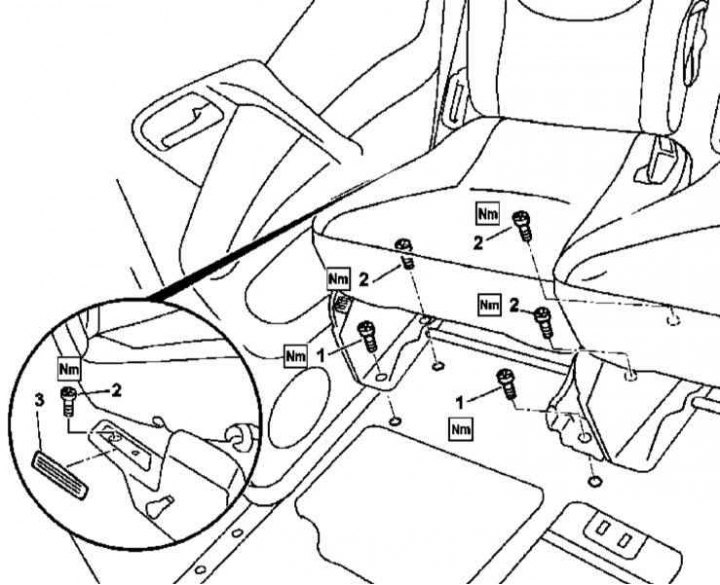
Installation details of single (40%) section of double rear seat on models produced up to 31.08.99


1. Installation details for the single (40%) section of the dual rear seat on models produced up to 31.08.99 are shown in the illustration, to which all references in the text refer.

2. Remove the headrest.

3. Remove the bottom cover (3).

4. Remove the front mounting screws (1).


5. Fold the seat back forward.

6. Lower the seat assembly to the floor.

7. Remove the rear mounting screws (2) and remove the single seat section.

8. Installation is carried out in the reverse order - replace the fasteners, lubricate the bolt threads with a special sealant to fix the threaded connections before installation.

Models produced since 01.09.99


Installation details for single (40%) section of dual rear seat on models produced from 01.09.99

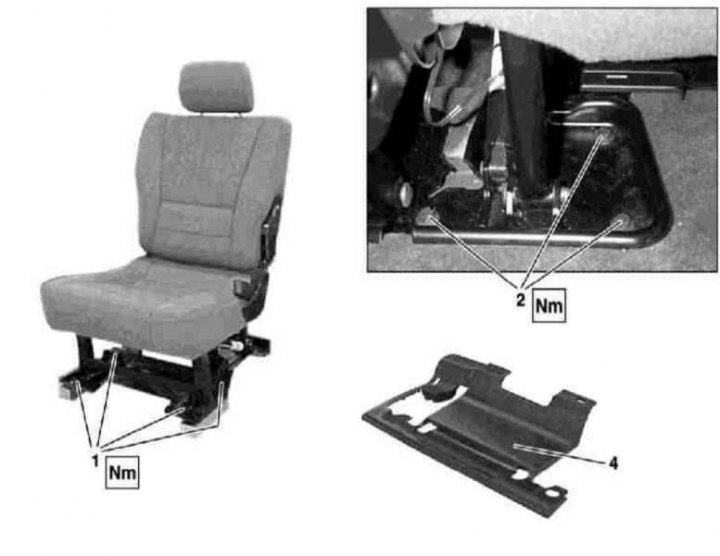
Installation details for single (40%) section of dual rear seat on models produced from 01.09.99


1. Installation details for the single (40%) section of the dual rear seat on models produced from 01.09.99 are shown in the illustration, to which all references in the text refer.

2. Remove the headrest.

3. Remove the bottom cover (4) (only with single section).

4. On models equipped with rear side airbags, disconnect the electrical wiring from the seat belt buckle and disconnect the harness secured to the seat frame with tape.

5. Remove the front mounting bolts (1).

6. Fold the seat back forward.

7. Lower the seat assembly to the floor.

8. Remove the rear mounting bolts (2) and remove the single seat section.

9. Installation is carried out in the reverse order - replace the fasteners, lubricate the bolt threads with a special sealant to secure the threaded connections before installation.
This article is available at: russian, bulgarian, belarusian, ukrainian, serbian, croatian, romanian, polish, slovak, hungarian
The article has been verified: Panova Maya Vladimirovna
Share with friends:
◀ Previous
M-Class W163 / Interior (internal elements)
Next ▶

Removal and installation front seat assemblies
Removal and installation carpet floor panels
Removal and installation door sill trims
Removal and installation front footwell trim panels
Removal and installation body pillar trim panels
Removal and installation seat backs
Removal and installation the folding armrest of the split rear seat
More similar articles for repairing other models

☛ Rear window defroster Mercedes W168 (1997-2004)
☛ Rear seat — removal and installation Mercedes W202 (1993-2000)
☛ Rear seat armrest Mercedes W124 (1984-1995)
☛ Removal and installation rear seat assemblies Mercedes W463 (1999-2019)
☛ Electric rear seat adjustment with solid structure Mercedes W140 (1991-1998)
☛ Rear crankshaft oil seal and its holder Mercedes Sprinter (1995-2000, diesel)
Link in different formats to this article
Comments and feedback from visitors
No comments yet


How much will 37 + 16 ?


W163 (1997-2005) 
  • General information
  • Introduction to the guide
  • Controls and instruments
  • Driving and operation
  • Maintenance
  • Power unit
  • Gasoline engines
  • Diesel engines
  • Cooling system
  • Heating and ventilation
  • Power system (gasoline)
  • Fuel system (diesel)
  • Exhaust system
  • Ignition and control system
  • Charging and starting system
  • Transmission
  • Mechanical gearbox
  • Automatic gearbox
  • Clutch
  • Drive shafts and cardan
  • Transfer case
  • Chassis
  • Brake system
  • Front suspension
  • Rear suspension
  • Steering
  • Suspension geometry
  • Body
  • Exterior (external elements)
  • Interior (internal elements)
  • Doors and locks
  • Electrical equipment
  • Equipment and devices
  • Drive motors
  • Lighting and signaling
  • Audio system
  • Electrical circuits
 
MercedesMan.ru © 2017–2026 · Mobile version · Read about Mercedes · Sitemap: EN BG BY UA RS HR RO PL SK HU · Feedback · Site search · Bookmark A-Class (W168) · C-Class (W201) · C-Class (W202) · C-Class (W203) · E-Class (W123) · E-Class (W124) · E-Class (W210) · G-Class (W463) · M-Class (W163) · S-Class (W116, petrol) · S-Class (W126, petrol) · S-Class (W140) · S-Class (W220) · Sprinter · Vito 1 · Vito 2 · Vario 814D ·
 
We only use cookies without which some of the site's features may not be available.