
Cars BMW Cars Volkswagen Cars Chevrolet Cars Land Rover Cars Lada Cars Honda Cars Peugeot
English Русский
Български
Беларускі
Український
Српски
Hrvatski
Română
Polski
Slovenský
Magyar
Bookmark News and articles Sitemap Feedback Site search
MercedesMan.ru


A-Class C-Class E-Class G-Class M-Class S-Class Others
W163 (1997-2005)
  • Main
  • M-Class
  • W163 (1997-2005)
  • Body
  • Interior (internal elements)
  • Removal and installation carpet floor panels

Removal and installation carpet floor panels (Mercedes-Benz M-Class W163)

0
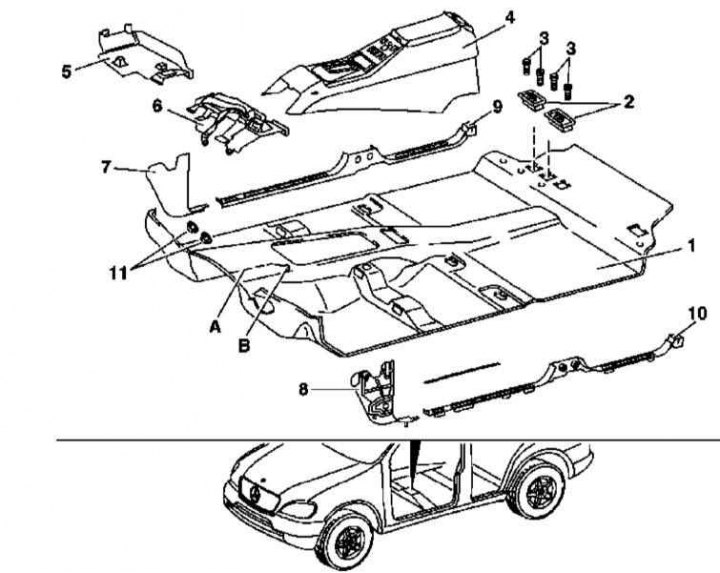
Carpet Floor Panel Installation Details

Carpet Floor Panel Installation Details
1 - Carpet panel (mat); 2 - Rear seat frame anchor points; 3 - Screws (TORX); 4 - Center console; 5 - Right lower instrument panel cover; 6 - Left lower instrument panel cover; 7 - Passenger footwell trim side panel; 8 - Passenger footwell trim side panel; 9 - Right side door sill trim; 10 - Left side door sill trim; 11 - Plastic nuts; A - Cut line; B - Cutout for central tunnel electrical wiring

Carpet Floor Panel Installation Details for Luggage Compartment

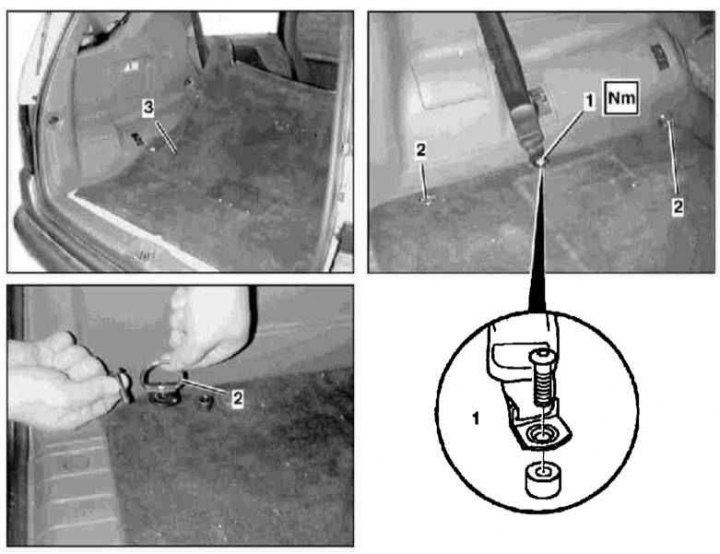
Carpet Floor Panel Installation Details for Luggage Compartment
1 - Additional third row seat belt anchor; 2 - Which are used to secure luggage; 3 - Carpet panel (mat)


The details of installing the carpet floor panels are shown in the illustrations.

Note: When removing the cargo area carpet panel, the child seat anchors must also be removed.
This article is available at: russian, bulgarian, belarusian, ukrainian, serbian, croatian, romanian, polish, slovak, hungarian
The article has been verified: Panova Maya Vladimirovna
Share with friends:
◀ Previous
M-Class W163 / Interior (internal elements)
Next ▶

Removal and installation door sill trims
Removal and installation front footwell trim panels
Removal and installation body pillar trim panels
Removal and installation the selector lever trim cover (using models produced up to 31.08.01 as an example)
Removal, disassembly and installation of the center console
Removal and installation front seat assemblies
Removal and installation the rear seat
Removal and installation seat backs
Removal and installation the folding armrest of the split rear seat
More similar articles for repairing other models

☛ Main Controls and Panels Mercedes W203 (2000-2007)
☛ Adjusting the gear shift drive (from the lever on the body floor… Mercedes W123 (1976-1985)
☛ Removal and installation carpet floor panels Mercedes W463 (1999-2019)
☛ Removal and installation interior door trim panels Mercedes W140 (1991-1998)
Link in different formats to this article
Comments and feedback from visitors
No comments yet


How much will 29 + 10 ?


W163 (1997-2005) 
  • General information
  • Introduction to the guide
  • Controls and instruments
  • Driving and operation
  • Maintenance
  • Power unit
  • Gasoline engines
  • Diesel engines
  • Cooling system
  • Heating and ventilation
  • Power system (gasoline)
  • Fuel system (diesel)
  • Exhaust system
  • Ignition and control system
  • Charging and starting system
  • Transmission
  • Mechanical gearbox
  • Automatic gearbox
  • Clutch
  • Drive shafts and cardan
  • Transfer case
  • Chassis
  • Brake system
  • Front suspension
  • Rear suspension
  • Steering
  • Suspension geometry
  • Body
  • Exterior (external elements)
  • Interior (internal elements)
  • Doors and locks
  • Electrical equipment
  • Equipment and devices
  • Drive motors
  • Lighting and signaling
  • Audio system
  • Electrical circuits
 
MercedesMan.ru © 2017–2026 · Mobile version · Read about Mercedes · Sitemap: EN BG BY UA RS HR RO PL SK HU · Feedback · Site search · Bookmark A-Class (W168) · C-Class (W201) · C-Class (W202) · C-Class (W203) · E-Class (W123) · E-Class (W124) · E-Class (W210) · G-Class (W463) · M-Class (W163) · S-Class (W116, petrol) · S-Class (W126, petrol) · S-Class (W140) · S-Class (W220) · Sprinter · Vito 1 · Vito 2 · Vario 814D ·
 
We only use cookies without which some of the site's features may not be available.