



Contents: Front seats ↡ Rear seats ↡
Front seats
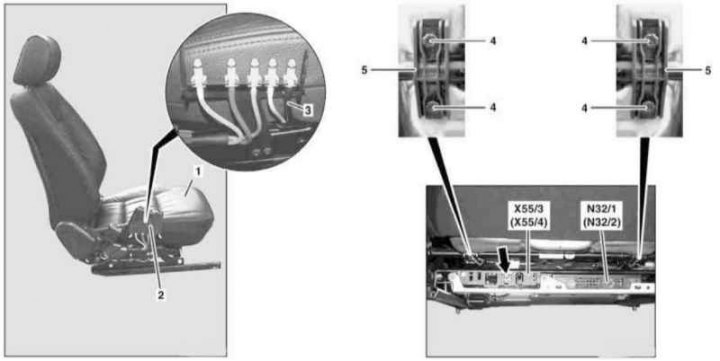
Driver's Seat Cushion Installation Details (1 of 2)
1 - Pillow; 2 - Control valve; 3 - Pneumatic line; 4 - Pins; 5 - Clamps; X55/3 - Driver's seat heating wiring connector; X55/4 - Passenger seat heating wiring connector; Arrow - Electrical wiring connector
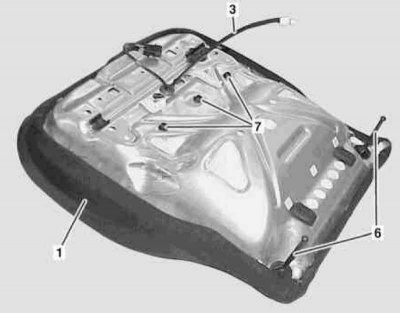
Driver's Seat Cushion Installation Details (2 of 2)
6 - Pins; 7 - Harness
1. On models with the corresponding configuration (code H10), remove the connecting block (X55/3 or X55/4) and disconnect the contact connector (arrow) from it. Having previously marked, release both seat heating wires from the connector casing.
2. Release both control module brackets.
3. On models with the corresponding configuration (code SM7 and SM/8) remove the check valve (2) and disconnect the pneumatic line 3) of the multi-circuit adjustment.
4. Remove the pins (4).
5. Carefully pry off the clamps (5).
6. Press the cushion (1) down and release the pins (6) from the guides.
7. Remove the harness (7), prepare replacement bandages.
8. Push forward and remove the cushion (1).
9. Installation is carried out in the reverse order - when installing the pins (6), ensure that the springs are positioned correctly.
Rear seats
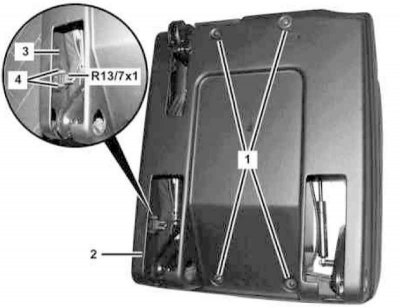
Rear Seat Cushion Installation Details (1 of 3)
1 - Cover fastening screw; 2 - Lid; 3 - Connecting block; 4 - Mounting screws; R13/7x1 - Right seat heating wiring connector
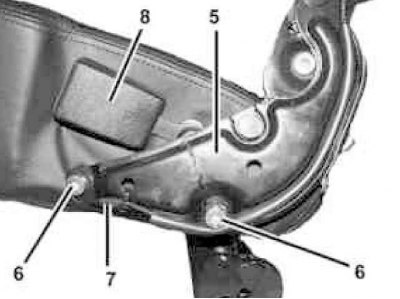
Rear Seat Cushion Installation Details (2 of 3)
5 - Bracket; 6 - Mounting screw; 7 - Heating wiring; 8 - Seat belt anchor
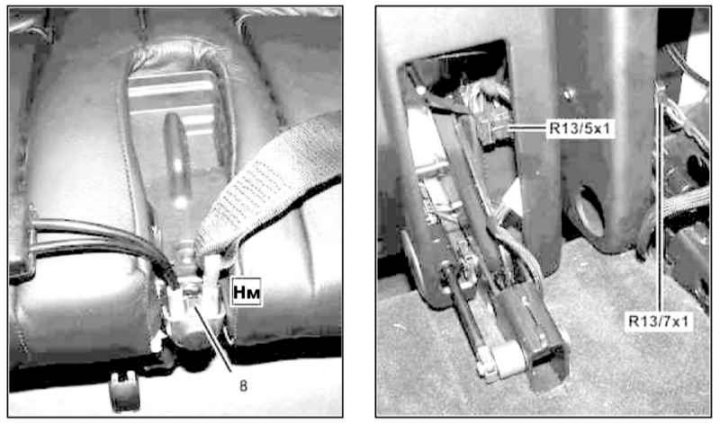
Rear Seat Cushion Installation Details (3 of 3)
R13/5x1 — Left seat heating wiring connector
R13/7x1 — Right seat heating wiring connector
[Publication reprinted from this resource: mercedesman.ru]
1. Remove the rear seat (see Section Removal and installation rear seat assemblies) and remove the back from it (see Section Removal and installation seat backs).
2. Place the seat assembly on a suitable support, with the lid facing up.
3. On models with the corresponding configuration (code H11), remove the connection block (3) of the heating element from the cover (2), unscrew the screws (4) and disconnect the connector (R13/5x1 or R13/7x1).
4. Loosen the fastening screws and remove the cover (2).
5. Unscrew the screws (6) and remove the bracket (5), - on models with the corresponding configuration (code H11), release the harness, release the electrical wiring (7) from the cushion and remove it together with the bracket.
6. Remove the rear seat belt(s) anchor assembly(ies) (8).
7. Installation is carried out in reverse order.