
Cars BMW Cars Volkswagen Cars Chevrolet Cars Land Rover Cars Lada Cars Honda Cars Peugeot
English Русский
Български
Беларускі
Український
Српски
Hrvatski
Română
Polski
Slovenský
Magyar
Bookmark News and articles Sitemap Feedback Site search
MercedesMan.ru


A-Class C-Class E-Class G-Class M-Class S-Class Others
190 (W201) (1982-1993) W202 (1993-2000) W203 (2000-2007)
  • Main
  • C-Class
  • W203 (2000-2007)
  • Transmission
  • Automatic gearbox
  • Transmission housing and torque converter

Transmission housing and torque converter (Mercedes-Benz C-Class W203)

0
Contents: Disassembly ↡ Assembly ↡

Transmission housing and torque converter
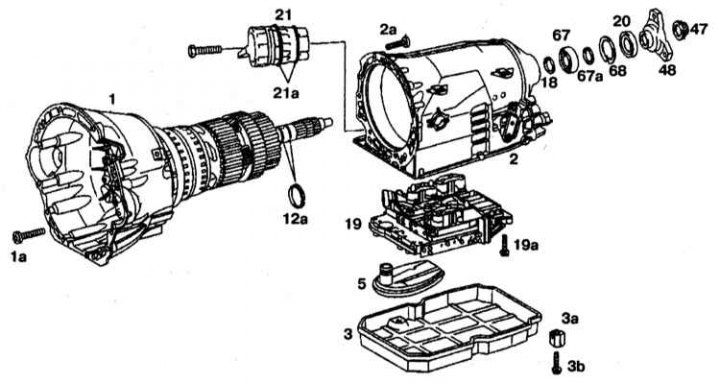


1 - Torque converter housing; 1a, 2a, 3b, 19a - Bolts; 2 - Transmission housing; 3 - Pallet; 3a -…

1 - Torque converter housing; 1a, 2a, 3b, 19a - Bolts; 2 - Transmission housing; 3 - Pallet; 3a - Spacer; 5 - Oil filter; 12a - Teflon rings; 18, 67a - Gaskets; 19 - Electrohydraulic control unit AT; 20 - Radial oil seal; 21 - Guide bushing; 21a - Sealing rings; 47 - Nut; 48 - Output flange; 67 - Ball bearing; 68 - Retaining ring


Disassembly


1. Loosen the guide sleeve (21) and remove it from the transmission.

2. Remove the tray (3).

3. Remove the oil filter (5).

4. Unscrew the bolts (19a) and remove the AT electro-hydraulic control unit (19).

5. Remove the flange (48).

6. Press out the radial oil seal (20), remove the gaskets (67a), the retaining ring (68) and press out the ball bearing (67) from the transmission housing.

7. Remove the gasket (18).

8. Remove bolt (1a) and (2a) from the torque converter and transmission housing.

9. Remove the transmission housing (2) from the torque converter housing (1).

Assembly


1. Lubricate with sealant and insert all Teflon rings (12a) into the groove together.

2. Install the gearbox (2) on the torque converter (1). Align brake discs B2 and B3.


3. Tighten bolts (1a) and (2a).

4. Measure the clearance between the parking brake pawl and the ball bearing. It should be within 0.3-0.5 mm.

5. Install the gasket (18), press the ball bearing into the rear of the transmission housing.

6. Install the gaskets (67a).

7. Install the radial oil seal (20) into the transmission housing.

8. Install flange (48).

9. Install and tighten the AT electrohydraulic control unit mounting bolts (19).

10. Further assembly is carried out in the reverse order of disassembly.
This article is available at: russian, bulgarian, belarusian, ukrainian, serbian, croatian, romanian, polish, slovak, hungarian
The article has been verified: Rodionov Artyom Semyonovich
Share with friends:
◀ Previous
C-Class W203 / Automatic gearbox
Next ▶

Disassembling and assembling the gear shift plate
Disassembly and assembly of the electrohydraulic control unit
Electrohydraulic control unit AT
Removal and installation of AT with a torque converter
Electronic control unit tasks and control signals
Multi-disc brakes B2, B3 and locking gear in «Parking»
Disassembly and assembly of the rear hollow shaft with the rear freewheel clutch
Removal and installation the B1 multi-disc brake and oil pump
Disassembly and assembly of the oil pump
Disassembly and assembly of the B1 multi-disc brake
More similar articles for repairing other models

☛ Manual transmission Mercedes W168 (1997-2004)
☛ Torque transmission Mercedes W210 (1996-2002)
☛ Removal and installation of AT with a torque converter Mercedes W463 (1999-2019)
☛ Removal and installation of AT with a torque converter Mercedes W163 (1997-2005)
☛ Disassembly and assembly of the transmission housing and torque… Mercedes W140 (1991-1998)
☛ Removal and installation of the automatic transmission housing Mercedes Sprinter (1995-2000, diesel)
Link in different formats to this article
Comments and feedback from visitors
No comments yet


How much will 12 + 42 ?


W203 (2000-2007) 
  • General information
  • Introduction to guide
  • User manual
  • Maintenance
  • Power unit
  • Gasoline engines
  • Diesel engines
  • Cooling system
  • Ventilation and heating
  • Supply system
  • Injection system (gasoline)
  • Injection system (diesel)
  • Exhaust system
  • Ignition and control system
  • Charge and launch systems
  • Transmission
  • Mechanical gearbox
  • Automatic gearbox
  • Clutch and drive shafts
  • Differential
  • Chassis
  • Brake system
  • Car suspension
  • Steering
  • Body
  • Exterior (external elements)
  • Interior (internal elements)
  • Electrical equipment
  • Equipment and devices
  • Lighting system
  • Electrical diagrams (2000)
  • Electrical diagrams (since 2001)
W202 (1993-2000) 
  • General information
  • User manual
  • Driving a car
  • Car care
  • Maintenance
  • Power unit
  • Gasoline engines
  • Diesel engines
  • Lubrication system
  • Cooling system
  • Heating and ventilation
  • Ignition system
  • Fuel system
  • Injection system (gasoline)
  • Injection system (diesel)
  • Exhaust system
  • Transmission
  • Clutch
  • Car gearbox
  • Chassis
  • Suspension, wheels and tires
  • Steering
  • Brake system
  • Body
  • Exterior (external elements)
  • Interior (internal elements)
  • Doors and windows
  • Electrical equipment
  • Equipment and devices
  • Power devices
  • Lighting system
  • Electrical circuits
190 (W201) (1982-1993) 
  • General information
  • Introduction to the guide
  • Operation and care
  • Maintenance (gasoline)
  • Maintenance (diesel)
  • Troubleshooting
  • Power unit
  • Petrol engine I4
  • Petrol engine V6
  • Diesel engines
  • Engine overhaul
  • Cooling and heating
  • Power system (carburetor)
  • Injection system (gasoline)
  • Injection system (diesel)
  • Exhaust system
  • Charge and start system
  • Ignition system (I4)
  • Ignition system (V6)
  • Diesel heating system
  • Transmission
  • Clutch
  • Mechanical gearbox
  • Automatic gearbox
  • Cardan shaft and axle shafts
  • Chassis
  • Brake system
  • Car suspension
  • Steering
  • Body
  • Exterior (external elements)
  • Interior (internal elements)
  • Doors, locks and windows
  • Electrical equipment
  • Equipment and devices
  • Electrical circuits
 
MercedesMan.ru © 2017–2026 · Mobile version · Read about Mercedes · Sitemap: EN BG BY UA RS HR RO PL SK HU · Feedback · Site search · Bookmark A-Class (W168) · C-Class (W201) · C-Class (W202) · C-Class (W203) · E-Class (W123) · E-Class (W124) · E-Class (W210) · G-Class (W463) · M-Class (W163) · S-Class (W116, petrol) · S-Class (W126, petrol) · S-Class (W140) · S-Class (W220) · Sprinter · Vito 1 · Vito 2 · Vario 814D ·
 
We only use cookies without which some of the site's features may not be available.