
Dismantling the carburetor
Loosen the four carburetor mounting nuts.
Remove safety spring ("1" pic. 117).
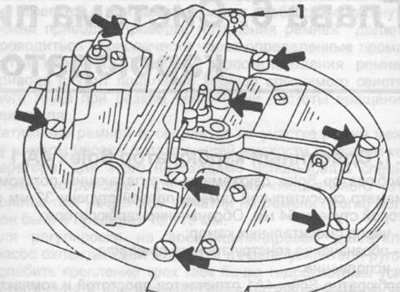
Pic. 117. Removing the carburetor.
1 - safety spring.
Remove control rods.
Loosen the eight pan head screws securing the carburetor cover (arrow in fig. 117), in the places provided, lift the cover with a screwdriver and then remove the cover.
Check the operation of the accelerator pump. At the same time, from two ball valves (shown by arrows in fig. 118) fuel should appear at the same time. If there is no fuel in the valves, remove the pump cover, check the condition of the diaphragm and blow out the inlet and outlet channels.
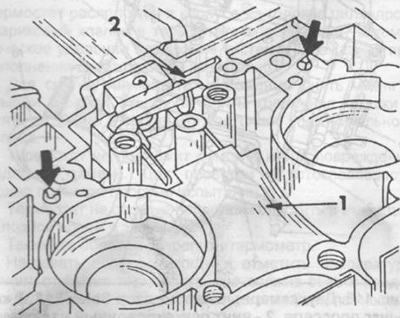
Pic. 118. Checking ball valves.
1 - float,
2 - holder.
Remove holder ("2", pic. 118) and remove the float and needle valve.
Unscrew the two main jets and two plugs from the idle fuel channels (see fig. 119).
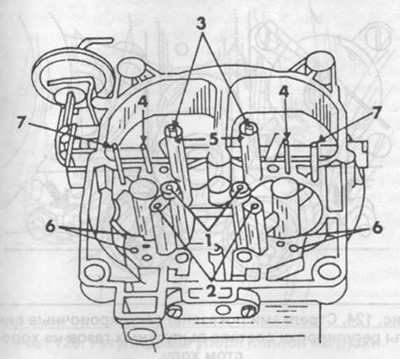
Pic. 119. Dismantling the carburetor.
1 - main jets of the 1st stage,
2 - plugs of fuel channels of idling (to idle fuel jets),
3 - jet needles 2nd stage,
4 - pressure pipes of the transition system 2 stages,
5 - main jets,
6 - calibrated holes for fuel injection,
7 - pressure tubes of the device for enriching the mixture at start-up.
Carburetor cleaning
Blow out the carburetor body, all drillings and pressure pipes in the carburetor cap and all jets with compressed air. For cleaning the jets, the use of needles or wire is unacceptable, because. the holes may be damaged or resized, which will affect the power of the engine.
Carburetor assembly
Install jets, float, needle valve and holder.
Install a new gasket on the carburetor body.
Check if the gasket is blocking the channels in the carburetor body.
Install the carburetor cover.
Tighten the carburetor mounting nuts crosswise to 15 Nm.