
Cars BMW Cars Volkswagen Cars Chevrolet Cars Land Rover Cars Lada Cars Honda Cars Peugeot
English Русский
Български
Беларускі
Український
Српски
Hrvatski
Română
Polski
Slovenský
Magyar
Bookmark News and articles Sitemap Feedback Site search
MercedesMan.ru


A-Class C-Class E-Class G-Class M-Class S-Class Others
190 (W201) (1982-1993) W202 (1993-2000) W203 (2000-2007)
  • Main
  • C-Class
  • W201 (1982-1993)
  • Electrical equipment
  • Equipment and devices
  • Windscreen wiper motor — removal and installation

Windscreen wiper motor — removal and installation (Mercedes-Benz C-Class W201)

0
Contents: Removal ↡ Installation ↡

Removal


1. Remove the wiper motor and linkage from the vehicle as described in the previous paragraph.

2. Loosen the fastening nut and remove the crankshaft lever from the electric motor pivot axis (see fig. 19.2).
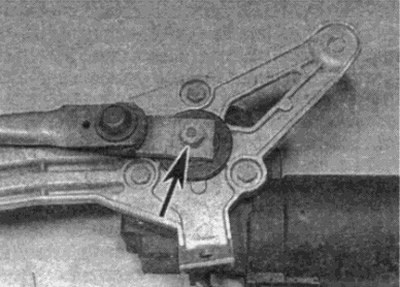
Fig. 19.2 Unscrew the crankshaft lever mounting nut (shown by arrow)

Fig. 19.2 Unscrew the crankshaft lever mounting nut (shown by arrow)


3. Remove the three bolts and remove the electric motor from the lever mechanism bracket.

4. Additionally, on the panoramic windshield wiper, the lever mechanism can be removed after unscrewing the nut on the other end (see fig. 19.4).
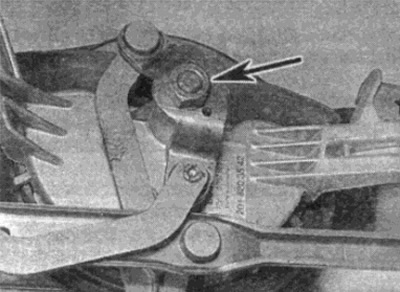
Fig. 19.4. Lever mechanism lever fastening nut (shown by arrow)

Fig. 19.4. Lever mechanism lever fastening nut (shown by arrow)


Installation


5. Installation is carried out in the reverse order. When installing the lever mechanism and the electric motor in the initial position, the cardan shaft and the lever mechanism must be located parallel to each other, as the cardan shaft is installed on the axis of rotation of the electric motor (see fig. 19.5).


[Text republished from the website: MERCEDESMAN.ru]
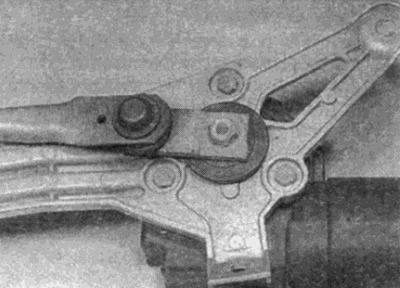
Fig. 19.5. The cardan shaft lever and the mechanism lever must be parallel and in line with the…

Fig. 19.5. The cardan shaft lever and the mechanism lever must be parallel and in line with the cardan shaft lever
This article is available at: russian, bulgarian, belarusian, ukrainian, serbian, croatian, romanian, polish, slovak, hungarian
The article has been verified: Lukyanov Nikita Ilyich
Share with friends:
◀ Previous
C-Class 190 (W201) / Equipment and devices
Next ▶

Windscreen wiper motor and linkage — removal and installation
Windscreen wiper blades and arms — removal and installation
Headlight beam height adjustment system — description
Headlight adjustment
Headlight glass — removal and installation
Windshield Washer System — Removal, Installation and Adjustment
Sound signals — removal and installation
Audio equipment — removal and installation
Front and rear speakers — removal and installation
Radio antenna — removal and installation
More similar articles for repairing other models

☛ Windscreen wiper — removal and installation Mercedes W168 (1997-2004)
☛ Windscreen wiper motor terminals Mercedes W210 (1996-2002)
☛ Removal and installation the electric motor of the ventilation flap… Mercedes W463 (1999-2019)
☛ Removal and installation the intake port shutoff motor (612 series… Mercedes W163 (1997-2005)
☛ Checking the windshield wiper motor Mercedes W140 (1991-1998)
☛ Removal and installation the windshield wiper motor and arms Mercedes Sprinter (1995-2000, diesel)
Link in different formats to this article
Comments and feedback from visitors
No comments yet


How much will 29 + 46 ?


W203 (2000-2007) 
  • General information
  • Introduction to guide
  • User manual
  • Maintenance
  • Power unit
  • Gasoline engines
  • Diesel engines
  • Cooling system
  • Ventilation and heating
  • Supply system
  • Injection system (gasoline)
  • Injection system (diesel)
  • Exhaust system
  • Ignition and control system
  • Charge and launch systems
  • Transmission
  • Mechanical gearbox
  • Automatic gearbox
  • Clutch and drive shafts
  • Differential
  • Chassis
  • Brake system
  • Car suspension
  • Steering
  • Body
  • Exterior (external elements)
  • Interior (internal elements)
  • Electrical equipment
  • Equipment and devices
  • Lighting system
  • Electrical diagrams (2000)
  • Electrical diagrams (since 2001)
W202 (1993-2000) 
  • General information
  • User manual
  • Driving a car
  • Car care
  • Maintenance
  • Power unit
  • Gasoline engines
  • Diesel engines
  • Lubrication system
  • Cooling system
  • Heating and ventilation
  • Ignition system
  • Fuel system
  • Injection system (gasoline)
  • Injection system (diesel)
  • Exhaust system
  • Transmission
  • Clutch
  • Car gearbox
  • Chassis
  • Suspension, wheels and tires
  • Steering
  • Brake system
  • Body
  • Exterior (external elements)
  • Interior (internal elements)
  • Doors and windows
  • Electrical equipment
  • Equipment and devices
  • Power devices
  • Lighting system
  • Electrical circuits
190 (W201) (1982-1993) 
  • General information
  • Introduction to the guide
  • Operation and care
  • Maintenance (gasoline)
  • Maintenance (diesel)
  • Troubleshooting
  • Power unit
  • Petrol engine I4
  • Petrol engine V6
  • Diesel engines
  • Engine overhaul
  • Cooling and heating
  • Power system (carburetor)
  • Injection system (gasoline)
  • Injection system (diesel)
  • Exhaust system
  • Charge and start system
  • Ignition system (I4)
  • Ignition system (V6)
  • Diesel heating system
  • Transmission
  • Clutch
  • Mechanical gearbox
  • Automatic gearbox
  • Cardan shaft and axle shafts
  • Chassis
  • Brake system
  • Car suspension
  • Steering
  • Body
  • Exterior (external elements)
  • Interior (internal elements)
  • Doors, locks and windows
  • Electrical equipment
  • Equipment and devices
  • Electrical circuits
 
MercedesMan.ru © 2017–2026 · Mobile version · Read about Mercedes · Sitemap: EN BG BY UA RS HR RO PL SK HU · Feedback · Site search · Bookmark A-Class (W168) · C-Class (W201) · C-Class (W202) · C-Class (W203) · E-Class (W123) · E-Class (W124) · E-Class (W210) · G-Class (W463) · M-Class (W163) · S-Class (W116, petrol) · S-Class (W126, petrol) · S-Class (W140) · S-Class (W220) · Sprinter · Vito 1 · Vito 2 · Vario 814D ·
 
We only use cookies without which some of the site's features may not be available.