



Contents: Setting the current time ↡ Setting the moment the heater is…↡ The heater is switched off ↡ View mode for selected settings ↡ Remote control of independent heater ↡ General notes on the rules for using…↡
Note: It is not permitted to activate an independent heater in the areas of petrol stations and inside closed premises not equipped with forced ventilation.
In addition to the automated air conditioning system, all models come standard with a programmable gasoline independent interior heater. The heater control panel with a built-in information display is located in the upper right corner of the vertical section of the central console.
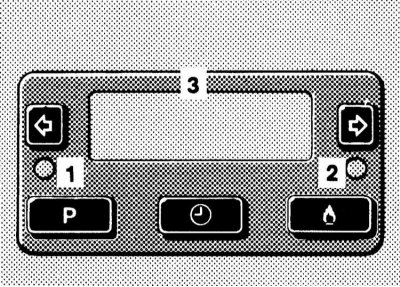
Control panel for independent interior heater operation
1 - Preset mode control LED (yellow)
2 — Heater activation control LED (green)
3 - Information display
Button
 allows you to program up to three heater activations.
Using the button
 enters the mode for setting the current time, day of the week and heater switch-on time.
Correction of data in the setup mode is performed using the buttons
 and
and  (forward/backward).
The button is used for immediate activation of the heater
 .
.
Before turning on the heater, use the buttons
 or
or  on the air conditioning control panel, set the temperature to which the air in the cabin should be heated.
To activate the heater immediately, press the button
 control panel, - the green control LED built into the panel should light up. The heater is activated after approximately 30 seconds or when the coolant temperature drops below 70°C. The maximum operating time of the device is 60 minutes. The heater can be switched off by pressing the button again
  , - the LED should go out.
Setting the current time
Enter the current time setting mode by holding down the button
 , - the clock readings start flashing on the display screen. The readings are adjusted using the buttons
  and
and  .
.
Note: Pressing the buttons simultaneously allows you to advance the clock in 1-minute increments.
After approximately three seconds, the day of the week is displayed on the display screen in flashing mode; the setting is made using the same buttons (
 and
and  ).
).
Note: To set the day of the week, you must first set the clock display by at least one minute.
Setting the moment the heater is turned on
The design of the device allows you to program up to three heater activations with the ability to then select any of the three settings.
To enter the setup mode, press the P button on the heater control panel once, twice or three times (first, second and third inclusion respectively), - the yellow control LED on the control panel will light up, and the last entered reading will be displayed on the screen, for example:
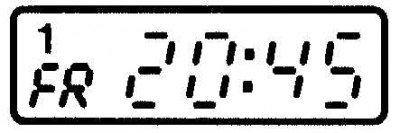
Note: The number 1 in the upper left corner of the display indicates the programmable power-on number (call by pressing the P button once).
The readings are adjusted using the buttons
 and
and  .
.
First, the value of the on-time is adjusted - pressing the buttons simultaneously allows you to change the readings in 1-minute increments. Then, the day of the week. As soon as the day of the week starts flashing, press one of the setting buttons (
 or
or  ) and hold it down for about 3 seconds. If necessary, the day of the week may not be set - select the designation in the form of two dashes (--).
20 seconds after the end of the setting, the time and day indication on the display will go out. The program number of the last setting remains displayed in the upper left corner of the screen. The yellow control LED of the preselection mode will also continue to light.
To exit preselection mode (failure of programmed heater activation) press the P button until the program input number disappears from the display screen and the yellow control LED goes out.
Activation of any of the settings entered into the device's memory for a given heater activation is also performed using the P button - the program number should appear in the upper left corner of the screen, as well as (for 20 seconds) - entered data.
If the day of the week has not been set, the lower left corner of the screen will remain blank, for example:
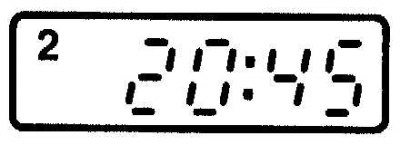
With this setting, the heater will be activated daily at 20:45.
The heater is switched off
If the green control LED on the control panel is lit, you should press the button
 , if yellow, - button P (press until the program number disappears from the screen and the LED goes out).
View mode for selected settings
Press and hold the button
 , - the display screen will show the current time of day and day of the week, for example:
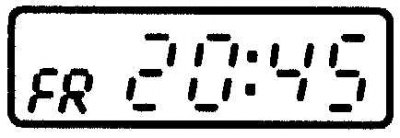
Release the button
 , - after approximately 3 seconds the display will show the activated preselection mode, for example:
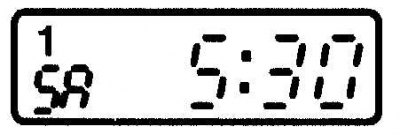
In this case, the heater will be activated in accordance with the first programmed activation setting every Saturday at 5:30 am.
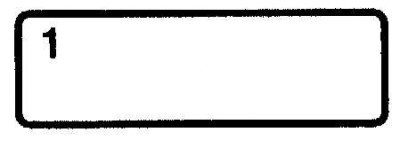
Finally, all data will disappear from the screen except for the number of the activated software switch on the heater:
Remote control of independent heater
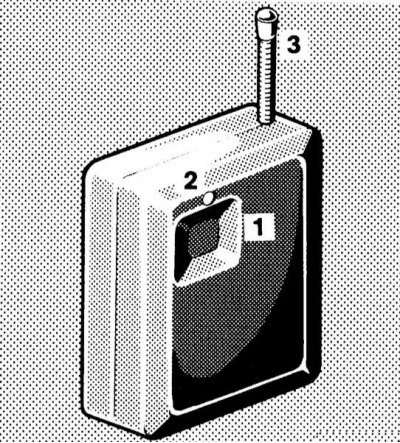
Remote control for independent heater
1 - Transmitter activation button
2 — Control LED
3 - Antenna
The heater kit includes a remote control (remote control).
The remote control allows you to activate an independent heater from a distance of up to 1000 meters.
Note: When transmitting a signal from an enclosed space, the transmitter's range may be reduced.
Hold the remote control with the antenna facing up. Press the transmitter button - the control LED should light up. Release the button - the LED will go out after about 6 seconds, during which time the remote control should continue to be held with the antenna facing up.
The independent heater will be activated after approximately 30 seconds or when the coolant temperature drops below 70°C. The maximum duration of continuous operation of the heater is 60 minutes.
The heater can be stopped from inside the vehicle by pressing a button
 , - the green control LED on the control panel should go out.
Note: If the control LED does not light when you press the transmitter button, you should replace the remote control battery.
Replacing the remote control battery
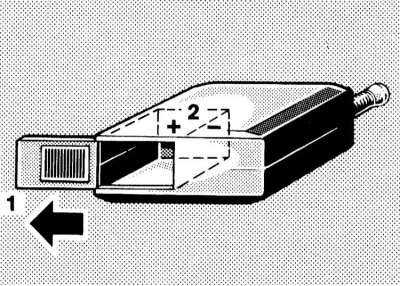
Replacing the battery of the remote control of an independent heater
1 - Sliding cover
2 — Polarity of element installation
Slide the access cover from the bottom of the remote control, remove the battery and install a new one in its place, making sure to observe the polarity.
Replace the cover.
Note: Disposal of used batteries must be carried out in compliance with environmental protection requirements!
General notes on the rules for using an independent heater
In order to save battery power, avoid unnecessary switching on of the heater, especially following each other in a short time. Switch off the heater as soon as the interior is sufficiently warmed up.
It should be noted that when the heater is turned on with the ignition key removed from the lock or turned to position 1 or 0, the activation of the cooling fan occurs only after the coolant has warmed up to a certain temperature.
When power is supplied after the on-board power supply is disconnected, the display screen flashes the day of the week and time of day, which should be adjusted first. Then, the settings for programmable heater activation can be entered into the device's memory.
If the green control LED switches off spontaneously, this indicates a malfunction - at the same time, the letter F appears on the display screen - contact a Mercedes-Benz service station for assistance.