
Cars BMW Cars Volkswagen Cars Chevrolet Cars Land Rover Cars Lada Cars Honda Cars Peugeot
English Русский
Български
Беларускі
Український
Српски
Hrvatski
Română
Polski
Slovenský
Magyar
Bookmark News and articles Sitemap Feedback Site search
MercedesMan.ru


A-Class C-Class E-Class G-Class M-Class S-Class Others
W463 (1999-2019)
  • Main
  • G-Class
  • W463 (1999-2019)
  • Electrical equipment
  • Equipment and devices
  • Relays — general information and checking the correct functioning

Relays — general information and checking the correct functioning (Mercedes-Benz G-Class W463)

0
Contents: General information ↡ Examination ↡

General information
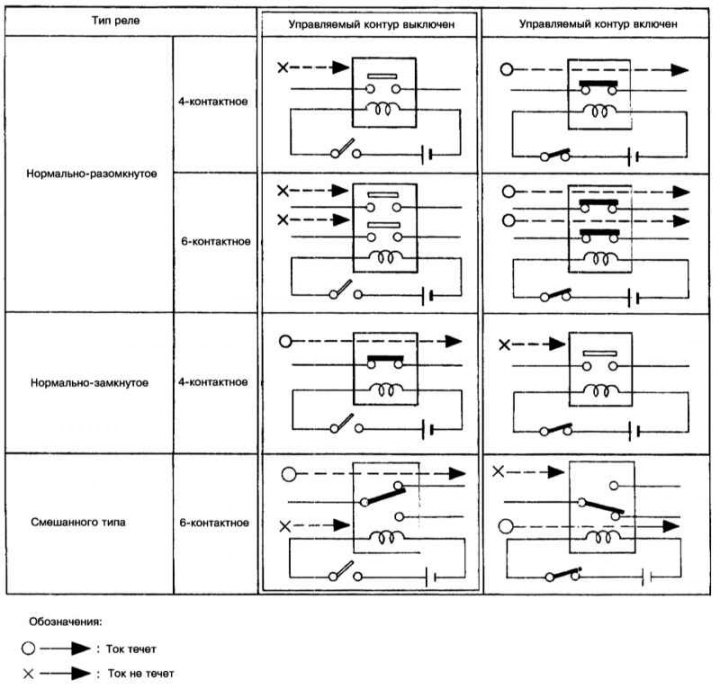


Operating principles of different types of relays

Operating principles of different types of relays


Relays are used to supply power or a control signal to many of the electrical consumers in a car (such as fuel injection system components, horn, starter, cooling fan(s), fog lights, etc.). In fact, a relay is an electric key that ensures the closure of the high-voltage circuit by a low-voltage signal. If a relay fails, the corresponding consumer will not function. Most relays are located in the engine compartment, while others are "scattered" throughout the car. A description of how to check the proper functioning of a relay is given below. Failed relays must be replaced.

Examination


The correctness of the relay connection can always be determined using the electrical connection diagrams provided in Part H of this Chapter.

Usually, the control circuit is always connected to two of the relay contact terminals. When voltage is applied to these terminals, the current begins to circulate through the relay control winding, which results in the closing of the large contacts of the working circuit of the consumer of electric power. The remaining terminals are terminals of the working (BB) circuit and are closed with each other when power is applied to the control circuit.


To facilitate identification of the relay terminals, explanatory markings with an image of the key connection diagram are usually applied to the relay body. If such markings are missing, refer to the electrical connection diagrams (see Electrical connection diagrams).

To check, connect an ohmmeter between the two terminals of the relay circuit - in a normally open type relay there should be no continuity. Now connect a jumper wire equipped with a fuse between one of the relay control terminals and the positive terminal of the battery (B+). Using another jumper wire, ground the second control terminal - the relay should click, after which the ohmmeter will record the presence of continuity (normally open relay). Some relays require that the polarity of the connection be strictly observed.

If the test result is negative, replace the relay.

Original can be found on the website MercedesMAN.ru
This article is available at: russian, bulgarian, belarusian, ukrainian, serbian, croatian, romanian, polish, slovak, hungarian
The article has been verified: Polyakov Zakhar Grigorievich
Share with friends:
◀ Previous
G-Class W463 / Equipment and devices
Next ▶

Circuit Breakers — General Information
Fuses — General Information
Search for causes of electrical equipment failures
General information and precautions
On-board electrical equipment specifications
Digital data bus CAN
Disconnecting and connecting electrical wiring of mounting blocks and control modules
Removal and installation fuse and relay mounting blocks
Removal and installation control modules
Removal and installation windshield wiper drive electric motors
More similar articles for repairing other models

☛ Checking the engine oil level using a dipstick Mercedes W168 (1997-2004)
☛ Checking the functioning of the cooling system and frost resistance… Mercedes W203 (2000-2007)
☛ Checking and adjusting clearances in the valve drive mechanism on… Mercedes W123 (1976-1985)
☛ Relays — general information and checking the correct functioning Mercedes W163 (1997-2005)
☛ Checking the functioning of the cooling system and frost resistance… Mercedes W140 (1991-1998)
☛ Checking the engine oil level Mercedes Sprinter (1995-2000, diesel)
Link in different formats to this article
Comments and feedback from visitors
No comments yet


How much will 27 + 16 ?


W463 (1999-2019) 
  • General information
  • Introduction to the guide
  • Controls and instruments
  • Driving and operation
  • Maintenance
  • Power unit
  • Engine repair
  • Cooling system
  • Heating and ventilation
  • Power system (gasoline)
  • Fuel system (diesel)
  • Exhaust system
  • Ignition and control system
  • Charging and starting system
  • Transmission
  • Automatic gearbox
  • Transfer case
  • Axles front and rear
  • Chassis
  • Brake system
  • Front suspension
  • Rear suspension
  • Steering
  • Body
  • Exterior (external elements)
  • Interior (internal elements)
  • Doors, locks and windows
  • Electrical equipment
  • Equipment and devices
  • Switches in salon
  • Headlights and lighting
  • Audio system and navigation
  • Electrical circuits
 
MercedesMan.ru © 2017–2026 · Mobile version · Read about Mercedes · Sitemap: EN BG BY UA RS HR RO PL SK HU · Feedback · Site search · Bookmark A-Class (W168) · C-Class (W201) · C-Class (W202) · C-Class (W203) · E-Class (W123) · E-Class (W124) · E-Class (W210) · G-Class (W463) · M-Class (W163) · S-Class (W116, petrol) · S-Class (W126, petrol) · S-Class (W140) · S-Class (W220) · Sprinter · Vito 1 · Vito 2 · Vario 814D ·
 
We only use cookies without which some of the site's features may not be available.