
Cars BMW Cars Volkswagen Cars Chevrolet Cars Land Rover Cars Lada Cars Honda Cars Peugeot
English Русский
Български
Беларускі
Український
Српски
Hrvatski
Română
Polski
Slovenský
Magyar
Bookmark News and articles Sitemap Feedback Site search
MercedesMan.ru


A-Class C-Class E-Class G-Class M-Class S-Class Others
190 (W201) (1982-1993) W202 (1993-2000) W203 (2000-2007)
  • Main
  • C-Class
  • W203 (2000-2007)
  • Transmission
  • Differential
  • Disassembling and assembling a differential with automatic locking

Disassembling and assembling a differential with automatic locking (Mercedes-Benz C-Class W203)

0
Contents: Disassembly ↡ Assembly ↡

Differential with automatic locking
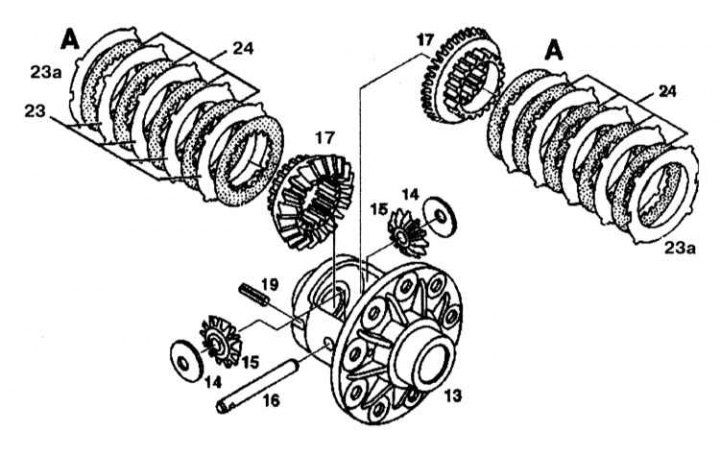


A - Block of friction discs with driven gear with diameter of 185 mm

A - Block of friction discs with driven gear with diameter of 185 mm


Remove roller pin 19 and differential pin 16 using a punch from differential housing 13.
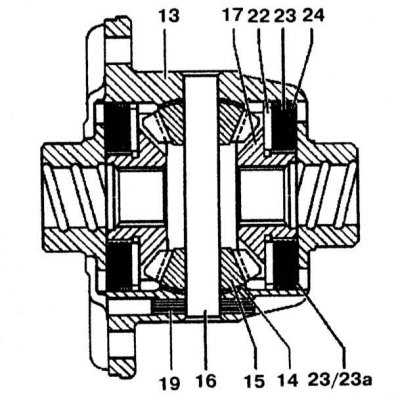
To all illustrations: 13 - Differential housing; 14 - Spherical washer; 15 - Satellites; 16 -…


To all illustrations: 13 - Differential housing; 14 - Spherical washer; 15 - Satellites; 16 - Differential pin; 17 - Drive shaft gears; 19 - Roller pin; 22 - Friction disc with lining on one side; 23, 23a - Friction discs without linings; 24 - Friction discs with linings on both sides


(Material borrowed from an online resource: MercedesMAN.ru)

Secure the friction discs in the correct order on both drive gears of the drive shafts 17.
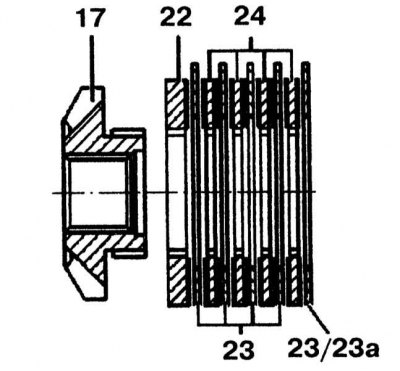
17 - Drive shaft gear; 22 - Friction disc with lining on one side; 23, 23a - Friction discs without…

17 - Drive shaft gear; 22 - Friction disc with lining on one side; 23, 23a - Friction discs without linings; 24 - Friction discs with linings on both sides


The differential with automatic locking is shown in the illustration.

Disassembly
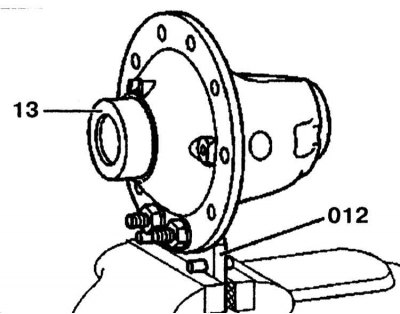


1. Secure the differential housing (13).


1. Secure the differential housing (13).

2. Remove the roller pin (19) and differential pin (16) using a punch from the differential housing (13).
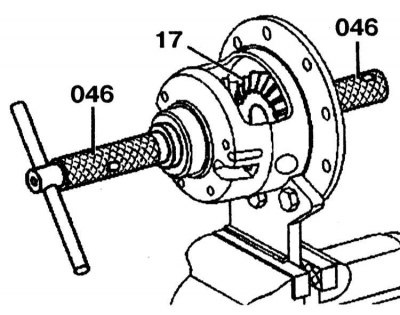
3. Install the drifts (046) into the drive gears of the drive shafts (17).

3. Install the drifts (046) into the drive gears of the drive shafts (17).

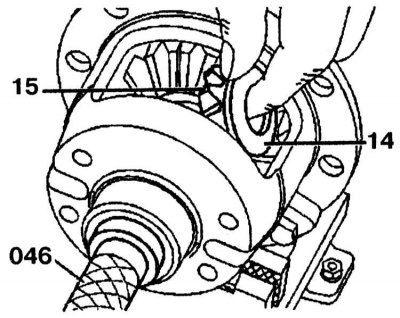
4. Turn the satellites (15) with spherical washers (14) towards the hole and remove them.

4. Turn the satellites (15) with spherical washers (14) towards the hole and remove them.


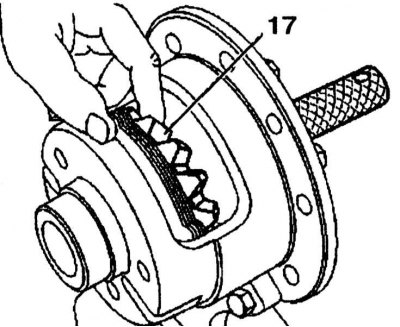
5. First remove the right drive shaft gear (17) (shown in installed position) with friction discs.
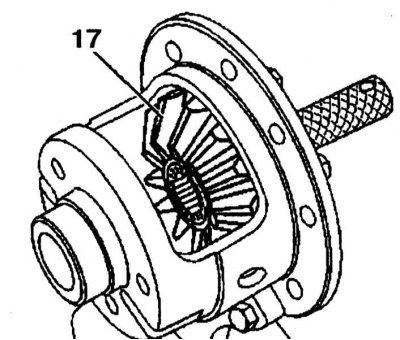

5. First remove the right drive shaft gear (17) (shown in installed position) with friction discs.

6. Remove the left drive shaft gear (17) (from the driven gear side) with friction discs.


6. Remove the left drive shaft gear (17) (from the driven gear side) with friction discs.

Assembly


1. Secure the friction discs in the correct order to both drive shaft gears (17) and thoroughly lubricate the friction discs (22) and (24) with universal hypoid transmission fluid.
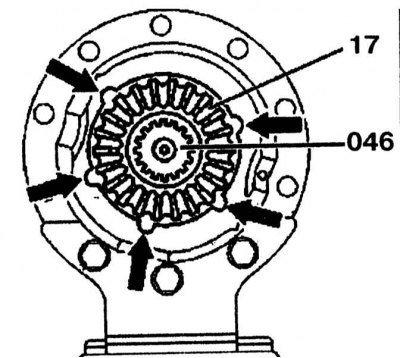
2. Install the left drive gear of the drive shaft first (from the driven gear side) with friction…


2. Install the left drive gear of the drive shaft first (from the driven gear side) with friction discs, then install the right drive gear of the drive shaft (17) with friction discs and install the drift (046), paying attention to the fact that the friction discs without linings have ears (arrows).
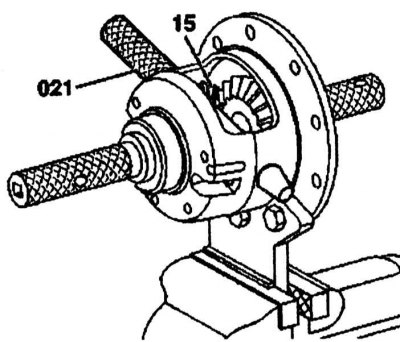


3. Install the satellites (15) with spherical washers (14), using a drift (046), screw them in…


3. Install the satellites (15) with spherical washers (14), using a drift (046), screw them in until they are seated in the differential housing.

4. Install the differential pin using a drift into the satellites and spherical washers.

5. Check the differential friction torque. It should be 80-160 Nm.

6. Install the differential pin (16) and roller pin (19).

7. Remove the differential from the vice.
This article is available at: russian, bulgarian, belarusian, ukrainian, serbian, croatian, romanian, polish, slovak, hungarian
The article has been verified: Rodionov Artyom Semyonovich
Share with friends:
◀ Previous
C-Class W203 / Differential
Next ▶

Checking and adjusting the flange clearance
Determining the thickness of the adjusting shim and installing it in the gearbox housing
Disassembly and assembly of the main gear reducer and adjustment of gear clearances
Disassembling and assembling the differential
 
More similar articles for repairing other models

☛ Locking the car locks Mercedes W168 (1997-2004)
☛ Disassembling and assembling the gearshift cover Mercedes W123 (1976-1985)
☛ Disassembling and assembling the bearing cap Mercedes W463 (1999-2019)
☛ Unlocking and locking doors Mercedes W163 (1997-2005)
☛ Disassembling and assembling a differential with automatic locking Mercedes W140 (1991-1998)
☛ Disassembling and assembling the differential Mercedes Vito 1 (1996-2003)
Link in different formats to this article
Comments and feedback from visitors
No comments yet


How much will 42 + 40 ?


W203 (2000-2007) 
  • General information
  • Introduction to guide
  • User manual
  • Maintenance
  • Power unit
  • Gasoline engines
  • Diesel engines
  • Cooling system
  • Ventilation and heating
  • Supply system
  • Injection system (gasoline)
  • Injection system (diesel)
  • Exhaust system
  • Ignition and control system
  • Charge and launch systems
  • Transmission
  • Mechanical gearbox
  • Automatic gearbox
  • Clutch and drive shafts
  • Differential
  • Chassis
  • Brake system
  • Car suspension
  • Steering
  • Body
  • Exterior (external elements)
  • Interior (internal elements)
  • Electrical equipment
  • Equipment and devices
  • Lighting system
  • Electrical diagrams (2000)
  • Electrical diagrams (since 2001)
W202 (1993-2000) 
  • General information
  • User manual
  • Driving a car
  • Car care
  • Maintenance
  • Power unit
  • Gasoline engines
  • Diesel engines
  • Lubrication system
  • Cooling system
  • Heating and ventilation
  • Ignition system
  • Fuel system
  • Injection system (gasoline)
  • Injection system (diesel)
  • Exhaust system
  • Transmission
  • Clutch
  • Car gearbox
  • Chassis
  • Suspension, wheels and tires
  • Steering
  • Brake system
  • Body
  • Exterior (external elements)
  • Interior (internal elements)
  • Doors and windows
  • Electrical equipment
  • Equipment and devices
  • Power devices
  • Lighting system
  • Electrical circuits
190 (W201) (1982-1993) 
  • General information
  • Introduction to the guide
  • Operation and care
  • Maintenance (gasoline)
  • Maintenance (diesel)
  • Troubleshooting
  • Power unit
  • Petrol engine I4
  • Petrol engine V6
  • Diesel engines
  • Engine overhaul
  • Cooling and heating
  • Power system (carburetor)
  • Injection system (gasoline)
  • Injection system (diesel)
  • Exhaust system
  • Charge and start system
  • Ignition system (I4)
  • Ignition system (V6)
  • Diesel heating system
  • Transmission
  • Clutch
  • Mechanical gearbox
  • Automatic gearbox
  • Cardan shaft and axle shafts
  • Chassis
  • Brake system
  • Car suspension
  • Steering
  • Body
  • Exterior (external elements)
  • Interior (internal elements)
  • Doors, locks and windows
  • Electrical equipment
  • Equipment and devices
  • Electrical circuits
 
MercedesMan.ru © 2017–2026 · Mobile version · Read about Mercedes · Sitemap: EN BG BY UA RS HR RO PL SK HU · Feedback · Site search · Bookmark A-Class (W168) · C-Class (W201) · C-Class (W202) · C-Class (W203) · E-Class (W123) · E-Class (W124) · E-Class (W210) · G-Class (W463) · M-Class (W163) · S-Class (W116, petrol) · S-Class (W126, petrol) · S-Class (W140) · S-Class (W220) · Sprinter · Vito 1 · Vito 2 · Vario 814D ·
 
We only use cookies without which some of the site's features may not be available.