
Cars BMW Cars Volkswagen Cars Chevrolet Cars Land Rover Cars Lada Cars Honda Cars Peugeot
English Русский
Български
Беларускі
Український
Српски
Hrvatski
Română
Polski
Slovenský
Magyar
Bookmark News and articles Sitemap Feedback Site search
MercedesMan.ru


A-Class C-Class E-Class G-Class M-Class S-Class Others
190 (W201) (1982-1993) W202 (1993-2000) W203 (2000-2007)
  • Main
  • C-Class
  • W202 (1993-2000)
  • Power unit
  • Gasoline engines
  • V-belt (6-cylinder engine)

V-belt (6-cylinder engine) (Mercedes-Benz C-Class W202)

0
Contents: Removal ↡ Installation ↡

Removal


Removal


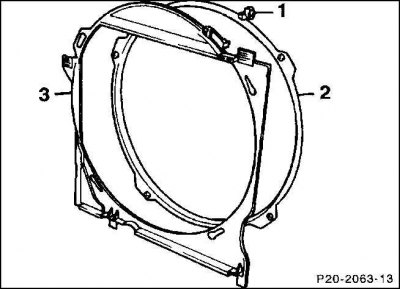
1. Pull the locking tab (1) out of the fan shroud ring (2). Turn the shroud in the direction of the "open" arrow and remove by turning the fan impeller.
1. Pull the locking tab (1) out of the fan shroud ring (2). Turn the shroud in the direction of the…


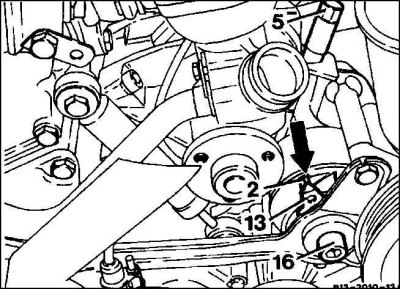
2. Loosen the bolt (16) by 1/4–1/2 turn. Turn the nut (5) to the left, thereby loosening the belt and remove it. Additionally shown parts: 13 – adjustment indicator, arrow – second division.

Installation


1. Tension roller; 2. Crankshaft belt pulley; 3. Cooling compressor (air conditioner); 5. Fan; 7.…

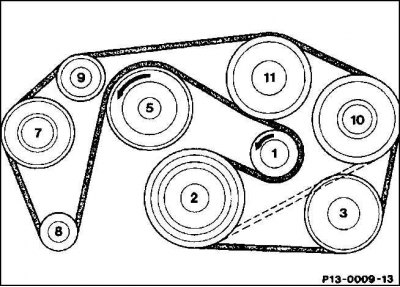
1. Tension roller; 2. Crankshaft belt pulley; 3. Cooling compressor (air conditioner); 5. Fan; 7. Air pump; 8. Generator; 9. Guide roller; 10. Power steering pump; 11. Coolant pump

Length: 2337 mm or 2440 mm (with air conditioning)


1. Check the profile of the belt pulleys and tensioner for damage and dirt, clean or replace if necessary. Pay attention to the knocked out places of the tensioner support and the dimples on the belt pulleys.

2. V-ribbed belts with dirt deposits between the ribs, loose ribs, cracks, fraying and broken ribs must be replaced.

3. Apply the V-belt, starting from the tension roller, according to the numbering sequence in the figure.

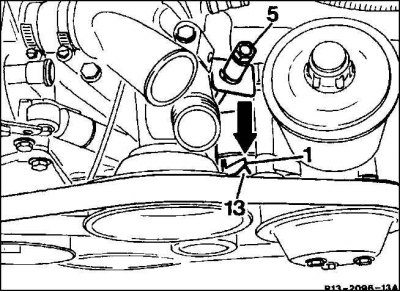
4. Set the adjustment pointer to the marking (1).
4. Set the adjustment pointer to the marking (1).


5. Turn the tension nut (5) to the right until the adjustment pointer (13) aligns with the marking (2).

(Publication taken from an online resource: mercedesman.ru)

6. Tighten the bolt (16) to 75 Nm.

7. Visually check the fit of the belt on the belt pulleys.

8. Install the fan shroud ring, rotate and lock.
This article is available at: russian, bulgarian, belarusian, ukrainian, serbian, croatian, romanian, polish, slovak, hungarian
The article has been verified: Khromov Roman Mikhailovich
Share with friends:
◀ Previous
C-Class W202 / Gasoline engines
Next ▶

V-belt (4-cylinder engine)
Checking the compression in the cylinders
Valve seats in the cylinder head
Directional valves
Valves — removal and installation
Diagnostics of malfunctions of gasoline engines
General notes on engine overhaul
Repair work without engine dismantling
Engine overhaul
Alternatives to Engine Overhaul
More similar articles for repairing other models

☛ Checking the engine oil level using a dipstick Mercedes W168 (1997-2004)
☛ Diesel 6-cylinder engine E320CDI Mercedes W210 (1996-2002)
☛ Starting the engine from an auxiliary power source Mercedes W463 (1999-2019)
☛ Starting the engine from an auxiliary power source Mercedes W163 (1997-2005)
☛ Cylinder head cover of a six-cylinder engine Mercedes W126 (1979-1991, petrol)
☛ Checking the engine oil level Mercedes Sprinter (1995-2000, diesel)
Link in different formats to this article
Comments and feedback from visitors
No comments yet


How much will 35 + 32 ?


W203 (2000-2007) 
  • General information
  • Introduction to guide
  • User manual
  • Maintenance
  • Power unit
  • Gasoline engines
  • Diesel engines
  • Cooling system
  • Ventilation and heating
  • Supply system
  • Injection system (gasoline)
  • Injection system (diesel)
  • Exhaust system
  • Ignition and control system
  • Charge and launch systems
  • Transmission
  • Mechanical gearbox
  • Automatic gearbox
  • Clutch and drive shafts
  • Differential
  • Chassis
  • Brake system
  • Car suspension
  • Steering
  • Body
  • Exterior (external elements)
  • Interior (internal elements)
  • Electrical equipment
  • Equipment and devices
  • Lighting system
  • Electrical diagrams (2000)
  • Electrical diagrams (since 2001)
W202 (1993-2000) 
  • General information
  • User manual
  • Driving a car
  • Car care
  • Maintenance
  • Power unit
  • Gasoline engines
  • Diesel engines
  • Lubrication system
  • Cooling system
  • Heating and ventilation
  • Ignition system
  • Fuel system
  • Injection system (gasoline)
  • Injection system (diesel)
  • Exhaust system
  • Transmission
  • Clutch
  • Car gearbox
  • Chassis
  • Suspension, wheels and tires
  • Steering
  • Brake system
  • Body
  • Exterior (external elements)
  • Interior (internal elements)
  • Doors and windows
  • Electrical equipment
  • Equipment and devices
  • Power devices
  • Lighting system
  • Electrical circuits
190 (W201) (1982-1993) 
  • General information
  • Introduction to the guide
  • Operation and care
  • Maintenance (gasoline)
  • Maintenance (diesel)
  • Troubleshooting
  • Power unit
  • Petrol engine I4
  • Petrol engine V6
  • Diesel engines
  • Engine overhaul
  • Cooling and heating
  • Power system (carburetor)
  • Injection system (gasoline)
  • Injection system (diesel)
  • Exhaust system
  • Charge and start system
  • Ignition system (I4)
  • Ignition system (V6)
  • Diesel heating system
  • Transmission
  • Clutch
  • Mechanical gearbox
  • Automatic gearbox
  • Cardan shaft and axle shafts
  • Chassis
  • Brake system
  • Car suspension
  • Steering
  • Body
  • Exterior (external elements)
  • Interior (internal elements)
  • Doors, locks and windows
  • Electrical equipment
  • Equipment and devices
  • Electrical circuits
 
MercedesMan.ru © 2017–2026 · Mobile version · Read about Mercedes · Sitemap: EN BG BY UA RS HR RO PL SK HU · Feedback · Site search · Bookmark A-Class (W168) · C-Class (W201) · C-Class (W202) · C-Class (W203) · E-Class (W123) · E-Class (W124) · E-Class (W210) · G-Class (W463) · M-Class (W163) · S-Class (W116, petrol) · S-Class (W126, petrol) · S-Class (W140) · S-Class (W220) · Sprinter · Vito 1 · Vito 2 · Vario 814D ·
 
We only use cookies without which some of the site's features may not be available.