



Contents: Removal ↡ Installation ↡
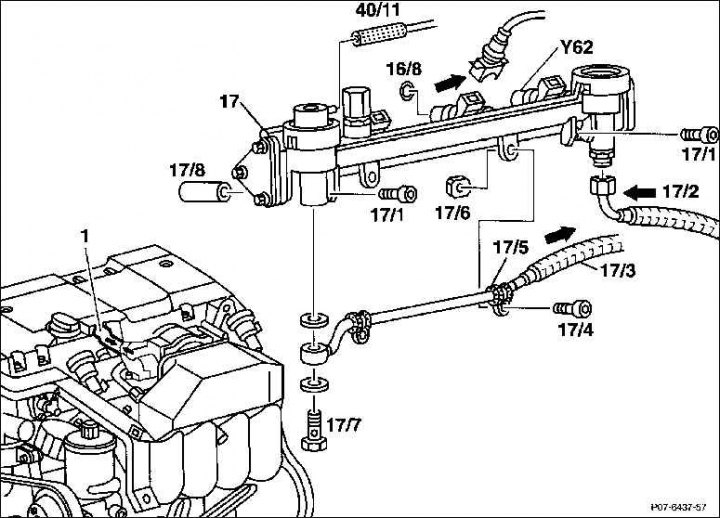
Removal
Warning! Ensure good ventilation of the workplace! Fuel vapors are toxic, avoid using open flames due to the risk of fire!
1. Disconnect the ground (–) cable from the battery terminal.
Attention! This will erase the radio's anti-theft code.
2. Reduce the fuel vapor pressure by briefly opening the fuel tank filler cap.
3. Remove the air cleaner cross pipe.
4. Remove the hose (1) to bleed air from the crankcase.
5. Remove the hose (40/11) under vacuum.
6. Remove the high tension wires from the ignition coil and disconnect them from the spring clips on the mounting device.
7. Remove the bolts (17/4) from the fuel line clamps (17/5). Make sure that the nuts (17/6) do not fall out.
8. Unscrew the feed (17/2) and drain (17/3) fuel lines. To do this, loosen the union nut and hollow bolt (17/7).
Caution: Before disconnecting the fuel lines, place thick rags over the connections to catch any fuel residues that may be released by any residual pressure that may remain.
9. Remove the plug connectors of the valve injectors (arrows).
10. Unscrew the bolts (17/1) and remove the spacer bushings (17/8).
11. Carefully pull the fuel distributor (17) together with the valve injectors out of the intake manifold.
Installation
1. Install the fuel rail with new O-rings.
2. Insert the spacers and screw on the fuel distributor.
3. Slide on the plug connector for the valve injectors.
4. Screw on the fuel lines with new sealing rings.
5. Secure the drain line to the fuel rail using clamps.
6. Place the high tension wires onto the ignition coils and secure them into the spring clips on the mounting device.
7. Install the crankcase bleed hose so that the arrows on the hose and rubber flange are opposite each other.
8. Install the air filter cross pipe.
9. Connect the ground (–) cable to the battery terminal.
10. Set the time on the clock.
11. Enter the radio anti-theft code.
12. Start the engine and check the fuel line connections for leaks.