
Cars BMW Cars Volkswagen Cars Chevrolet Cars Land Rover Cars Lada Cars Honda Cars Peugeot
English Русский
Български
Беларускі
Український
Српски
Hrvatski
Română
Polski
Slovenský
Magyar
Bookmark News and articles Sitemap Feedback Site search
MercedesMan.ru


A-Class C-Class E-Class G-Class M-Class S-Class Others
W116 (1972-1980, petrol) W126 (1979-1991, petrol) W140 (1991-1998) W220 (1998-2005)
  • Main
  • S-Class
  • W140 (1991-1998)
  • Power unit
  • Petrol engine V12
  • Removal and installation the engine oil pan

Removal and installation the engine oil pan (Mercedes-Benz S-Class W140)

0
Contents: Removal ↡ Installation ↡
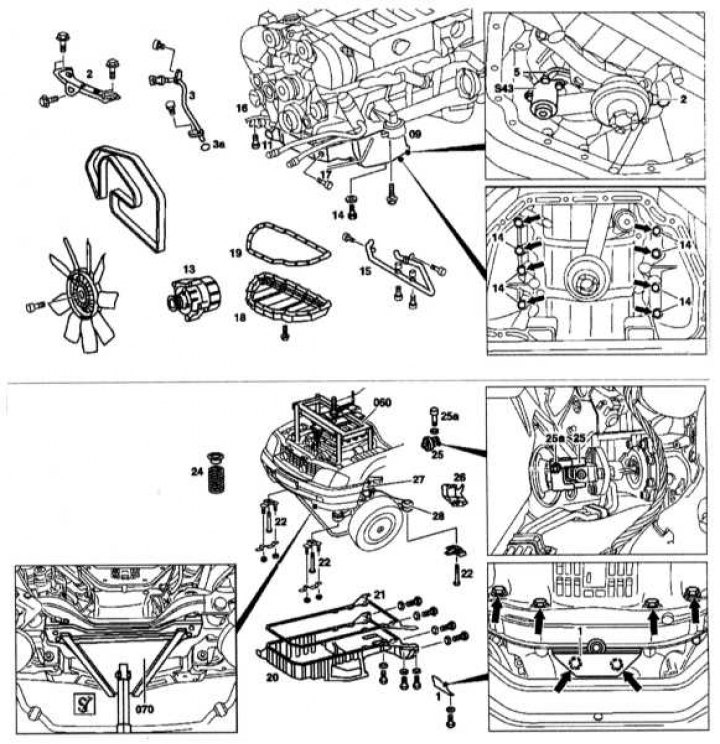
Engine Oil Pan Installation Details

Engine Oil Pan Installation Details


Removal


1. Remove the alternator drive belt.

2. Remove the air filter with air flow meter

3. Disconnect the negative cable from the battery.

4. Remove the lower engine guard.

5. Drain the engine oil.

6. Disconnect the wiring connector from the oil pressure sensor on the oil distributor (18).

7. Unscrew the AT pipes (17) from the tray (20).

8. Unscrew the exhaust air mixing pipes (15) at the bottom of the sump (18) and the left and right engine brackets.

9. Unscrew the oil distributor (18).

10. Disconnect the connector (2) from the oil level sensor (S43) in the pan (20).

11. Unscrew the bolts (14) securing the tray.

12. Remove the front anti-roll bar.

13. Remove the front springs (21).

14. Unscrew the shock absorber (27) from below.

15. Unscrew both lower front engine mounts (09) from the front brackets (28).

16. Install the engine lift (060).

17. Screw the engine lifting eyes at the front and rear.

18. Unscrew the oil level indicator guide pipe (3) from the cylinder head cover.

19. Unscrew the shield (26) of the steering shaft joint (25) and secure it to the side.


20. Disconnect the steering shaft joint (25).

21. Raise the engine using the jack (070).

22. Remove the rear bolt covers (22).

23. Unscrew the bolts (22) of the front support (28).

24. Lower the front of the engine (28) until the oil pan can be removed.

25. Remove the generator (13).

26. Unscrew the AT pipes (16) and (17), remove the oil radiator (11), and the air conditioning compressor from the pan.

(Publication taken from an online resource: «MercedesMan»)

27. Unscrew the oil level dipstick guide tube (3) from the pan.

28. Loosen the pan mounting bolts.

29. Lower the tray (20) and remove it by moving it forward.

30. Replace the gasket (21).

Installation


Installation is carried out in the reverse order of removal.
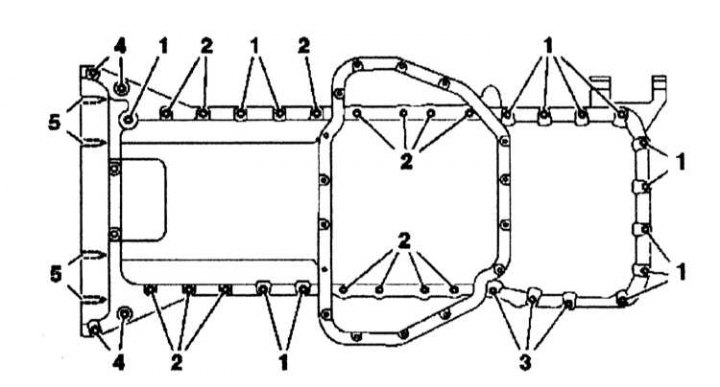
The order of tightening and loosening the engine sump mounting bolts

The order of tightening and loosening the engine sump mounting bolts
1 — Bolts M6x22
2 — Bolt M6x50
3 — Bolts M6x85
4 — Bolts M8x40
5 — M10x40 boots
This article is available at: russian, bulgarian, belarusian, ukrainian, serbian, croatian, romanian, polish, slovak, hungarian
The article has been verified: Polyakov Zakhar Grigorievich
Share with friends:
◀ Previous
S-Class W140 / Petrol engine V12
Next ▶

Removal and installation the crankshaft
Removal and installation pistons
Replacing valve guide bushings
Checking and adjusting the position of the camshafts
Checking the valve timing
Oil Level Switch Sensor — Installation Details
Oil pump — design and installation details
More similar articles for repairing other models

☛ Checking the engine oil level using a dipstick Mercedes W168 (1997-2004)
☛ Engine hood — opening and closing Mercedes W202 (1993-2000)
☛ Design and specification of engine lubrication system Mercedes W123 (1976-1985)
☛ Starting the engine from an auxiliary power source Mercedes W463 (1999-2019)
☛ Starting the engine from an auxiliary power source Mercedes W163 (1997-2005)
☛ Checking the engine oil level Mercedes Sprinter (1995-2000, diesel)
Link in different formats to this article
Comments and feedback from visitors
No comments yet


How much will 30 + 37 ?


W220 (1998-2005) 
  • General information
  • Introduction to guide
  • User manual
  • Maintenance
  • Power unit
  • Engine repair
  • Cooling and heating systems
  • Power and exhaust systems
  • Ignition and control system
  • Charge and launch systems
  • Transmission
  • Automatic gearbox
  • Drive shafts
  • Chassis
  • Brake system
  • Front suspension
  • Rear suspension
  • Steering
  • Body
  • Body elements
  • Electrical equipment
  • Equipment and devices
  • Electrical circuits
W140 (1991-1998) 
  • User manual
  • Controls and instruments
  • Driving and operation
  • Maintenance
  • Power unit
  • Petrol engine V6
  • Petrol engine V8
  • Petrol engine V12
  • Diesel engine OM603
  • Diesel engine OM606
  • Cooling system
  • Power supply and injection system
  • Control system HFM-SFI
  • Control system LH-SFI
  • Control systems ME-SFI
  • Diesel control system
  • Ignition system
  • Charge and launch system
  • Transmission
  • Mechanical gearbox 717.438
  • Mechanical gearbox 717.454
  • Automatic gearbox 722.5
  • Automatic gearbox 722.6
  • Clutch and drive shafts
  • Differential
  • Chassis
  • Brake system
  • Steering
  • Front suspension
  • Rear suspension
  • Body
  • Exterior (external elements)
  • Interior (internal elements)
  • Electrical equipment
  • Equipment and devices
  • Electrical circuits
W126 (1979-1991, petrol) 
  • Power unit
  • Engine repair
  • Ignition system
  • Lubrication system
  • Cooling system
  • Fuel system
  • Fuel injection system
  • Transmission
  • Clutch and cardan
  • Mechanical gearbox
  • Automatic gearbox
  • Chassis
  • Front suspension
  • Rear suspension
  • Steering
  • Brake system
  • Electrical equipment
  • Power devices
  • Electrical circuits
W116 (1972-1980, petrol) 
  • General information
  • Introduction to guide
  • Power unit
  • 8-cylinder V8 engine
  • 6-cylinder I6 engine
  • Cooling and lubrication system
  • Power system (carburetor)
  • Fuel injection system
  • Ignition system
  • Transmission
  • Clutch and cardan
  • Car gearbox
  • Chassis
  • Front suspension
  • Rear suspension
  • Steering
  • Brake system
  • Electrical equipment
  • Power devices
  • Electrical circuits
 
MercedesMan.ru © 2017–2026 · Mobile version · Read about Mercedes · Sitemap: EN BG BY UA RS HR RO PL SK HU · Feedback · Site search · Bookmark A-Class (W168) · C-Class (W201) · C-Class (W202) · C-Class (W203) · E-Class (W123) · E-Class (W124) · E-Class (W210) · G-Class (W463) · M-Class (W163) · S-Class (W116, petrol) · S-Class (W126, petrol) · S-Class (W140) · S-Class (W220) · Sprinter · Vito 1 · Vito 2 · Vario 814D ·
 
We only use cookies without which some of the site's features may not be available.