



Security measures
Be careful when replacing xenon bulbs in headlights. There is a risk of injury due to high voltage! To be on the safe side, turn off the headlight and disconnect the battery. After replacing, briefly turn the headlight on and off to relieve residual voltage. For safety reasons, wear shoes with rubber soles.
Removal
1. Open the hood.
2. Disconnect the negative (-) battery cable with the ignition off. The cabin air filter box must be removed first.
Warning! Before disconnecting the cable, find out the radio receiver security code, if any, refer to Section Replacing the battery.
3. Remove the front bumper, refer to Section Removal and installation the bumper.
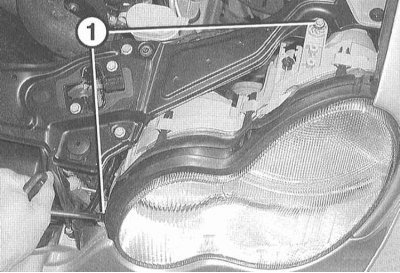
4. Remove the screws (1).
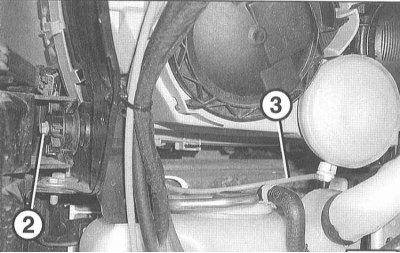
5. Remove the bolt (2).
6. Disconnect all headlight connectors as described in Section Replacement of incandescent lamps for outdoor lighting devices.
7. Carefully remove the pneumatic hose of the automatic headlight range control unit using a screwdriver.
Caution! There is a risk of damage to the connecting element.
Note: For models with xenon headlights, the air hose is secured to the bottom of the headlight.
8. Carefully pull the headlight forward and remove it.
Installation
1. Insert the headlight into the wing recess.
2. Connect the headlight connector.
3. Fix the air hose.
4. Check the correct position of the rubber seal and adjust if necessary.
5. Screw in the three headlight mounting screws.
6. Reinstall the bumper, refer to Section Removal and installation the bumper.
7. Connect the battery ground (-) cable with the ignition off. Reinstall the cabin air filter box. If necessary, enter the radio code and set the clock.
8. Close the hood.
9. Check the correct adjustment of the headlight at the service station and adjust it if necessary.
10. Models with xenon headlights: Set the zero position of the electronic headlight range control unit at a service station.