
Cars BMW Cars Volkswagen Cars Chevrolet Cars Land Rover Cars Lada Cars Honda Cars Peugeot
English Русский
Български
Беларускі
Український
Српски
Hrvatski
Română
Polski
Slovenský
Magyar
Bookmark News and articles Sitemap Feedback Site search
MercedesMan.ru


A-Class C-Class E-Class G-Class M-Class S-Class Others
W163 (1997-2005)
  • Main
  • M-Class
  • W163 (1997-2005)
  • Chassis
  • Brake system
  • Removal and installation the caliper

Removal and installation the caliper (Mercedes-Benz M-Class W163)

0
Contents: Front wheel brake mechanism ↡ Rear wheel brake mechanism ↡
Attention! The brake calipers must be replaced in pairs for each axle!


Front wheel brake mechanism
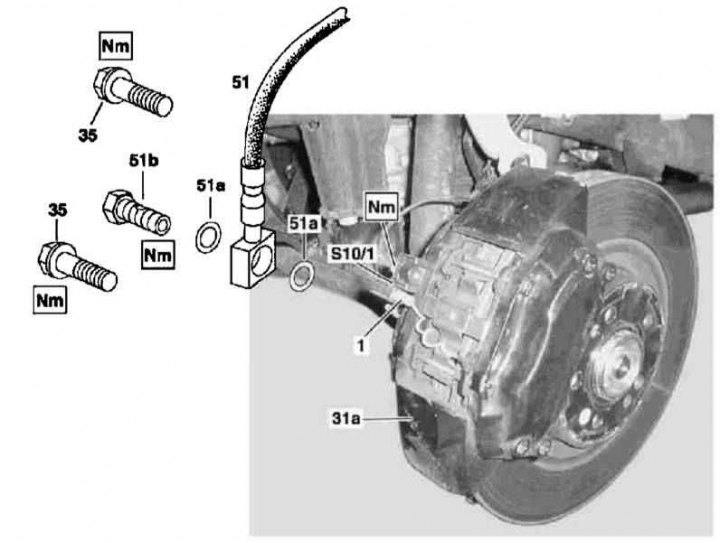


Front Wheel Brake Caliper Installation Details

Front Wheel Brake Caliper Installation Details


1. The details of the front wheel brake caliper installation are shown in the illustration, to which all references in the text refer.

2. Remove the front wheels.

3. If equipped, disconnect the electrical wiring (1) and remove the brake pad wear sensor (S10/1 - in case of left brake mechanism), self-locking fastening bolts must be replaced without fail.

4. Using a special gate, press the foot brake pedal so much that the master cylinder filler port is locked. To release the pressure, release the bleed valve of the corresponding caliper - try not to allow the fluid level in the reservoir to drop excessively.

5. Unscrew the hollow bolt (51b) of the union nut connecting the flexible brake hose (51) to the caliper.

6. If necessary, remove the brake pads (see Section Assessing the degree of wear and replacing brake pads).

7. Unscrew the self-locking mounting bolts (35) and remove the caliper (31a) from the steering knuckle - the bolts must be replaced without fail.


8. Installation is carried out in the reverse order - do not forget to replace the sealing washers (51a) of the nipple connector.

9. Finally, bleed the brake system (see Section Bleeding the brake system).

Rear wheel brake mechanism
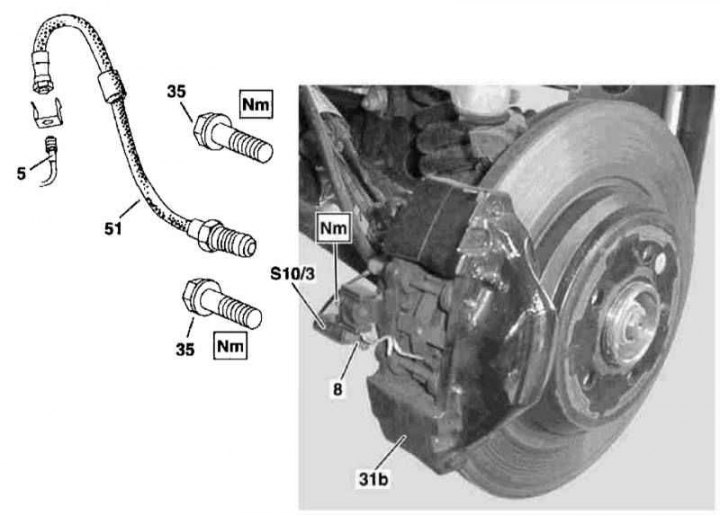


Rear Wheel Brake Caliper Installation Details

Rear Wheel Brake Caliper Installation Details
5 - Brake line


1. The details of the rear wheel brake caliper installation are shown in the illustration, to which all references in the text refer.

2. Remove the rear wheels.

3. After unscrewing the nipple, disconnect the flexible hose (51) from the caliper (31b) of the rear brake mechanism - immediately plug the open end of the hose.

Note: The hose may be clamped before disconnecting.


4. If equipped, disconnect the electrical wiring (8) and unscrew the brake pad wear sensor contact (S10/3 - in case of left brake mechanism).

5. After unscrewing the self-locking bolt, remove the sensor (S10/3 – in the case of the left brake mechanism) - the bolt must be replaced without fail.

6. If necessary, remove the pads from the caliper (see Section Assessing the degree of wear and replacing brake pads).

7. Unscrew the self-locking mounting bolts (35) and remove the caliper (31b) from the hub assembly - the bolts must be replaced without fail.


8. Installation is carried out in the reverse order - do not forget to replace the sealing washers (51a) of the nipple connector.

9. Finally, bleed the brake system (see Section Bleeding the brake system).
This article is available at: russian, bulgarian, belarusian, ukrainian, serbian, croatian, romanian, polish, slovak, hungarian
The article has been verified: Panova Maya Vladimirovna
Share with friends:
◀ Previous
M-Class W163 / Brake system
Next ▶

Replacing brake hoses
Assessing the degree of wear and replacing brake pads
Removal and installation of hydraulic lines laid between the master cylinder and the ETS/ESP hydraulic modulator
Removal and installation of the ETS/ESP hydraulic modulator
Removal and installation the brake booster and the BAS diaphragm stroke sensor
Removal and installation the brake disc
More similar articles for repairing other models

☛ Removal and installation the front caliper Mercedes W203 (2000-2007)
☛ Removal, disassembly and installation of the brake caliper Mercedes W123 (1976-1985)
☛ Fixed type caliper repair Mercedes W463 (1999-2019)
☛ Removal and installation the brake caliper Mercedes W140 (1991-1998)
☛ Front disc brakes with floating caliper — general information Mercedes Sprinter (1995-2000, diesel)
Link in different formats to this article
Comments and feedback from visitors
No comments yet


How much will 28 + 22 ?


W163 (1997-2005) 
  • General information
  • Introduction to the guide
  • Controls and instruments
  • Driving and operation
  • Maintenance
  • Power unit
  • Gasoline engines
  • Diesel engines
  • Cooling system
  • Heating and ventilation
  • Power system (gasoline)
  • Fuel system (diesel)
  • Exhaust system
  • Ignition and control system
  • Charging and starting system
  • Transmission
  • Mechanical gearbox
  • Automatic gearbox
  • Clutch
  • Drive shafts and cardan
  • Transfer case
  • Chassis
  • Brake system
  • Front suspension
  • Rear suspension
  • Steering
  • Suspension geometry
  • Body
  • Exterior (external elements)
  • Interior (internal elements)
  • Doors and locks
  • Electrical equipment
  • Equipment and devices
  • Drive motors
  • Lighting and signaling
  • Audio system
  • Electrical circuits
 
MercedesMan.ru © 2017–2026 · Mobile version · Read about Mercedes · Sitemap: EN BG BY UA RS HR RO PL SK HU · Feedback · Site search · Bookmark A-Class (W168) · C-Class (W201) · C-Class (W202) · C-Class (W203) · E-Class (W123) · E-Class (W124) · E-Class (W210) · G-Class (W463) · M-Class (W163) · S-Class (W116, petrol) · S-Class (W126, petrol) · S-Class (W140) · S-Class (W220) · Sprinter · Vito 1 · Vito 2 · Vario 814D ·
 
We only use cookies without which some of the site's features may not be available.