
Removing
1. Mark with paint the position of the front wheel on the hub. This will allow the assembly to set the balanced wheel in its original position.
2. Loosen the wheel bolts. The vehicle must be on wheels during this operation.
3. Install the front of the car on the goats and, having unscrewed the wheel bolts, remove the wheel.
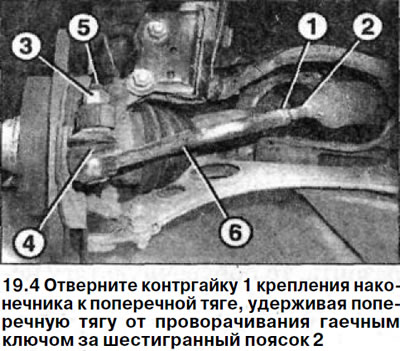
4. Turn away a counternut 1 fastenings of a tip to cross draft. At the same time, keep the transverse link from turning with a wrench by the hexagonal belt 2 (see illustration).
5. Unscrew the self-locking nut 3 from the pin 5 of the ball joint of the tie rod end. At the same time, hold the pin 5 of the ball joint from turning with an overhead wrench. Do not completely unscrew the self-locking nut 3, but leave it at the end of the ball pin.
In this position, the nut will support the tie rod end remover and prevent damage to the threads on the ball joint pin (see illustration 19.4).
6. Press the tie-rod end ball joint pin out of the steering knuckle arm using a conventional puller and completely unscrew the self-locking nut.
7. Mark the mounting position of the tie rod end 6 on the tie rod itself; drawing a line along both parts with chalk or a felt-tip pen (see illustration 19.4).
8. Unscrew the tip from the tie rod. At the same time, count the number of revolutions and write down the resulting value in order to subsequently screw the tip with the same number of revolutions.
Installation
9. Screw the tip to the tie rod, making the same number of turns as when removing.
10. Fix a tip on cross steering draft by means of a counternut, having combined put before label removal. Tighten the locknut with a torque of 50 Nm, holding the rod from turning with a wrench on the hexagon.
Attention! When tightening the locknut, do not allow the steering collar to be twisted.
11. Clean the ball joint stud cone.
12. Install the tip ball joint pin into the steering knuckle arm and secure the pin in the arm hole with a new self-locking nut, tightening it with a torque of 30 Nm. After that, turn the nut with a wrench by 90° (1/4 turn).
13. Establish a forward wheel according to the marks put at removal. Before doing this, lubricate the wheel disc seat on the hub with a thin layer of bearing grease. Do not grease wheel bolts. Screw in the wheel bolts and lower the car. Tighten the nuts in a cross pattern to 110 Nm.
14. Have a workshop check and adjust the camber and toe, if necessary.