
Cars BMW Cars Volkswagen Cars Chevrolet Cars Land Rover Cars Lada Cars Honda Cars Peugeot
English Русский
Български
Беларускі
Український
Српски
Hrvatski
Română
Polski
Slovenský
Magyar
Bookmark News and articles Sitemap Feedback Site search
MercedesMan.ru


A-Class C-Class E-Class G-Class M-Class S-Class Others
W168 (1997-2004)
  • Main
  • A-Class
  • W168 (1997-2004)
  • Chassis
  • Steering
  • Steering wheel — removal and installation

Steering wheel — removal and installation (Mercedes-Benz A-Class W168)

0
Contents: Removal ↡ Installation ↡

Removal


1. Disconnect the ground (-) wire terminal from the negative battery terminal, after turning off the ignition.

Warning! When you disconnect the battery from the radio, the security code is deleted, as well as all automatic settings on the radio station. Therefore, first read the provisions of Chapter "Battery - removal and installation".


2. Remove the airbag unit from the steering wheel, see the relevant chapter.

3. Set the steering wheel to neutral. This position of the steering wheel aligns the front wheels and sets them for straight-ahead driving. Secure the steering wheel in this position with the steering wheel lock.

4. Disconnect the horn power plugs from terminals 2 and remove the wires (see illustration).
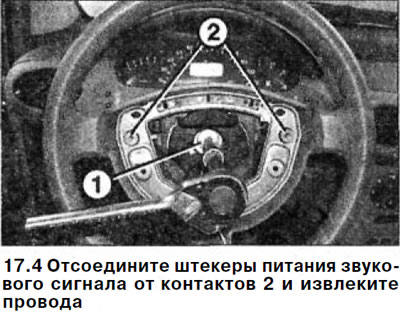
4. Disconnect the horn power plugs from terminals 2 and remove the wires (see illustration).


5. Unscrew the countersunk head bolt 1 that secures the steering wheel to the steering shaft (see illustration 17.4).

6. Remove the steering wheel 3 from the steering shaft 4, removing the electrical wires 5 through the holes (see illustration).
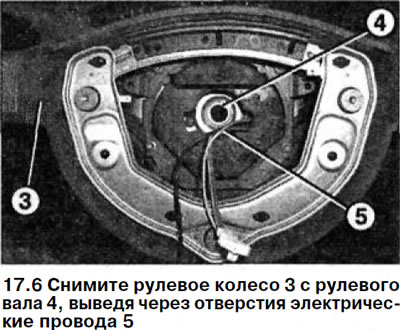
6. Remove the steering wheel 3 from the steering shaft 4, removing the electrical wires 5 through…


7. Remove the vibration damper, if necessary, by unscrewing the four bolts that secure it to the steering wheel.


Attention! Not all models are equipped with a vibration damper. Its removal is usually necessary in case of replacement of the steering wheel.


8. Remove the contact coil if necessary.

Installation


9. Make sure the vehicle wheels are aligned and straight.

10. Reinstall the contact coil if it was removed.

11. Secure the vibration damper to the steering wheel by screwing in four bolts if the damper was removed.

12. Install the steering wheel on the splines of the steering shaft so that the factory marks on the steering wheel and shaft match. Insert the electrical wires into the holes.

13. Connect the horn power plugs and route the wires as they were before removing the steering wheel.

14. Screw in the new self-locking steering wheel mounting bolt onto the shaft and tighten it to a torque of 80 Nm.

15. Reinstall the airbag unit.

16. Unlock the steering wheel shaft lock.

17. Connect the negative (-) cable terminal to the battery.

18. Set up the electronic clock,

19. Enter the security code into the radio receiver.

20. Carry out a test drive and while driving straight ahead, make sure that the steering wheel is set correctly and the airbag status indicator light is off.

If the steering wheel is installed with an offset of more than one tooth of the steering shaft spline, this will hinder the operation of the steering column turn signal switch and it will not automatically return to its original position.

21. Turn the steering wheel from lock to lock to the left and then to the right. The airbag indicator light should not come on.


Material based on data from the portal (MercedesMan)

If it turns out that the steering wheel is installed with a deviation, although the reference marks were aligned during installation, it can be moved by one tooth of the spline. If the steering wheel is significantly deviated, check the camber and toe-in of the front wheels.
This article is available at: russian, bulgarian, belarusian, ukrainian, serbian, croatian, romanian, polish, slovak, hungarian
The article has been verified: Lukyanov Nikita Ilyich
Share with friends:
◀ Previous
A-Class W168 / Steering
Next ▶

Steering Wheel Airbag Unit — Removal and Installation
Airbags — Safety Precautions
Steering — device
Contact spiral — removal and installation
Tie Rod End — Removal and Installation
Steering gear cuff — removal and installation
More similar articles for repairing other models

☛ Checking the steering wheel free play Mercedes W202 (1993-2000)
☛ Removal and installation the steering wheel Mercedes W123 (1976-1985)
☛ Removal and installation the steering wheel Mercedes W463 (1999-2019)
☛ Removal and installation the steering wheel and the steering column… Mercedes W163 (1997-2005)
☛ Multifunctional steering wheel, multi-information display Mercedes W220 (1998-2005)
☛ Adjusting the position of the steering wheel Mercedes Vito 1 (1996-2003)
Link in different formats to this article
Comments and feedback from visitors
No comments yet


How much will 15 + 27 ?


W168 (1997-2004) 
  • General information
  • User manual
  • Maintenance
  • Troubleshooting
  • Power unit
  • Engine repair
  • Cooling and heating
  • Injection system (gasoline)
  • Fuel system (diesel)
  • Fuel system
  • Exhaust system
  • Ignition system
  • Transmission
  • Clutch
  • Transmission
  • Chassis
  • Brake system
  • Suspension
  • Steering
  • Body
  • Interior (all models)
  • Interior (since 1997)
  • Interior (since 2001)
  • Exterior
  • Doors and windows
  • Electrical equipment
  • Equipment and devices
  • Power devices
  • Windshield wipers and washers
  • Headlights and lighting
  • Electrical circuits
 
MercedesMan.ru © 2017–2026 · Mobile version · Read about Mercedes · Sitemap: EN BG BY UA RS HR RO PL SK HU · Feedback · Site search · Bookmark A-Class (W168) · C-Class (W201) · C-Class (W202) · C-Class (W203) · E-Class (W123) · E-Class (W124) · E-Class (W210) · G-Class (W463) · M-Class (W163) · S-Class (W116, petrol) · S-Class (W126, petrol) · S-Class (W140) · S-Class (W220) · Sprinter · Vito 1 · Vito 2 · Vario 814D ·
 
We only use cookies without which some of the site's features may not be available.